Software
- Office 365
- How to get the desktop version of Office 365 (Word and Excel)
- Microsoft Office 365 Instructions - How to Use Office 365 Online
- How to sync Outlook with Gmail or Google Calendar
- How to set your alias as the default email address in Outlook
- Google Workspace Business Starter (Gsuite) to Office 365 Migration Plan
- LastPass
- How to install the Microsoft Store if it is missing from your computer
- Adobe
- Zoom
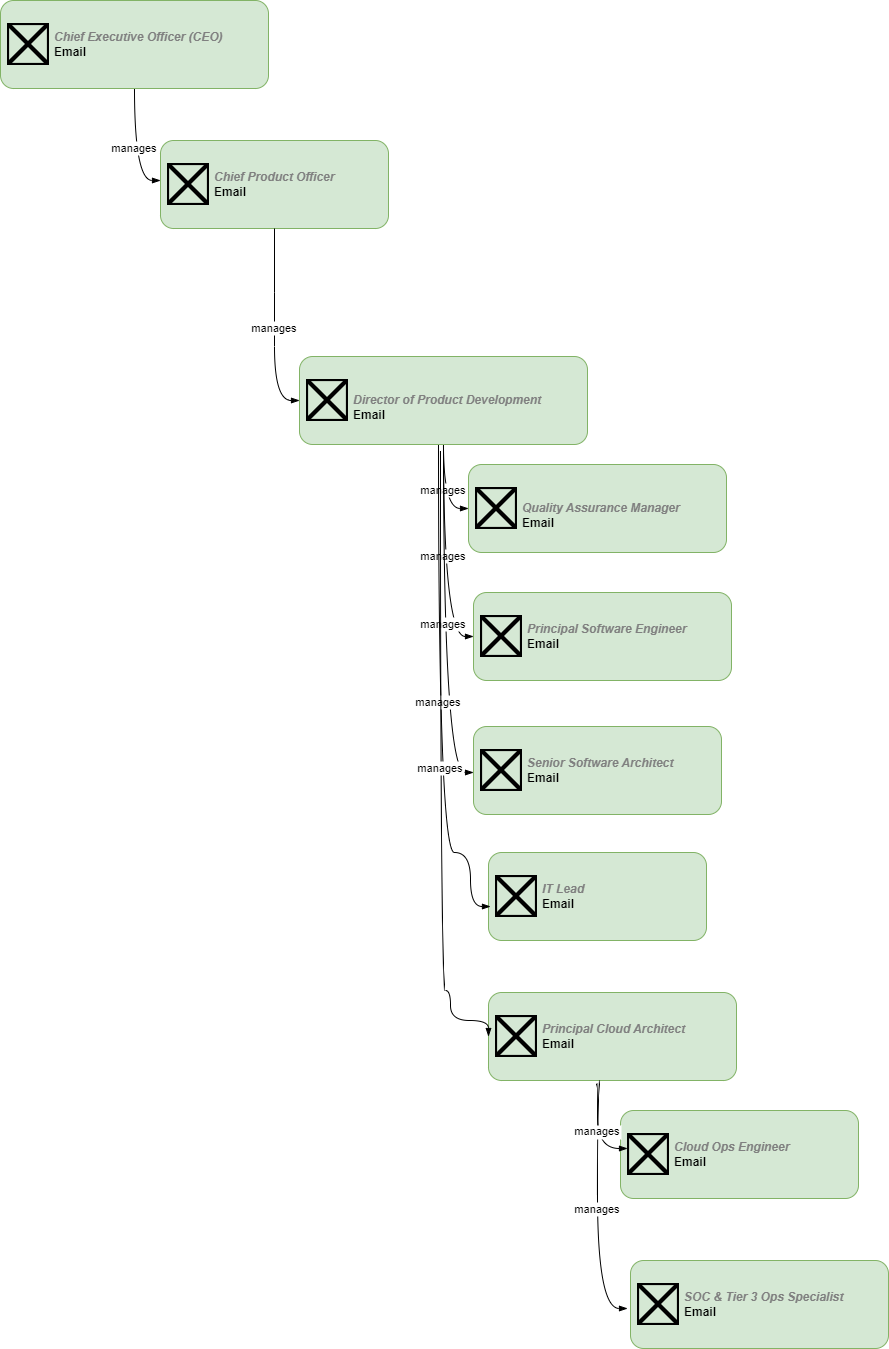
- Org chart Test
- Sonicwall VPN
- Rubex
- Bookstack Training
- Automated diagram types you can create here in BookStack
- How to create a diagram or flowchart here in BookStack
- General Bookstack overview and Training
- Gmail - Grant access to your account (Delegate and collaborate on email)
- How to configure Gmail to use your Revver email alias
- How to add or remove members of and email (Google) group
- Windows OS
- Org chart Technology
- Online Services
- Docusign Integration
- Intune
Office 365
How to get the desktop version of Office 365 (Word and Excel)
Everyone here at eFileCabinet has access to Office 365 online. To access it, please sign on to https://www.office.com/
Once you are logged into office.com you can create new Word, Excel, or PowerPoint documents. Here are detailed instructions for doing this.
Once you have created your document, you can store it in Rubex and edit it using the Microsoft Office Addin for Rubex.
Requesting Microsoft Office Desktop Apps
If your position requires you to have Office Desktop Apps, you can request a license from IT by following this procedure:
- Submit a ticket at https://ithelp.efilecabinet.com
- In your ticket, please set the subject as “Request for Microsoft Office Desktop Apps”
- In the body of the ticket please explain the task that you need to perform in the desktop app that cannot be performed in the online version.
- Once we get manager approval, we will submit the request for approval.
- If your request is approved, we will activate your license and you can download the software by logging into office.com with your existing account.
Microsoft Office 365 Instructions - How to Use Office 365 Online
Microsoft Office 365 Instructions
We are pleased to announce that everyone in the company now has their own Microsoft 365 account that can be used for all the online Microsoft Office apps within the Office 365 portal (not in the desktop applications). Found below are some steps that you can go through to use your own Microsoft 365 account within the web.
There are also some walkthroughs on how to complete more common/necessary tasks while using Microsoft 365 including the following:
-
Opening a document sent to you in an email
-
sending a file to someone else’s email
-
saving a file in your microsoft account
etc.
We hope this document will help clear up any confusion related to this new system.
Signing in and basic usage:
-
Open a web browser and navigate to office365.com.
-
Click on the “Sign in” option (example below). If the page you see is not the same as the page below, don’t worry! You should still be able to find a sign in option in the upper-right hand corner of the page.

-
On the sign in page, enter your company email address (example: tdavis@efilecabinet.com) and click Next.

-
Enter your Microsoft Azure password (although this uses your company email address, it is not the same credentials for your Gmail account). If you don’t know what this means try using your computer password. If that doesn’t work or you still can’t login, please email ithelp@efilecabinet.com.

-
Next, you will be brought to a window like the one below. For ease of access and so you don’t have to sign in every time, you can choose to stay signed in. You can also check the box for “Don’t show this again” if you would like.

-
You will then be brought to the Microsoft Office home page. Here, you can use any of the Microsoft Office apps while in the web page. Any documents that have been uploaded or saved to your account will appear here in your Microsoft Office home page (see instructions below for uploading files).

Create New Document/ View and Edit Documents
-
On your home page, you can click New to create a new document.
-
To view and make changes to documents sent to you by someone else, follow these next three steps:
-
Open the email that contains the file (be sure to follow safe guidelines for opening files - make sure the email is what you’re expecting and the email address is who email says it’s from)
-
Download the file
-
Upload file to office 365 (see steps 8-11)


Upload a File
-
To upload a file that is on your computer or one that has been sent to you (see steps 7a-7c), you can click either the Upload option or Upload and Open option (both are highlighted in the two images below).


-
You should see a screen like the one below informing you that your file is being uploaded.

-
You can now open the file (if you selected the upload option), or if you chose the upload and open option, your file will be opened and shown like the image below.

Save a File
-
To save a file, it’s the same process as you are used to:
- Click File,then Save as
- Choose a location and a name for the file, then hit Save.

Send a File
-
To send the file you have been working on in Office 365, click File, Save as, then choose Download a Copy (this will download the file to your computer and will most likely save to your downloads folder). Click Download a Copy on the next window.


-
Once the file is downloaded, you can attach it to an email as normal.
Additional Standard Office Help
For more standard Office 365 help see:
https://support.microsoft.com/en-us/office/get-started-with-office-for-the-web-in-microsoft-365-5622c7c9-721d-4b3d-8cb9-a7276c2470e5
Click the respective links at the bottom of the page (from the link above) for Word, Excel, Powerpoint, etc (on those instructions, you will want to make sure you have the “Web” tab selected).
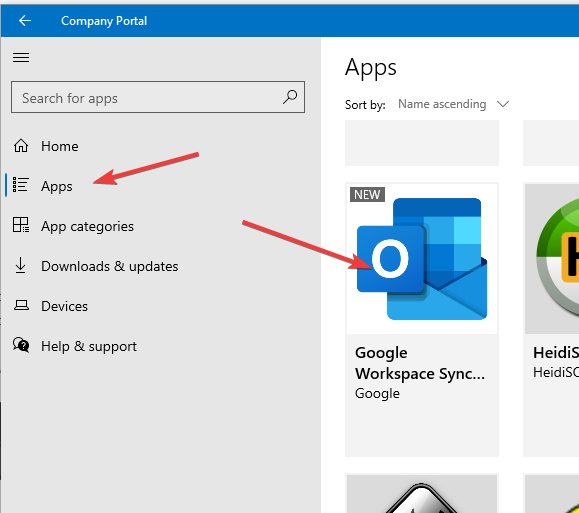
How to sync Outlook with Gmail or Google Calendar
There are a couple ways to setup Outlook to use Gmail. Using Google Workspace Sync for Microsoft Outlook® (GWSMO) is the easiest way to do this. The other way to do this would be to manually setup IMAP in Gmail (not recommended).
To install GWSMO please follow the steps below:
- Close Outlook if it is currently open
- Open Company Portal on your computer
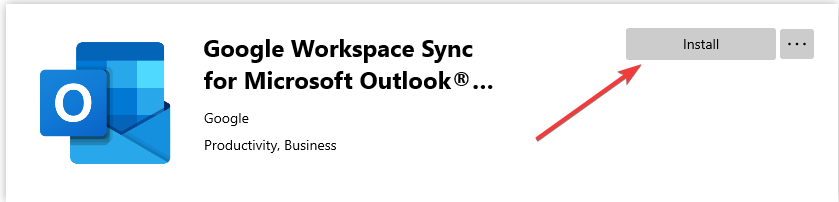
- Search for "Google Workspace Sync for Microsoft Outlook® (GWSMO)" within Company Portal and click on the install button.
-
- Note; if that installation fails you can alternatively go to Google's website and download the (RECOMMENDED FOR USERS version. Click on the file to manually install it.
- If you get an error that no supported version of Outlook is installed then you will need to uninstall and reinstall your entire Office suite.
- Once the install is successful it will open a pop-up prompting you to sign into your email account.
- Follow all the prompts to finish the install.
- Click "Create Profile" when that window shows up.
- Click OK on the default profile name
- At this point you should see the software syncing things from Google to Outlook. You may see some errors. You should allow 30 minutes for all syncs to happen before you report any errors to IT.
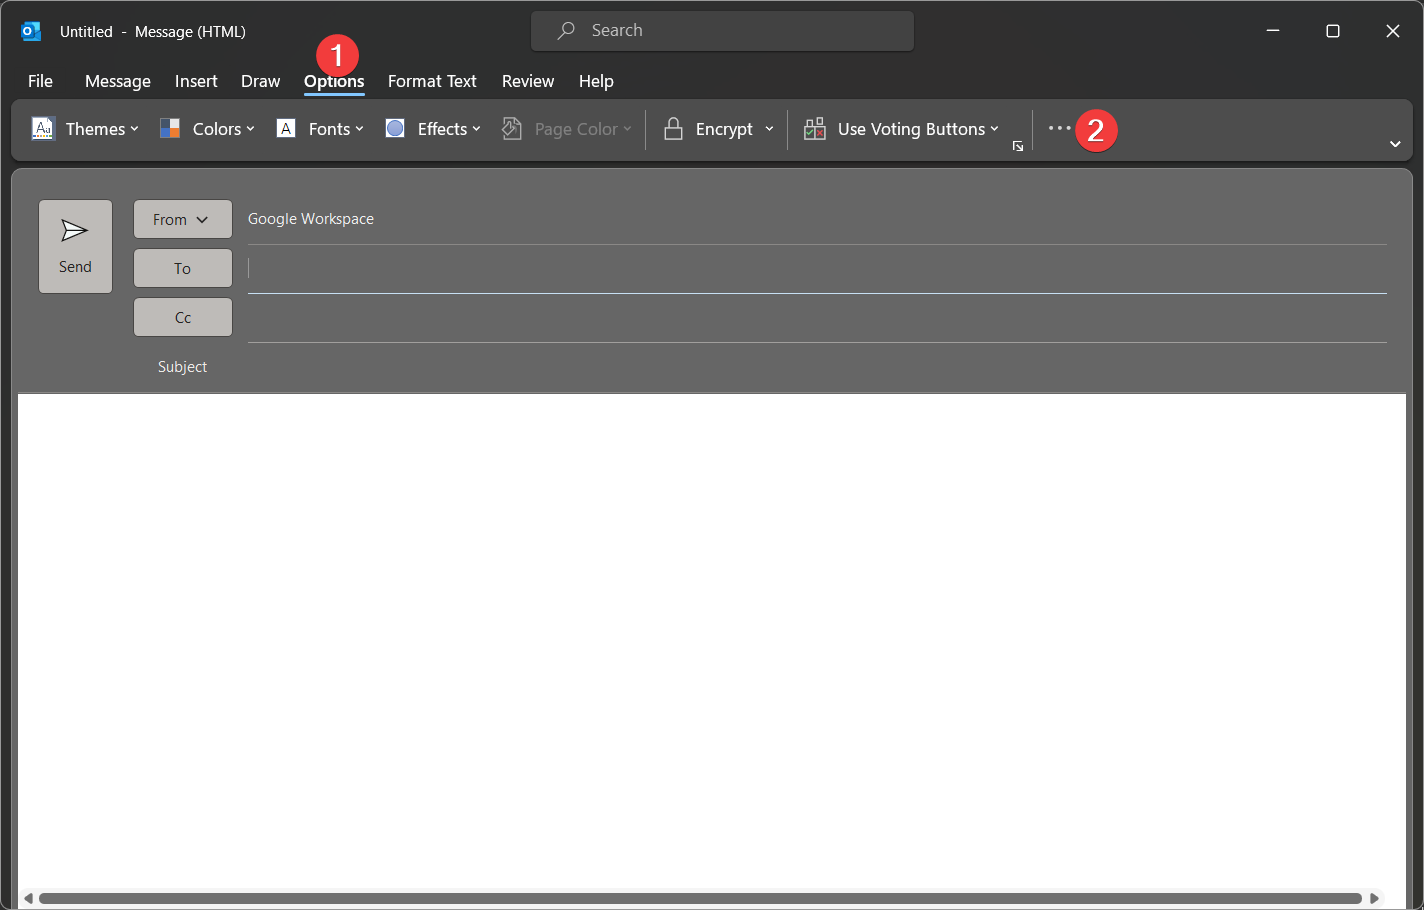
How to set your alias as the default email address in Outlook
- Note; this method has been tested when using the Google Workspace Sync tool to sync Google with Outlook.
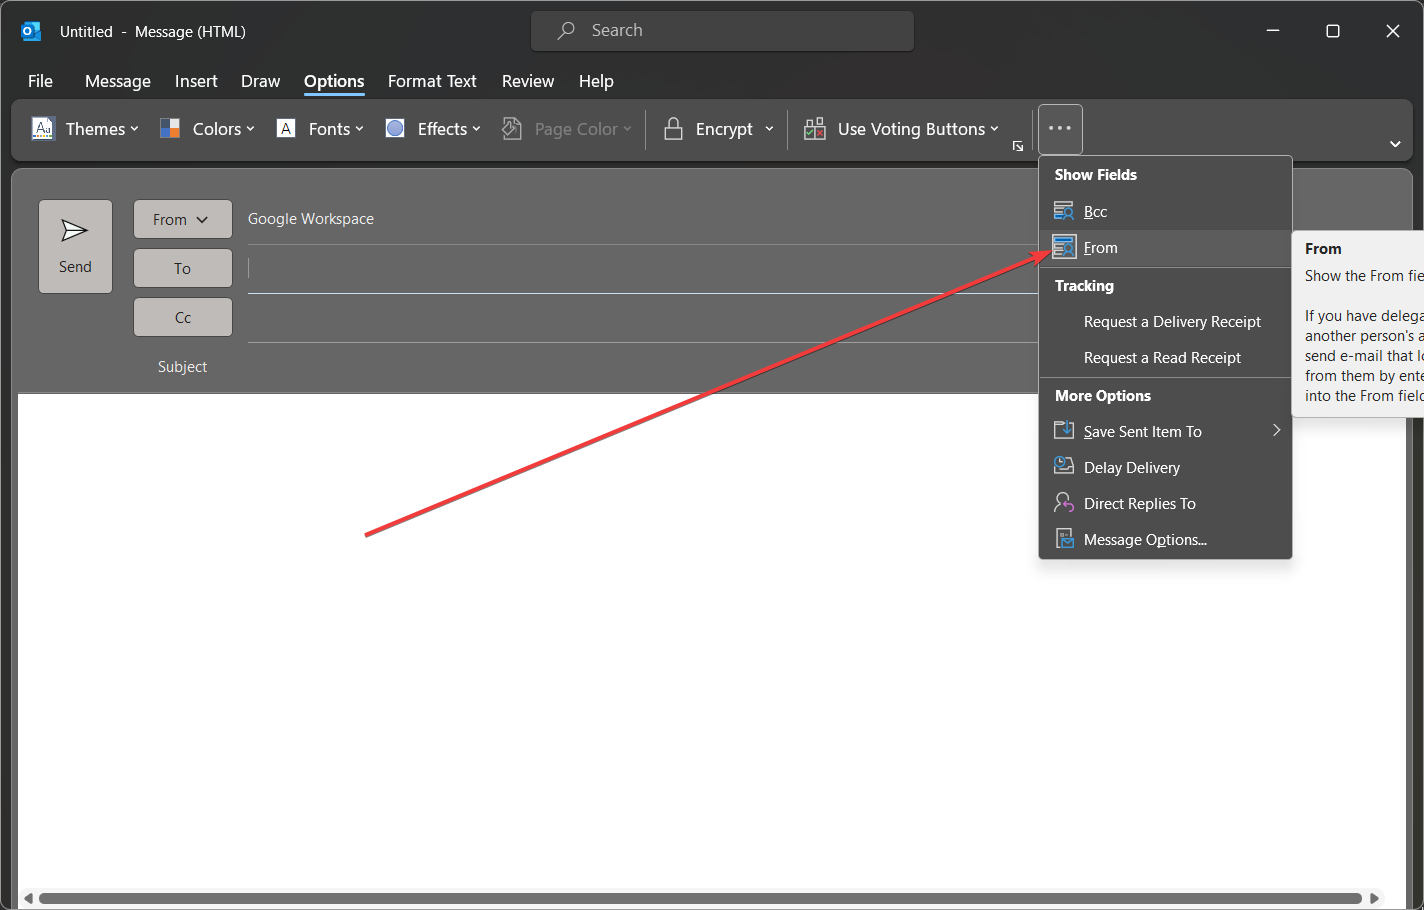
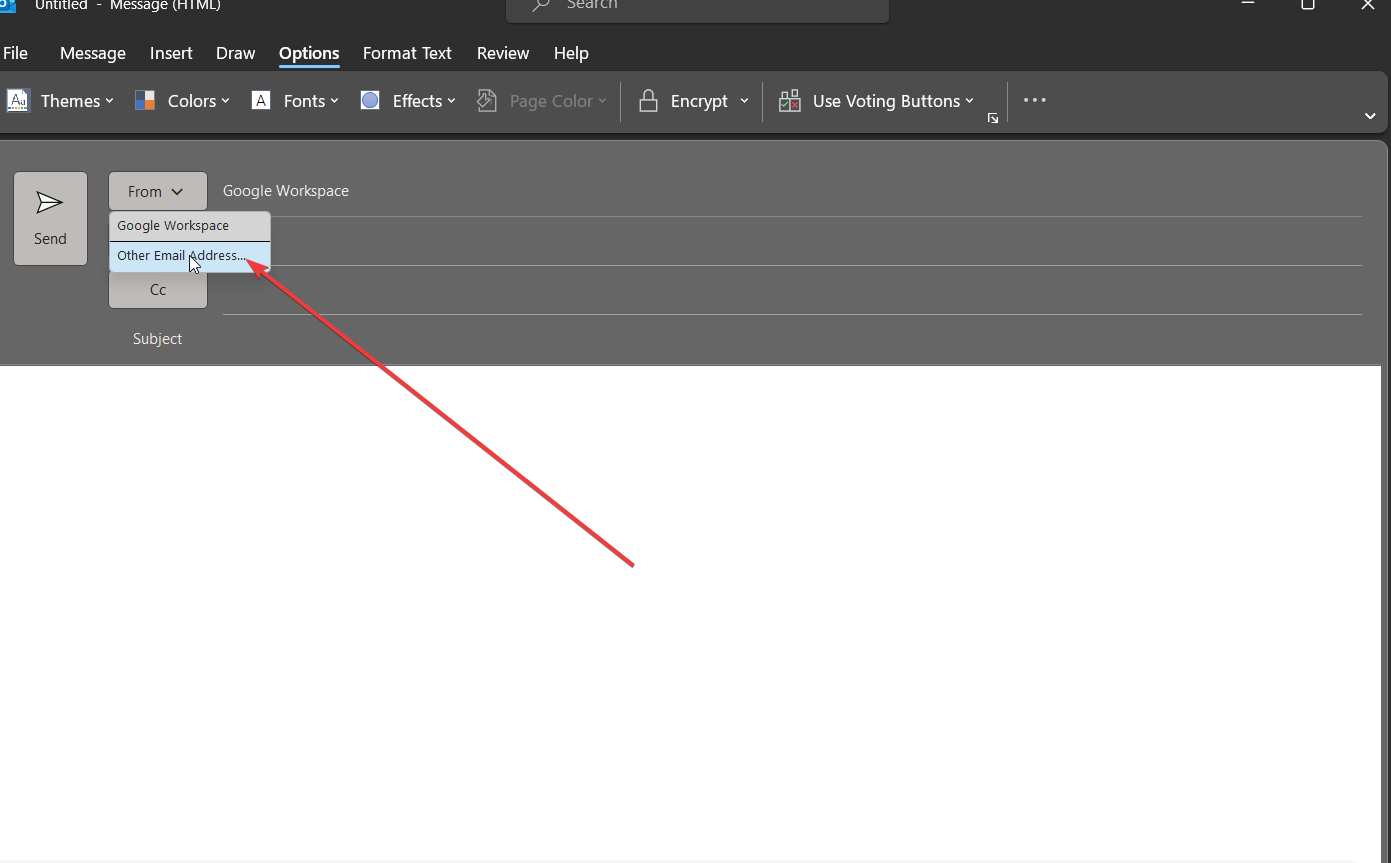
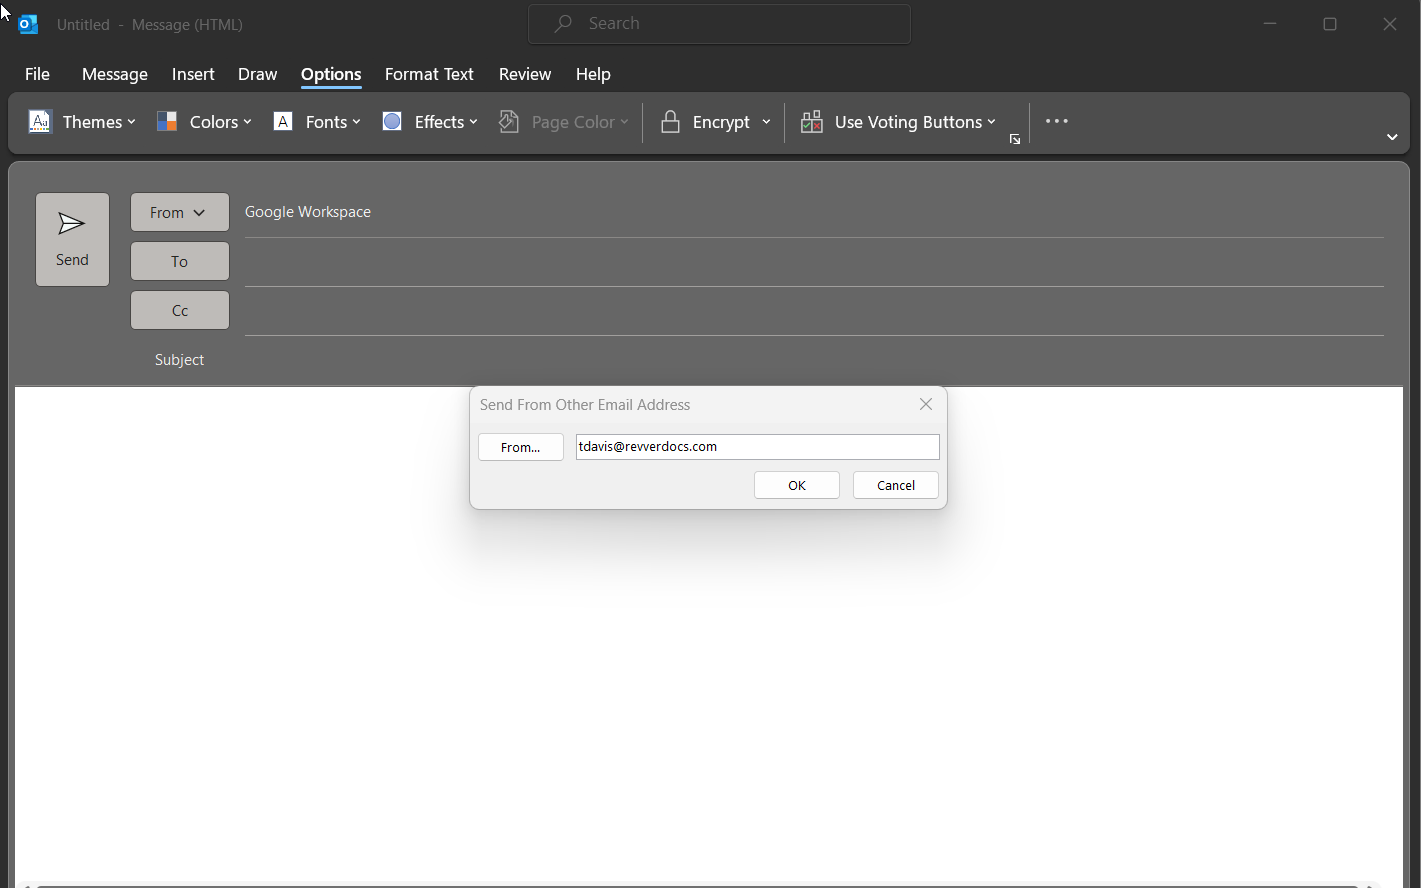
- Go to Options, then the ". . ." menu.
-
- Select the "From" field. This allows you to see the "From" dropdown when you are composing an email.
-
- When you compose an email, select the "From" dropdown.
-
- Add your alias address.
- Note that you may have to close and reopen Outlook for it to select your new alias email address as the default.
Google Workspace Business Starter (Gsuite) to Office 365 Migration Plan
Potential Issues
Refer to this spreadsheet: https://docs.google.com/spreadsheets/d/1s3zNp5wq9b3-Xiue1eCx6h92JBn2RrzvwuOUwMxmGIY/edit?usp=sharing
Main Points
- To migrate from a Google / Office 365 solution to strictly an Office 365 solution could save around $4,000 a year from a strictly software cost. Check out this spreadsheet to see the exact figures: https://docs.google.com/spreadsheets/d/1SpmWYJBOw_F6hxZyDUvwKODz4XxwG7MVChn7mdPbYIo/edit?usp=sharing
- To make this change we would need to move the entire company on a "Microsoft 365 Apps for business". This gives everyone a Desktop version of the Office suite as well as Outlook. It also increases the storage to 1TB (this would be the main reason to move to this license). F3 licenses would still need to be used as this is what gives users the Azure AD ability.
- Advantages to Migrate
- Fewer platforms to manage
- More document storage
- Everyone gets a Desktop license
- Savings up to $300 / Month
- Disadvantages of Migrating
- Man hours lost setting this up (for admins)
- Man hours lost configuring email boxes (everyone in the company)
- Migration time lost - documents and emails
- General pains of learning and adopting new software
- Loss of Google scripts and automations
General Procedure / Steps
- Research / Documentation phase:
- Reach out to Microsoft VAR (Lenovo) and see what recommendations they have
- Get McKay an Apps for Business license
- Proof of Concept - Need to make sure we can setup Outlook and use IMAP and that it works how we are currently using email.
- Try a Google Takeout and import into Microsoft via OneCloud
- Figure out Barracuda changes
- New Azure AD logins while we make the switch?
- Figure out best documentation migration implementation
- Service migration
- Begin migrating services with Google logins to start using Azure AD or password logins. Slack, Zoom, Atlassian.
- Apps for Business Account creation
- Before we can move on to migrations we will need to give everyone (presumably) an apps for Business license
- Email Migration
- Setup IMAP for email accounts so employees can begin accessing mail using Outlook.
- Document Migration
- Send instructions for Google Takeout (probably)
- Azure AD - New Logins
General Notes
- Spreadsheet Link for pricing: https://docs.google.com/spreadsheets/d/1SpmWYJBOw_F6hxZyDUvwKODz4XxwG7MVChn7mdPbYIo
- As of 2023-05-08 we are on Google Workspace Business Starter: Usage of 125 seats
- We are on a flex plan that allows us to change licenses and cancel at any time without penalty
- Starting 2023-05-15 we will be paying $7.20 per user per month
- This plan includes 30GB of storage
- Microsoft has a tool for data migration. I am not sure if it can be used for a company with fewer than 150 employees https://docs.microsoft.com/en-us/fasttrack/data-migration
- Office 365 - We have two main types of licenses F3 (online Office), and Apps for Business (desktop office).
- Microsoft F3 - $8 ($6.74 actual) / User / Month - Every employee in the company has this. 2GB Storage
- Apps for business - $8.25 ($6.99 actual) / User / Month - About half the company has this license. 1TB Storage (does not have teams or email) 2GB Exchange (email) storage.
- To get the functionality we need we would need to upgrade everyone to an Office 365 E3 License - $23 / user / month
- Licensing Links:
Questions
- Do employees with an Apps for business license still need an F3 license? | Yes
- Do we want to change how we do usernames? First name only? First name last initial?
- Do we want to change Azure AD domain name while we transition?
- Is there any way to get similar Chrome functionality / login?
Links
- Perform a Google Workspace (formerly G Suite) migration to Microsoft 365 or Office 365 - https://learn.microsoft.com/en-us/exchange/mailbox-migration/perform-g-suite-migration#migration-limitations
- MigrationWiz might be an easier way to do things. https://get.bittitan.com/pricing/
LastPass
LastPass Basic Training and Instructions
LastPass policy for eFileCabinet
- All eFileCabinet employees should be using LastPass and not the browser's built-in password manager.
Basic Features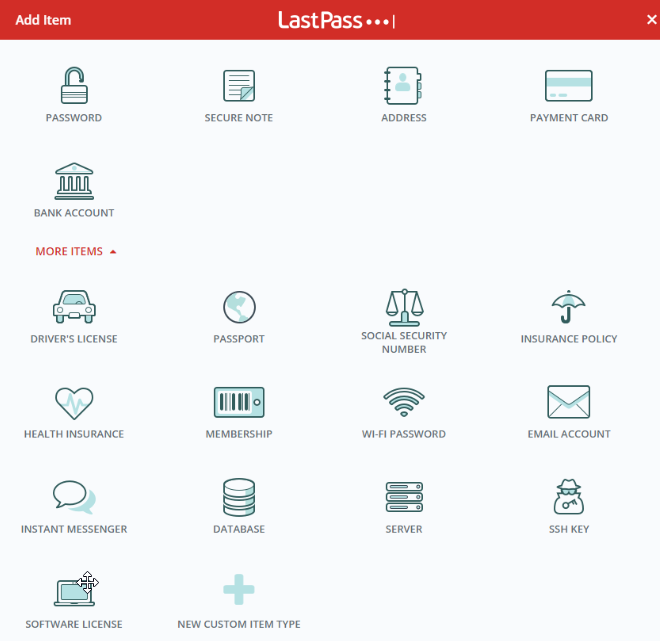

- Auto save passwords - Please install the browser plugin to do this
- LastPass vault
- Here you can manually save passwords and notes. Some examples:
- Passport, Driver’s license, SSN, etc.
- Form fill - automatically fill in addresses.
- Here you can manually save passwords and notes. Some examples:
- LastPass allows you to auto-generate passwords. LastPass will generally make a suggestion for you when you start entering a new password field.
- Security Dashboard
- This let’s you know your security habits and how many passwords you are reusing.
Additional Benefits
- With our LastPass subscription you can link with your personal/family LastPass account.
- Vault>Account Benefits>Activate LastPass Families
- All personal notes and passwords now show up in LastPass. You can also find them in a folder in your vault.
Sharing
- All passwords and secure note sharing within the company should be done using LastPas
 s.
s.
- You can share with an individual (not recommended)
- Click the share icon on the item - enter email address
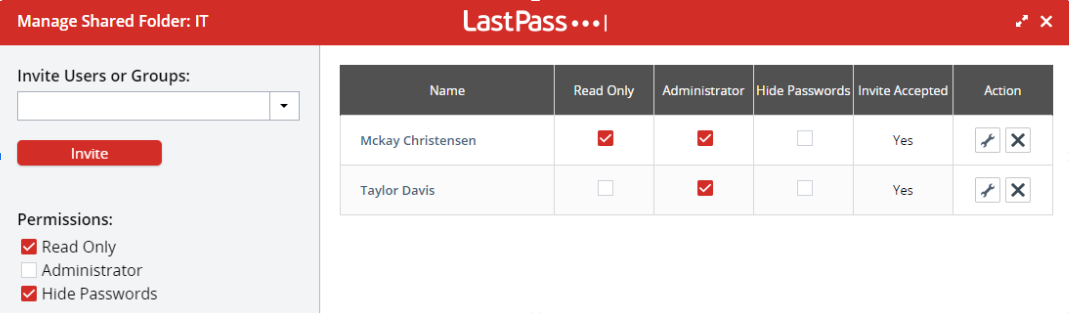
- Or you can share with a group/team (recommended)
- Vault>Sharing Center>+ (Add a shared folder)
- You can share with an individual (not recommended)

Best practices
- Never use a Post-it note again (seriously, you should never be writing passwords down on paper)
- You can enable the extension for incognito mode.
- Get in the habit of sharing in folders; this way if someone on your team leaves and someone else joins you can just add them to the folder and you don’t have to manually share all passwords and notes.
- Use LastPass on your phone.
Resources
- LastPass extension download
- LastPass 101 Training Youtube videos
- LastPass help articles
- Setup recovery option
- Import passwords
- Link or unlink personal account
How to install the Microsoft Store if it is missing from your computer
Explanation
Many computers here have been factory reset using Intune's "Fresh Restart" feature. This re-installs Windows and removes all bloatware and OEM installed software including the Microsoft store and other apps such as "Calculator" and "Photos".
You do not need the Microsoft Store on your computer but if you would prefer to have it, please follow the following steps.
Instructions
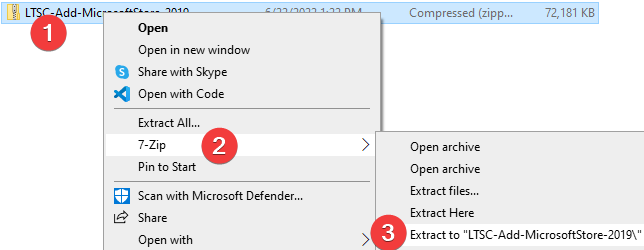
- Download this Zip file.
- Extract the downloaded file by right clicking on it it then selecting "7-Zip" then select "Extract to "LTSC-....."
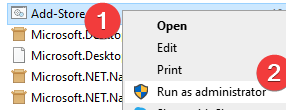
- Open the extracted folder
- Right click on the "Add-Store" file and select "Run as administrator"
- This will open up a script that will install the Microsoft Store. Please note that the script may show some errors. This is normal. Once the script is running you should be able to search for "Store" in the Windows search bar to find the Microsoft Store.
- If you would like help doing any of this, please submit a ticket to IT.
Adobe
Zoom
Setting up and using Zoom
Zoom user types
Everyone here at eFileCabinet has a Zoom account with a "Basic" or "Licensed" account type. You can find your user type on your Profile page.
Basic User
- Basic: A Basic user is a user without a paid license. Basic users can be on Basic (free) plans, as well as paid plans, such as Pro or Business.
- A basic user on a Basic plan can host meetings with up to 100 participants, but their meetings are limited to 40-minutes.
- A basic user on a paid account inherits the account's default meeting capacity, such as a Business account's default meeting capacity of 300. If 3 or more participants join, the meeting will time out after 40 minutes, but 1-on-1 meetings can last longer than 40 minutes. They cannot utilize user and account add-ons, such as large meeting, webinar, or conference room connector.
Licensed User
- Licensed: A Licensed user is a paid account user who can host unlimited meetings. By default, they can host meetings with up to 100 participants and large meeting licenses are available for additional capacity. Licensed users have these additional features available:
- Customize Personal Meeting ID
- Record to the Zoom cloud
- Be an alternative host
- Assign others to schedule and schedule on behalf of
- Utilize account add-ons such as conference Room Connector
- Be assigned user add-ons such as Large Meeting, Webinars, or Personal Audio Conference
- Customize Personal Link, if on a Business or Education account
If you are a Basic user and you need to be a Licensed user, please submit a ticket to IT.
Signing into Zoom
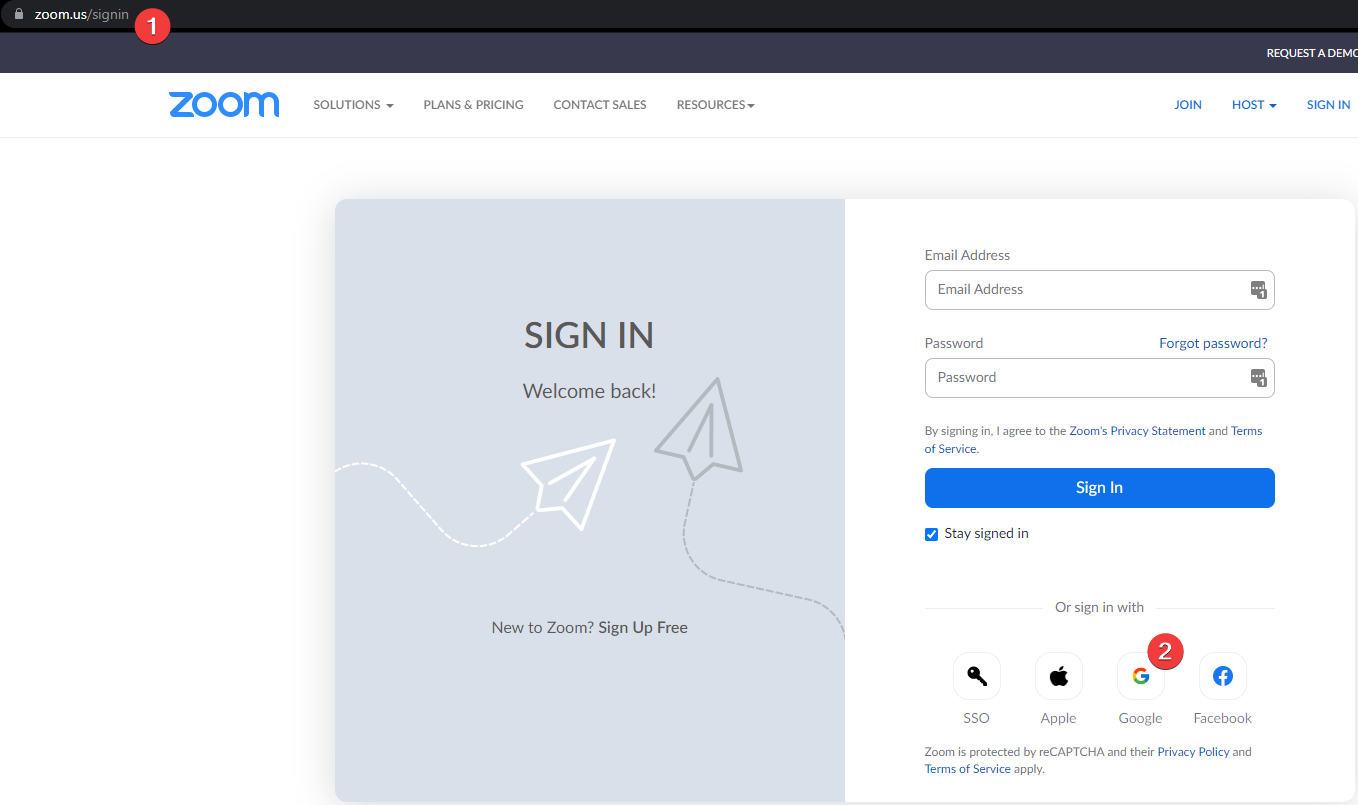
To sign into Zoom go to zoom.us and click on the login link. Sign in using the "Google" icon.
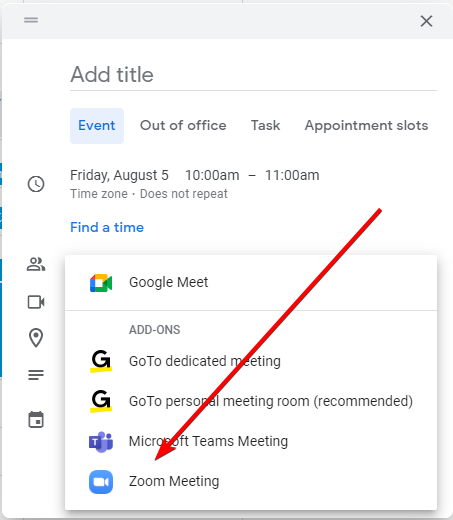
Installing and using the Zoom plugin to Google Calendar
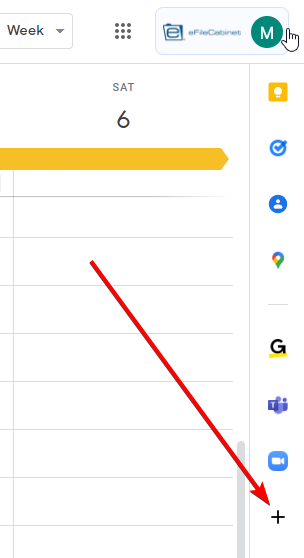
Zoom has created an add-on to make adding Zoom meetings to calendar items easier. If you would like to use this go to your Google calendar page and click on the plus icon on the very right of the page.
Find the Zoom add-on and click on it to install it. Follow the prompts to provide the necessary permissions.
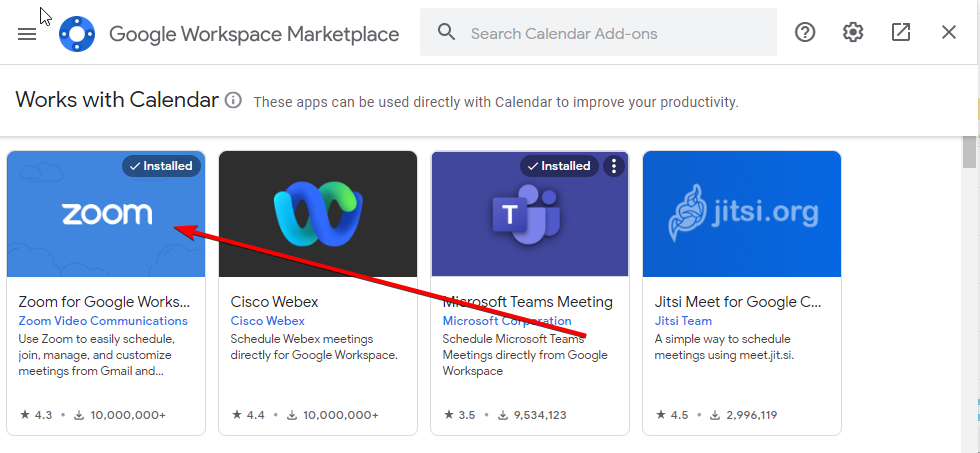
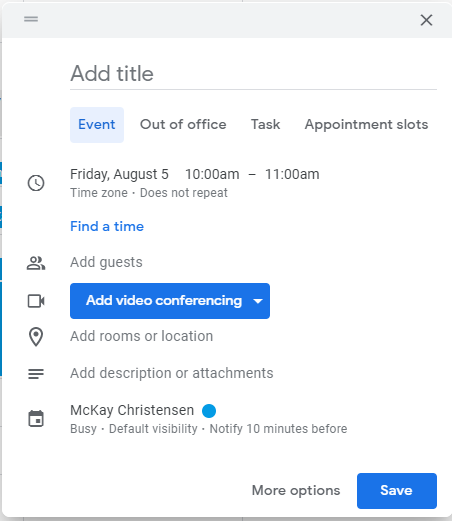
When you create a calendar event you will see an "Add video conferencing" link. Click the dropdown for that and select "Zoom Meeting."
Org chart Test

Sonicwall VPN
Installing and using VPN to connect to company network
Prerequisites
- Before you can connect to VPN a username and password must be created for you. Please submit a ticket to IT to obtain your username and password if you don't already have one.
- To connect to the VPN you cannot already be on the office network. If you would like to test the VPN while you are in the office, you can connect to the Auditorium Guest Wifi. Sometimes you can connect to this at your desk (especially if you are at the south west part of the building), sometimes you might need to go to the first floor.
- Before you can login for the first time, IT will need to enter a shared key. Please schedule an event in McKay or Taylor's calendar to do this. This can be done in the office (using the the Auditorium Guest Wifi) or it can be done over Zoom by sharing your screen and giving IT remote control access to enter the shared key.
How to install VPN
How to connect to VPN for the first time
- Open "SonicWall Global VPN Client"
- Click on the + icon to create a new connection.
- For the IP address add "50.230.88.131"
- For the connection name add a descriptive name (like Office) or leave the default (IP address).
- Double click the connection or press on the "Enable" icon.
- Enter your username and password.
- Have IT enter the shared key. If you are in the office you can go to the IT area for help. If you are remove you should schedule a calendar event with McKay Christensen to do a Zoom call.
Rotating Shared Key
Rubex
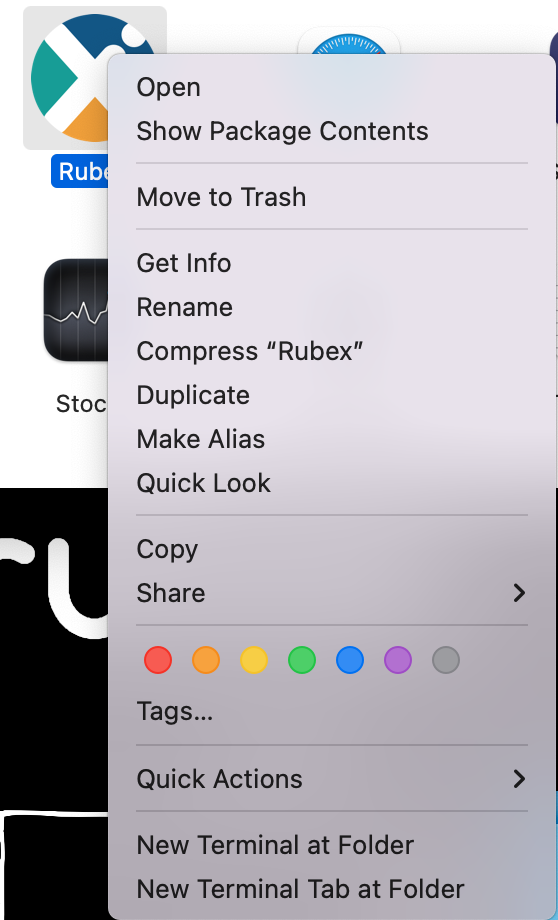
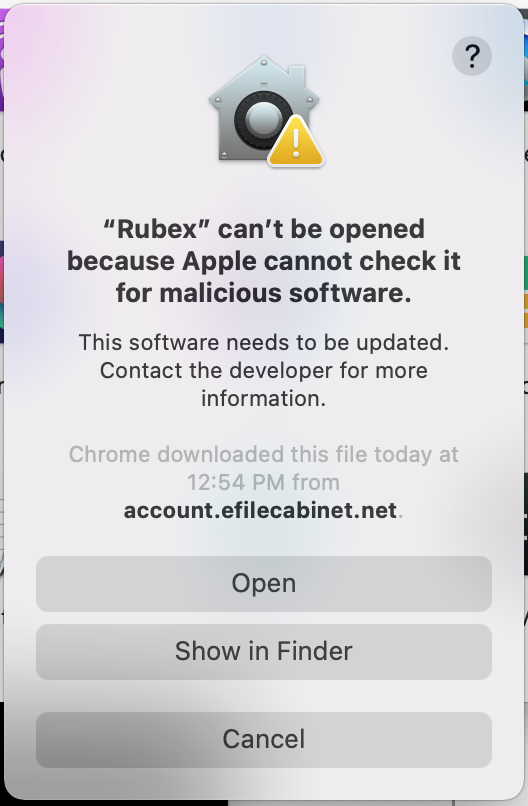
Running Rubex on a Mac
If you try to open Rubex on a Mac you will get the following error:
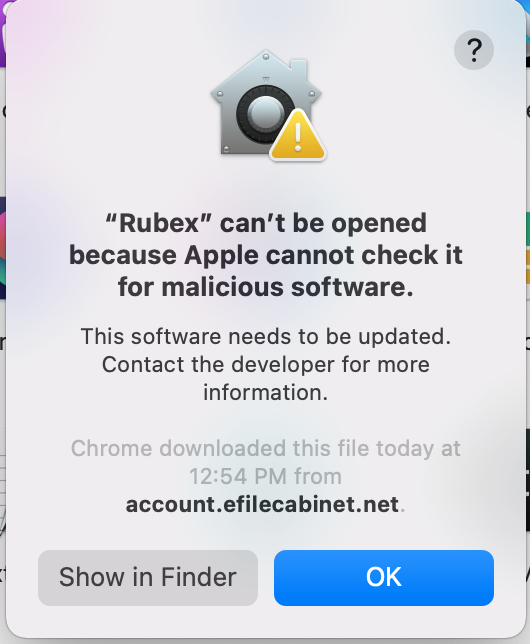
In order to open the software, you will need to find Rubex in your applications folder. Press "Ctrl" while you left click on the Rubex app. A dialog box will open as shown below. Click on "Open".
A popup will show on the screen as shown below. Click on "Open". This will add a security exemption to Rubex.
Bulk Renaming files (and moving into subfolderds) for upload into Revver
Rough steps:
Export file list into a spreadsheet
- Open Powershell and navigate to the directory
-
Dir | Export-CSV content.csv -NoTypeInformation - Open in a spreadsheet and remove the unneeded columns
- Do a find and replace to rename any files
- The left column should have the original file name and the right column should have the new file name
Download Bulk Rename Utility
- Download Bulk Rename Utility - https://www.bulkrenameutility.co.uk/Download.php
- Actions>Import Rename-Pairs>Import Rename-Pairs - Note; It looks like this can be done in f2. That is probably the better option.
- Most basic stuff can be done here. Folders and subfolders should be done in f2
Download f2 Renamer
- Download f2 - https://github.com/ayoisaiah/f2
- Navigate to the area you need to rename and add files to subfolders. The following example uses underscores to specify where the subfolders go.
-
f2 -f '([a-zA-Z0-9-]+)_([a-zA-Z0-9-]+)_([a-zA-Z0-9-]+)*.txt$' -r '$1/$2/$3{ext}'
-
- The command above just does a test run to check. You need to add -e (or something) at the end to execute.
Bookstack Training
Automated diagram types you can create here in BookStack
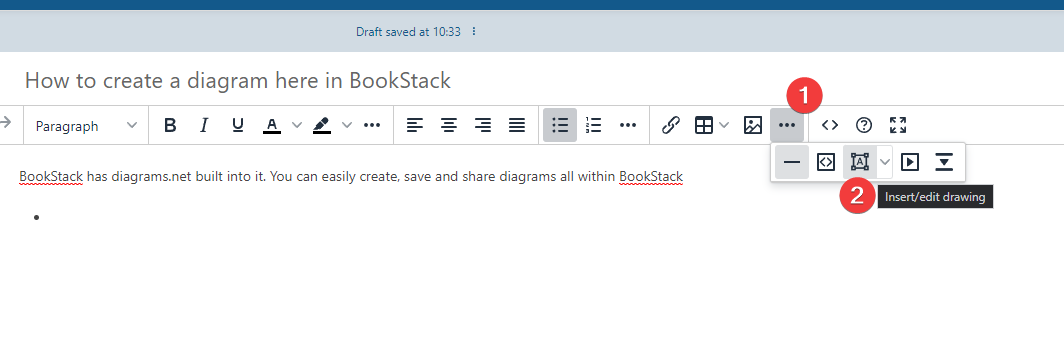
You can easily do diagrams in BookStack by clicking the "..." next to the graphic icon and selecting "Insert / Edit Drawing".
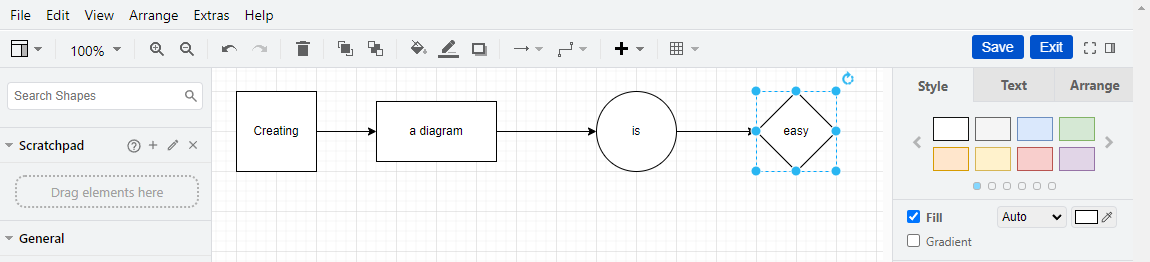
How to create a diagram or flowchart here in BookStack
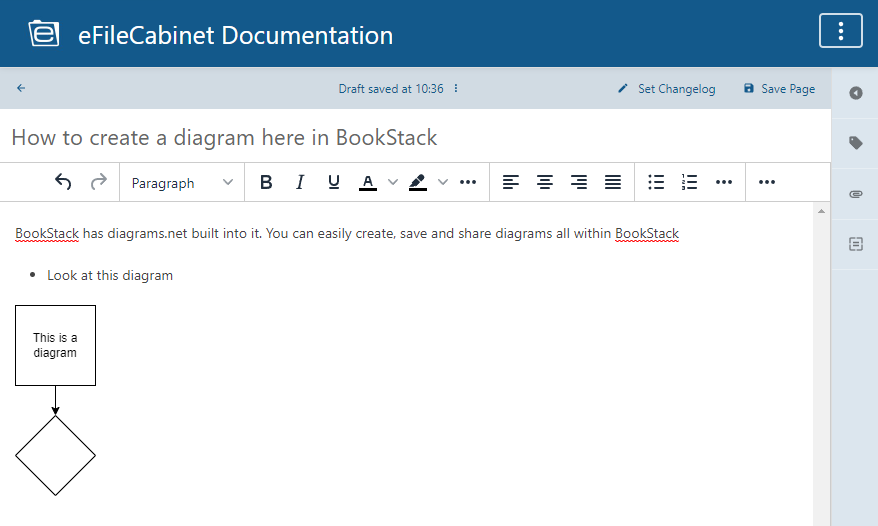
BookStack has diagrams.net built into it. You can easily create, save and share diagrams all within BookStack
- Make sure you have edit permission in BookStack. If you do not, you can request permissions by going to ithelp.efilecabinet.com and submitting a ticket.
- Create a new page or edit an existing page by clicking on the the link on the right side of the screen.
-
- On the top navigation, click on the "..." then click on the icon for Inserting or Editing drawings.
-
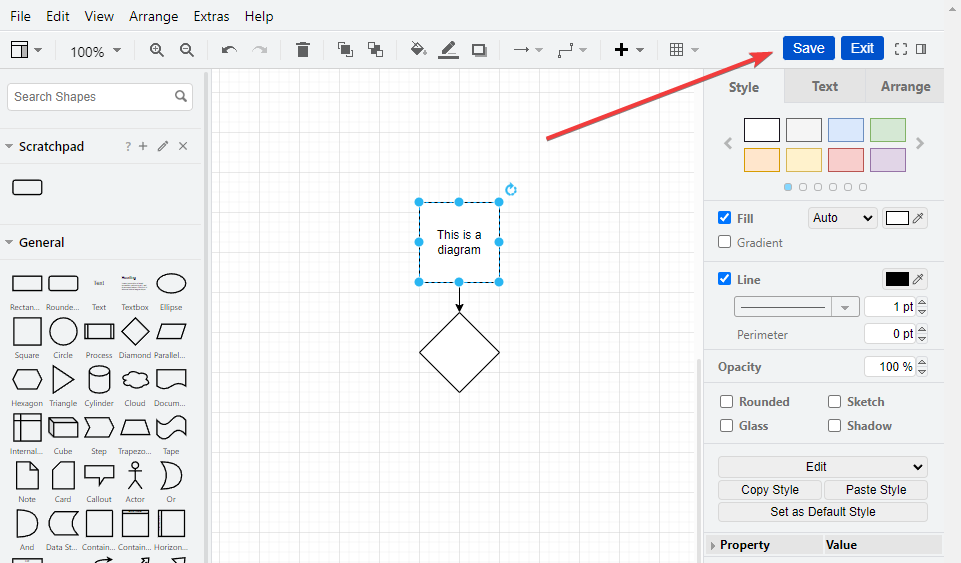
- Create your diagram. When you are done, you can save the document.
-
- Don't forget to save the page as well after the diagram is inserted.
-
- To edit a diagram, you will first need to edit the page
-
- In the page edit mode, you can double click on the diagram to edit it.
- If you would like to share the diagram, you can share the URL of the BookStack page. Anyone with edit permissions for that page will be able to edit the diagram.
- Please note that real-time collaboration is not possible. If multiple people are editing the diagram at the same time, the diagram that is saved last will be the diagram that shows up on the page.

General Bookstack overview and Training
Default Permissions
By default, all Revverers have edit permissions (note; this is a recent change; previously everyone was a view by default). Having edit permissions give you the ability to create, access, and edit all Books, Chapters and Pages, UNLESS restrictions have been added.
Restricting permissions for Books / Chapters / Pages
By default, any Book, Chapter, or Page you create will be viewable and editable by anyone in the company. If you need to add restrictions please follow this process:
- Find out what Stack, Book, or Chapter you would like to change the permissions to. (By default, all Stacks have an Admin role assigned to it)
- Slack McKay or open a ticket at ithelp@revverdocs.com and specify which Stack, Book, or Chapter you wish to be an admin for.
- Once you have been added to a group, you can change permissions to be restricted to that (or other) groups.
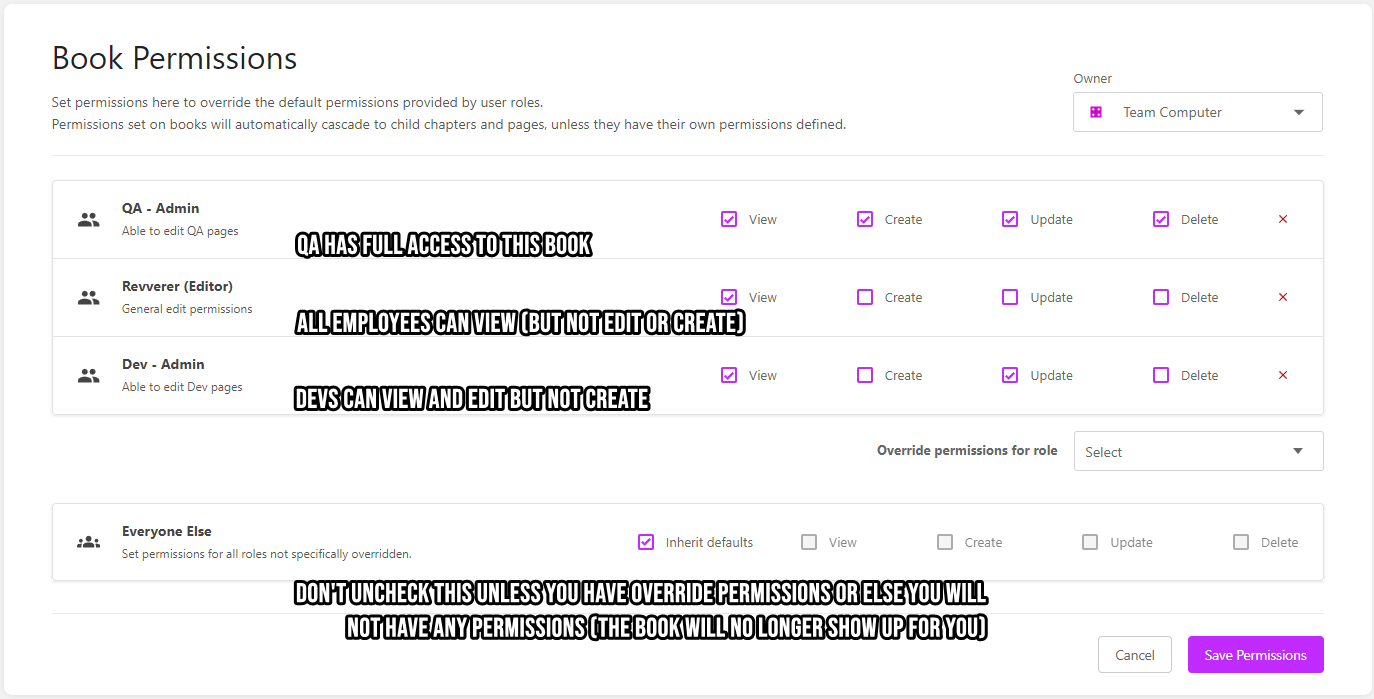
- MAKE SURE THAT YOU DO NOT UNCHECK INHERIT DEFAULTS UNTIL YOU HAVE ADDED PERMISSIONS THAT YOU ARE A MEMBER OF. If you do uncheck this box before adding additional permissions you will lose access.
- See the graphic below for examples of how you could set permissions.
-

The Search bar is your best friend
See the search bar at the top of this screen?

This is easily the simplest and quickest way to find pages. Here are some examples you could look for:
- Wondering who is the admin for Marketo? Type in "marketo" to find out.
- Want to see the most recent org chart? Type in "org chart"
- Want to go back to this page but can't remember how? Type in "bookstack training" to find out.
- Want to practice using Bookstack? Type in "sandbox" to go to a sandbox Book. Please delete any Pages, Chapters, or Books that you create that are no longer needed.
Where to put private/personal pages?
The purpose of having an internal wiki like this is to share data with colleagues. While it is technically possible to create a private page (you would have to create a group and be the only one added to it) at this time it probably makes more sense to put personal documentation in Google Docs. Personal pages may become a feature of future Bookstack editions but you should not plan on this happening.
Features that you may not know about
Revision History
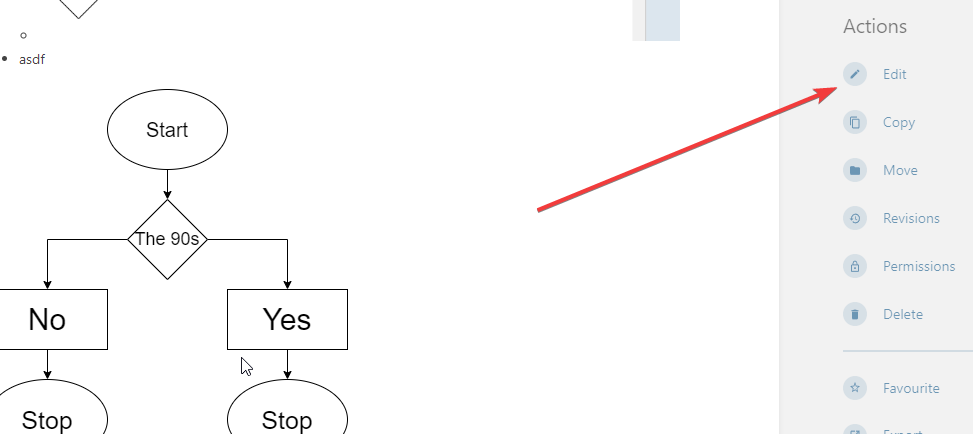
If you ever need to revert changes to a page, Bookstack allows you to view and revert back to any previous version of the page. To do this, click on the revision link in the upper right hand corner.
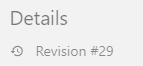
Once you are on the revisions page you can view or revert back to any previous version of the Page.

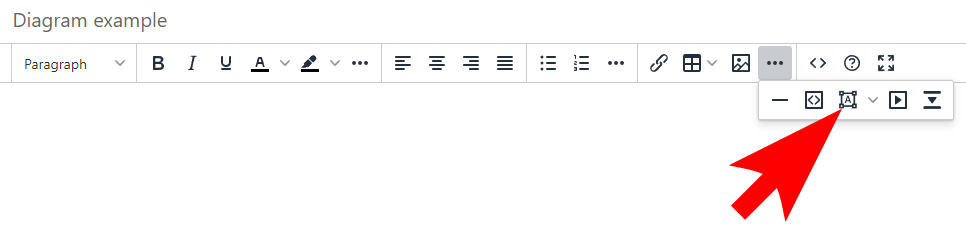
Diagrams and Drawings
Within Bookstack you can create and edit diagrams and drawings. To do this, click on the ... in the WYSIWYG editor and select the drawing icon.
Once you are in the diagram edit page, you can create a diagram and save it. Once saved, it will be inserted into the Page.
Find more information about diagrams here.
Bookstack uses https://app.diagrams.net/ for diagrams. If you simply need to just create a diagram and don't necessarily need to share it in Bookstack, you can go to https://app.diagrams.net/ and create the diagram there. You can export or save the diagram in Google Drive or OneDrive.
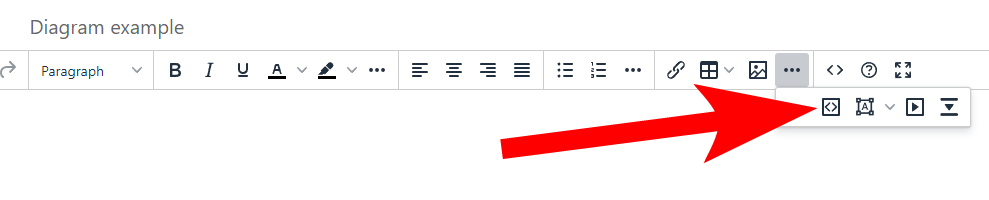
Code Block
In the WYSIWYG editor you can embed a code block. The embedder allows you to select the language for color formatting.
import antigravity

def tell_joke():
    joke = """
    Why do programmers prefer dark mode?
    Because light attracts bugs!
    """
    print(joke)

if __name__ == "__main__":
    tell_joke()
Sharing Link to Specific Section (Headers)
Bookstack uses headers for easier navigation. If you need to share a specific section of your documentation, you can click on the header and copy that URL. So instead of sharing this:
https://internal.revverdocs.com/books/software/page/general-bookstack-overview-and-training
Exporting Pages
At the bottom right of the page there is an option to export a Book, Chapter, or Page.
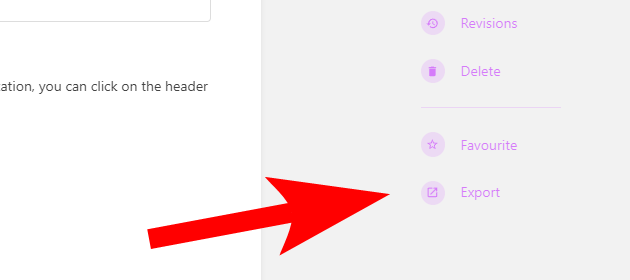
This can be an extremely useful feature especially if you need to send documentation to people outside of the company.
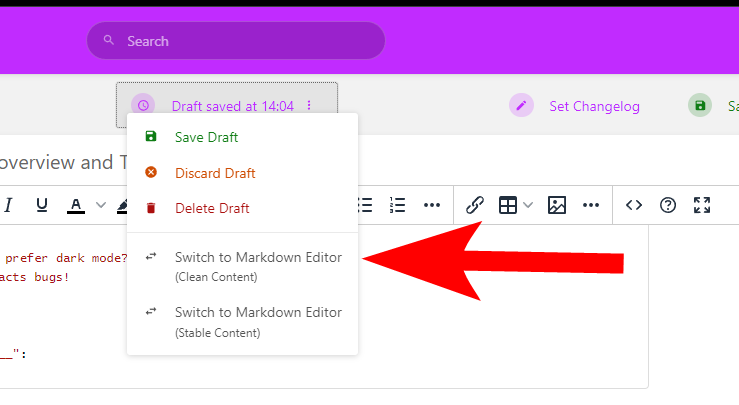
Markdown Editor
If you enjoy torturing yourself, you can use markdown instead of the WYSIWYG editor. To do this just click on hamburger dot menu at the top of the page. Be aware that the change applies to EVERYONE for that page. The change can easily be reverted back however.
Sort or Move pages
On the right menu of a Book, Chapter, or Page, you have the ability to "Move" and sort items.
Gmail - Grant access to your account (Delegate and collaborate on email)
Gmail gives you the option to allow other people to manage your email account and send and receive emails as you. Another name for this is a Shared Inbox.
Setting up Email Delegation (this will allow someone else to send and receive emails as you)
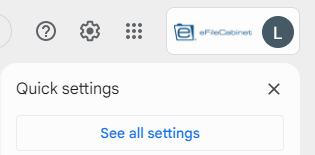
- In your Gmail account click on the gear icon in the upper right corner of the screen then click on "See all settings"
-
- Go to the "Accounts" tab then find the "Grand access to your account" section
- Click on the link to add and account or add another account
-
- Enter the email address of the person you want to give access to. The person will receive an email and they will need to accept the invite.

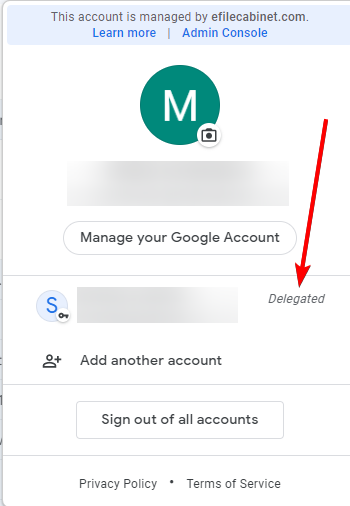
Using Email Delegation setup on your account
- After you have received and accepted the email delegation invite, you can click on the profile icon in the top right of your Gmail screen. You should now see an additional account that you can switch to (note; you may have to refresh your browser if you recently accepted the invite).
-
- Once you select the account that you are a delegate for you will be taken to their email box and can use it as if you are that person.
More info on delegate access:
How to configure Gmail to use your Revver email alias
Please do NOT use your alias before the official launch day
Everyone has already been setup with a @revverdocs.com email alias. Before you can use this you will need to configure Gmail to use this.
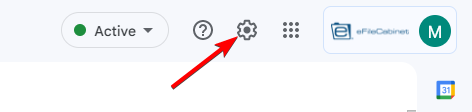
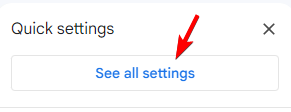
- Click on the settings (gear icon) in the upper right corner of Gmail.
-
- Press the "See all settings" button.
-
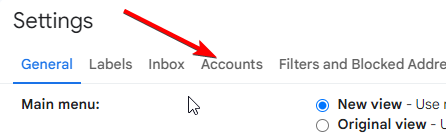
- Go to the Accounts tab.
-
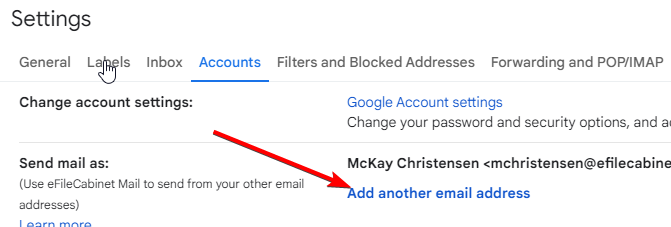
- Click on the link to "Add another email address"
-
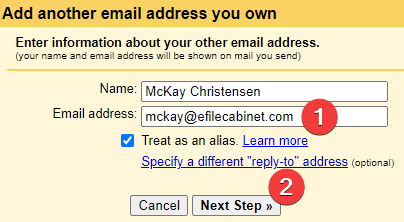
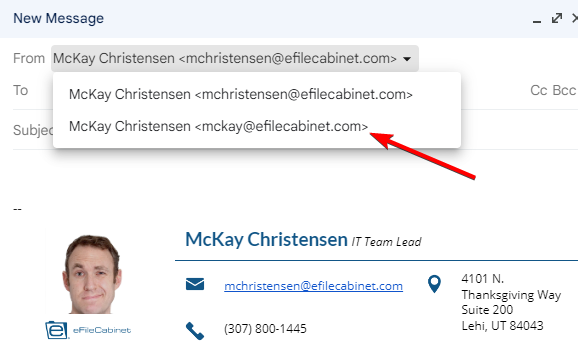
- Enter your alias email address then click on "Next Step"
-
- To make this your default email address you can click the "make default" link
-
- When you compose a new email, you will now have a dropdown in the "From" field and you can choose the email address you would like to send the email as. Make sure this is your new revverdocs.com alias.
-
- Make sure you update your signature before you start sending out emails with your new alias.

Don't forget to update your email signature
You can find the instructions for how to do that here.
A note about additional aliases
Some of you may have had additional aliases setup. For example, some of you might have had an @efilecabinet.NET alias or something similar. Some email groups also had aliases associated with them. I have done my best to look for all aliases and make an equivalent @revverdocs.com alias. It is possible that I may have missed some. If you find that you need an additional @revverdocs.com alias setup for you, please submit a ticket at https://ithelp.efilecabinet.com/
How to add or remove members of and email (Google) group
Email group managers and owners can add or remove members to the group they manage.
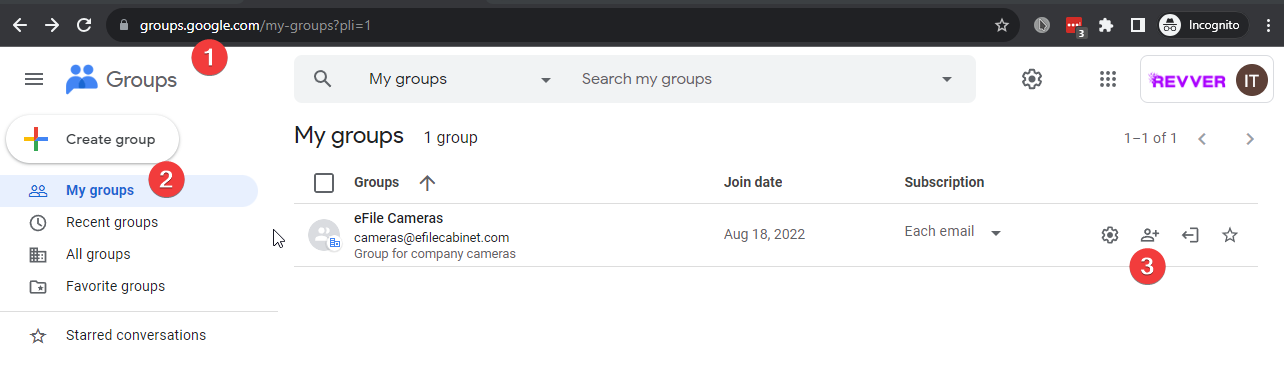
- Go to https://groups.google.com/
- Click on "My Groups"
- To the right of the group you manage click on the + member icon.
- Please note, if you do not see that icon or don't see the group that you want to manage, then that means you are not a member or manager of that group. You will need to request access from an existing group manager or IT before you can make those changes. Go to https://ithelp.revverdocs.com to submit a ticket if needed.
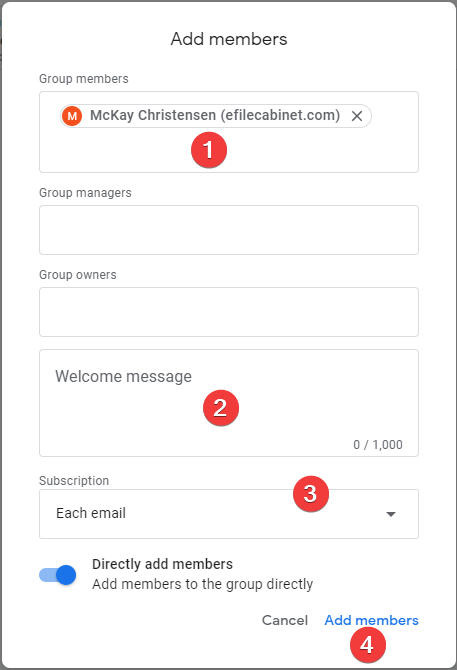
- Type in the name of the group member that you wish to add.
- I highly suggest that you type a welcome message so that the recipient understands why they are now getting more emails than they probably want.
- Select how you want the emails to be sent to the group member (Each email is the most common and default method).
- Click the Add members link.
Windows OS
Upgrading from Windows 10 to Windows 11
We are currently (2022 Q4) in the testing phase of Windows 11. While our company is currently using Windows 10 as our official operating system, employees now have the option to upgrade to Windows 11.
Here are some things to keep in mind before upgrading to Windows 11:
- While it has been tested on some computer models here at eFileCabinet, it has not been tested on all. There is no guarantee that it will work seamlessly with your computer model.
- With a large upgrade like this there is always a possibility that something will go wrong. You should not attempt to upgrade unless you have ALL important files backed up. (Note; no one so far has had an issue upgrading)
Is upgrading to Windows 11 required?
No. This upgrade is completely optional. End of Life for Windows 10 is on October 14, 2025. At that time, and possibly before, upgrading to Windows 11 will be required. Until that time you have the option to use the version of Windows that you prefer as long as security updates are being installed.
How to upgrade to Windows 11
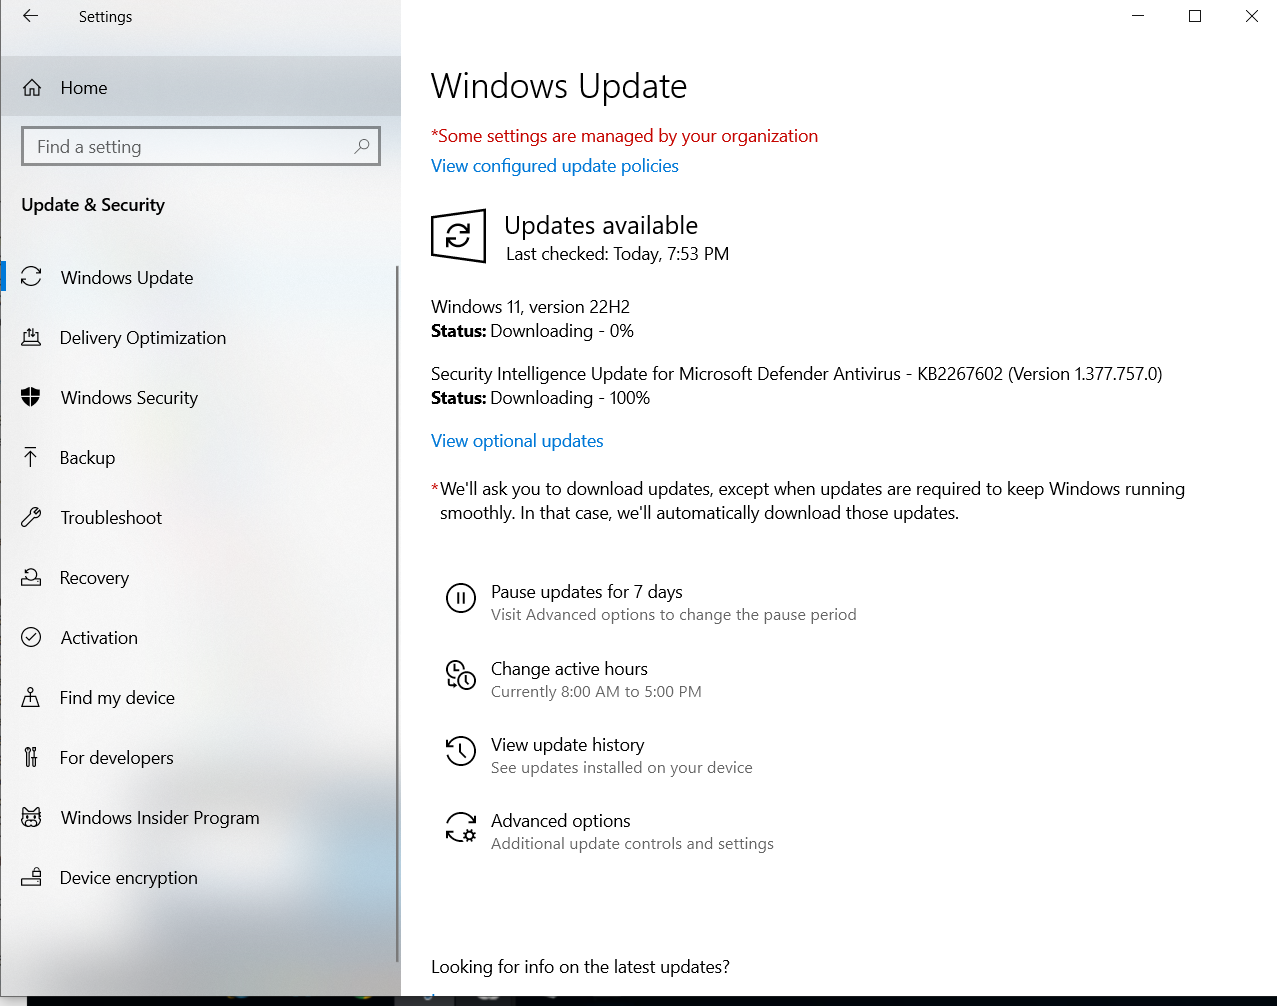
- Go to ithelp.efilecabinet.com (or sent an email to ithelp@efilecabinet.com) and submit a ticket requesting your computer to get upgraded to Windows 11.
- You will be added to an Azure AD group where your computer will automatically download the Windows 11 update and allow you to upgrade. You may have to wait a few days before the Windows 11 update downloads.

- You can go to Windows Updates to check the download status.
- If you have been added to the group for several days and your Windows 11 download has not completed (or if you want to speed up the process) please go to Microsoft's website and download and run the Windows 11 Installation Assistant.
- Accept the agreement and install.
- Wait for the download and installation to finish. It will automatically reboot your computer, or you can manually reboot the computer when prompted.
Org chart Technology
Online Services
ChatBot (Integration for LiveChat)
ChatBot is an integration for LiveChat that allows automating of LiveChat chats.
Making Changes
To make changes to ChatBot you will need to become an admin. To become an admin please submit a ticket to ithelp.efilecabinet.com and request admin access for ChatBot.
Docusign Integration
Utopia Docusign Integration
it@efilecabinet.com is the docusign account under which the production integration is managed.
The password is in last pass and Quinn and Bryce at the very least should have the password on hand, though you will probably need to bug someone in IT because it@efilecabinet.com will likely be sent an email when you attempt to log in the first time on a new device.
You need to log in to https://account.docusign.com/ (not developers.docusign.com).
You then need to go to your 'Settings' tab and then to the 'Apps and Keys' section.
Intune
Packaging the Revver MSI for deployment via Intune
Update:
2024-02-27 - I tried this again and realistically, until we package the Revver file differently, I just don't think this is ever going to work.
These are general instructions for installing Revver via Intune. Before proceeding you should have some familiarity with adding a Win32 app to Intune. You will also need to know how to use the Microsoft Win32 Content Prep Tool.
IMPORTANT
This is a general guide for the basic steps. It is likely that file names and locations may change over time. The following steps will need to be done on a Windows computer.
Here are the basic resources you should be familiar with before continuing:
Win32 app management in Microsoft Intune
Prepare Win32 app content for upload
Microsoft Win32 Content Prep Tool
Download the necessary files
- Download the Revver msi file here.
- Download the Microsoft Win32 Content Prep Tool here.
- Download the Revver icon here.
Prepare the Revver file using the Content Prep Tool
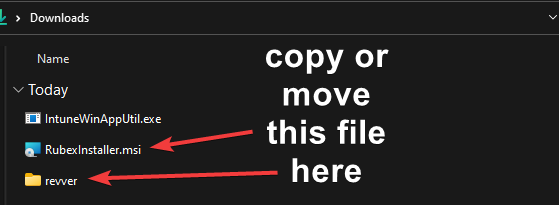
- Use File Explorer to navigate to the IntuneWinAppUtil.exe file
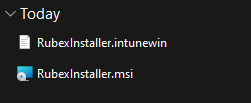
- While not required, to simplify things you can create a new folder (call it "revver" or something similar) in the same folder where IntuneWinAppUtil.exe is located. Copy or move the RubexInstaller.msi file to that folder (right click and drag to copy).
-
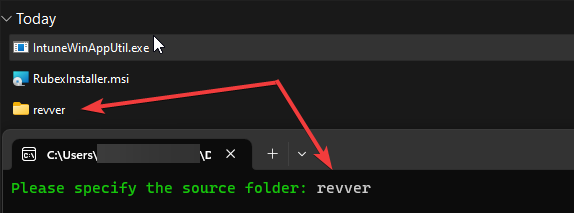
- Right click on the IntuneWinAppUtil.exe to open the app to Run as administrator.
- Enter the name of the folder that contains the RubexInstaller.msi file. If the folder is not on the same level as the IntuneWinAppUtil.exe app then you will need to enter the full path of the folder.
-
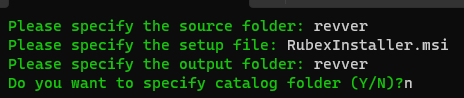
- Enter the name of the Revver msi file (example: RubexInstaller.msi)
- Enter the name of the output folder. I recommend you type the same folder name. Type "n" when it asks you if you want to specify a catalog folder.
-
- Press "Enter" and wait for the app to finish. This process can take several minutes.
- The app will automatically close upon completion. In the output folder you should see a file with the .intunewin extension.
-
Add the newly created file to Intune
- Login to Intune as an administrator.
- Go to Apps>All apps (or Windows)> + Add
- Select "Windows app (win32) for the App type
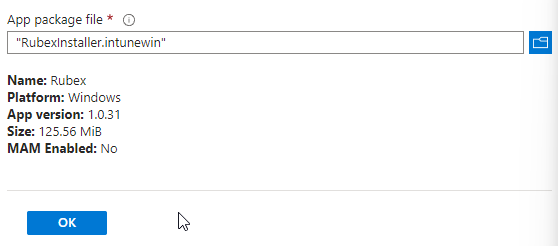
- Click on the "Select app package file" and select the .intunewin file and press "OK".
-
- App information
- Add the required information according to your preference. Don't forget to upload the Revver icon here.
- Program
- Most information will auto-populate. You can leave the defaults.
- Change "Device restart behavior" to "No specific action" (this is not necessary but the computer does not need to be restarted after Revver is installed).
- Requirements
- Set your Operating system architecture and Minimum operating system as preferred. You can leave everything else blank.
- Detection rules
- Rules format - Change to "Manually configure detection rules"
- + Add
- Rule type - File
- Path = C:\Program Files (x86)\eFileCabinet, Inc\Rubex\
- File or folder = Rubex.exe (Note; this is likely to change to Revver.exe in the future. If this info is incorrect the app will still install just fine but in Company Portal it will show as the app not being installed. To fix this you will need to manually find the folder and exe file and update this info accordingly. This info can be updated at any time.)
- Detection method - File or folder exists
- Associated with a 32-bit app - Leave as default.
- Dependencies
- You can leave this blank
- Supersedence
- You can leave this blank
- Assignments
- Make the appropriate assignments. It is recommended that you assign this to a test group first to make sure everything works as expected.
- Review + create
- Press the "Create" button
- Wait for Intune to complete the uploading of the app before you close the window or tab.
Alternate Method - Powershell script to download and install
$fileLocation = "C:\Windows\Temp"
$fileName = "RubexInstaller.exe"
$url = "https://account.revverdocs.net/ClientApplicationInstallers/Windows/RubexInstaller.exe"
$outpath = "$fileLocation/$fileName"
Invoke-WebRequest -Uri $url -OutFile $outpath


"$fileLocation\$fileName"


# Arguments q = quiet h = hide dialog
$args = "/q /h /npf"
Start-Process -Filepath "$fileLocation/$fileName" -ArgumentList $args
Verification
"C:\Program Files (x86)\eFileCabinet, Inc\Rubex\Rubex.exe"