QA
- QA Home
- QA Goals
- QA Index of Everything
- Onboarding for New Hires
- Testing
- Remote Desktop Instructions
- Email Import Instructions
- Postman Instructions
- NYL Postman API Testing Setup & Tests
- Bugs
- Automation
- InitialInstanceSettings.txt
- Troubleshooting Automated UI Tests
- Automated Test Help (In Progress)
- Selector Conventions (data-id-xxx)
- XPATH
- Running Automated Testing Locally
- Automated UI Test Code Layout
- Cloning Utopia
- JMeter Load Testing Tutorial
- Release Testing - Atlantis
- Selenium Automated UI Tests
- Running Against Staging and Test Settings Description
- Terminating Old Web Drivers
- Selenium
- Selectors
- Postman API Tests
QA Home
QA Goals
C# Automation Resources
Selenium Automated UI Tests
First Time Setup - Utopia (Work in Progress)
Automation Training Videos
Manual Testing
Nightwatch Testing Guide
Rubex Testing Tracking Doc
Test Assets
Files for Testing
eFileCabinet Downloads page
Documentation

(In progress) Who's in charge of what
QA Goals
QA Department Goals
- Complete Regression Tests within 24 hours
- 80% C# Test coverage by End of Year
- Thorough Integration of Agile and Scrum Principles
SecDevOps Department Goals
- Create a culture of Security
- Improve Operational Efficiency and Reduce Rework by embedding QA with Development
- Cloud Cost and Architectural Excellence
eFilecabinet Company Goals
- Double our revenue
- Provide more data visibility
- Shift market focus to mid and enterprise
- Retain existing customers
QA Index of Everything
Everyday Definitions
-
Meetings
- Standup
- Our daily meeting where we coordinate what everybody's doing for the day and make sure we're on track to meet goals
- Called "standup" because it's supposed to be such a short meeting that you could stand up for the whole thing
- Product Development Department Meeting
- Every two weeks on Thursdays. Includes the whole Product Development department (QA, development, UI/UX designers, etc.)
- Half the meeting is spent talking about concerns/topics team members have, the other half is spent on training.
- In-person attendance is strongly encouraged
- Standup
-
Migration Tools
- We are trying as hard as possible to move all customers to our Rubex Hosted or Rubex Private Cloud (self-hosted) environments. Old products like eFileCabinet Online (eFCO), eFileCabinet Desktop (internally called Legacy or Legacy Desktop) have an end-of-life date, and these tools are for migrating customers from old products to current products.
- Pangea migrates customers from Legacy Desktop to Rubex Hosted
- Project Hope migrates customers from eFCO to Rubex Hosted
- The RPC Migration Tool (to my knowledge, it doesn't have an actual name) migrates customers from Legacy Desktop to Rubex Private Cloud
-
OCR
- One great feature of Rubex is that your pdf's/images will get scanned to be full-text searchable. We call this scanning process OCRing. When files are waiting to be OCR'd, they will be in the File Queue, which can be found by going to Admin --> File Processing Queue in Rubex.
- One great feature of Rubex is that your pdf's/images will get scanned to be full-text searchable. We call this scanning process OCRing. When files are waiting to be OCR'd, they will be in the File Queue, which can be found by going to Admin --> File Processing Queue in Rubex.
-
Types of Tests
- Smoke test
- Brief tests that confirm whether a component is running or not. For example, as a Previewer smoke test, you would find a previewable file and attempt to preview it. As long as the file can be previewed, you'll know that the Previewer smoke test has passed. Our release nights mainly consist of smoke tests of all the major components.
- Regression test
- Longer tests that deal with a situation like "we changed a part of this feature. Let's test all aspects of the feature, so we can make sure the code change didn't have unintended consequences." We tend to do targeted regression tests on areas that have had recent code changes.
- Longer tests that deal with a situation like "we changed a part of this feature. Let's test all aspects of the feature, so we can make sure the code change didn't have unintended consequences." We tend to do targeted regression tests on areas that have had recent code changes.
- Smoke test
-
Typical schedules
- Full and Part Time Employees (not interns) work M-Th
- In addition, we have releases most weeks in the evenings, usually on Tuesday and Wednesday evenings at 8pm. Talk to Michael for more information on this.
-
Utopia
- Utopia is sort of our general name for the Rubex project as a whole. It's pretty much only used within the Product Development department. It's most commonly used when talking about "the Utopia code-base".
- Utopia is sort of our general name for the Rubex project as a whole. It's pretty much only used within the Product Development department. It's most commonly used when talking about "the Utopia code-base".
-
WalkMe
- WalkMe is a customer self-help system that shows the user how to do a wide range of functions within Rubex. It is intended to be the first line of defense before a customer calls in to our support team.
- WalkMe is a customer self-help system that shows the user how to do a wide range of functions within Rubex. It is intended to be the first line of defense before a customer calls in to our support team.
-
Workflows
- Workflows are the bread and butter of our product. Originally, the eFileCabinet software was based around document storage and sharing, but it has evolved to include helpful features like Workflows that automate a user's business tasks.
- Workflows are customizable, so there's really no easy way to describe them. Our CSM and Marketing teams have created several videos walking through examples, and I would highly recommend watching those. As you learn more about Workflows, it will be easier to recognize the wide variety of applicable situations in which Workflows can help.
- Workflows a little intimidating at first, but don't be afraid. Just like a new programming language, progress may be slow. But, it is important that you become as familiar as possible with Workflows.
Account Logins
Govcloud QA Account
Username: qa+govcloud@efilecabinet.com
Password: efilecabinet*1
Docusign
Username: qa@efilecabinet.com
Password: efilecabinet*123
Salesforce
Username: qa@efilecabinet.com
Password: efilecabinet*1
Workflows Testing
User 1: workflowsregressiontesting@gmail.com
Password: NeverChangeme1!
User 2: qaefctester@gmail.com
Password: efilecabinet*1
User 3: qaefctester2@gmail.com
Password: efilecabinet*1
Onboarding for New Hires
1st Day - Important Links and Logins
Welcome to the team! First things first it's a good idea to get yourself setup with all the apps and websites that you'll be using on a regular basis. To make things easier we've collected some links to installers for apps and websites to bookmark.
Invitations from Manager
You will need to be invited to certain things in order to use them.
You should have email invitations to:
- Azure DevOps
- Revver (Production, Staging, Govcloud, UK, CA)
- Slack
- Discord
- Zoom
- Google Calendar (Recurring QA team / Product Development meetings and weekly 1-on-1's)
If you are missing any of these invites, please let Michael or another team member know!
Communication
This job involves a lot of communication, both within and outside our department, so get used to reaching out and asking questions. Our main app used for communication is Slack, however Discord is frequently used when communicating with the Dev team. Azure Dev Ops (ADO) is where the majority of our documentation for testing is located. It contains our Test Plans, Ticketing System, Work Items, Boards, and a multitude of other important information. It can be overwhelming at first but you'll get more comfortable with it as you use it.
Downloads
Slack Installer - To login you will use your work email address. Once you have slack installed you'll want to make sure that you're invited to the qa, qa-verification, and release-team channels in addition to the general channels.
Discord Installer - You can login with either a personal account or create a new account with your work email address, but you will need to be invited to the eFileCabinet server to access it.
Zoom - You will need to set up a Zoom account with your work email.
Teams - You will log in with your work credentials (Microsoft, not Gmail) We no longer use Teams
Remote Desktop Instructions - You will need to remote into our Mac for testing as well as our other machines for running automated tests. If working remotely, you will need to talk to McKay in IT to get a VPN set up on your computer. Connecting from within the office will work automatically.
Websites to Bookmark
Replicon - Clocking in and out for Hourly employees and time off requests for Salaried employees.
Azure Dev Ops - Used for everything (bug ticket tracking, productivity boards and assignments, etc.)
Gmail - Company email. It is also useful to set up a second non-work email account for testing (ex. firstName.LastName.efc@gmail.com or efctesterLastName@gmail.com)
Google Calendar - Keep track of various meetings throughout the day. Can also be accessed through Gmail and integrated into Slack.
Rubex
There are four production Rubex environments, and one Staging environment where we do the majority of our testing. You should create bookmarks for all of these.
- US Production (Live) - Most of our customers are on this environment.
- Staging - Only Revver employees have accounts here. Staging will usually get multiple updates per week, while our Production environments only get updated a few times per month with builds that were tested and approved on Staging.
- Govcloud - An environment where some of our government customers have accounts. It has a slightly different security protocol than our other environments.
- UK Production - This environment is similar to our US Production environment, but the servers are based in the United Kingdom so our UK customers have better experiences speed-wise.
- Canada Production - Same deal as our UK environment, eh.
Google Sheets
Not everything we use lives in ADO, below are some Google sheets that we regularly reference.
Rubex Post-Release Testing - Used for tracking testing assignments for releases. Due to an increase in release cadence and the release Smartsheet, this has become obsolete.
Rubex Staging Testing - Used during swarms on Staging. Sometimes we'll do a "practice release" on Staging that mimics our release process onto our Production environments. This document is set up to match our Post-Release Testing document.
Automation Progress - Tracks our regression tests and which ones have been automated in Nightwatch and C#.
Home/Office Assignments - Spreadsheet that shows when to expect team members to be in the office or working remotely. This is rarely used now. Instead, when you work remotely, make sure to update your Slack status to show that you are working remotely for the day. Services like Zapier can be used to automate this, if you have a consistent WFH schedule.
ADO Testing Discussion - Notes to track changes to Test Plans while running through them. Sometimes you may encounter smaller spelling errors or be able to include clarification. Keep this open to make note of things while testing. This was mostly being used when we were developing our ADO test suite. We don't use this much anymore, but I'm leaving the entry just in case we start using it again.
Smartsheets
Release Details Tracker Smartsheet - Sheet that reports items in releases to other internal employees. Updated to match what we're releasing based on work items on staging.
Last 30 Days Dashboard - Easily digestible version of the Release Details sheet. Shows items in upcoming releases, last 30 days (duh.) and status of the top 10 QoE items.
Customer Escalations (Old QoE) - Sheet that shows items reported from the Customer Escalations team that they would be liked to be worked on based on customer complaints and friction.
QoE Top 10 - Priority list of items from the Customer Escalations sheet. What is regularly discussed in weekly QoE meetings.
Other Useful Links
Request Catcher - Website for catching API Requests while testing
QA Goodies - Google Drive that contains:
- Folder of files to download for testing
- Videos for automation training
- Misc. documents
Once you have reviewed all of these resources and taken the appropriate related steps, go ahead and move on to the First Week section.
First Week - Getting a Taste of Revver and ADO
Goals
- Develop a basic understanding of Revver and how to navigate it
- Familiarize yourself with ADO Test Plans and run through a complete Test Suite
- Obtain a collection of files to use for testing
Files to Use
The most common file type for testing is a PDF, but it is important to have a collection of different types for regression testing. Check the QA Goodies link in the above Other Useful Links section for a wide assortment of files for use.
Getting to know Revver
Revver CSM Videos
This link will take you to a list of videos our CSM (Customer Success Management) team has put together to explain the basics and some advanced features of Revver. Don't worry about watching all of them, but treat it as a second reference if you have questions.
Rubex Exploration Through WalkMe
The best way to learn Rubex is through experience. Open Rubex in a new tab and login to your account. Once on the home screen, click on the orange "Need Help?" button in the top right. This will open a feature called WalkMe, which gives step by step tutorials for different Rubex functions. Take the time to complete each subsection listed in WalkMe and write down any questions that you may have as you do so. Make sure you do this in our US Production environment, not Staging, because the WalkMe content on Staging is experimental. Walkme is dead.
Revver Onboarding Test Plan
After finishing the tutorials in WalkMe and watching the tutorial videos, contact Michael or another team member and they will create a Test Plan for you to follow. This will give you more experience with ADO and further reiterate the things covered by WalkMe and the tutorial videos.
Test Plans is where you'll find instruction and guidance for completing the bulk of our work - testing!
Each Revver release needs to be thoroughly tested before it is released to the public, and our methods for testing are found in the Test Plans area on Rubex. We use a combination of testing types to provide the best coverage:
- Automated: Selenium tests that cover a wide variety of basic tests
- Smoke: Simple tests performed on other browsers to verify normal function
- Manual Regression: In-depth tests that cover a wide variety of factors and options
To access Test Plans, go to ADO and find the Test Plans section, or click on this link. Once there, you should be able to view all Test Plans, both past and current. Let's use your onboarding test plan as an example.
With your test plan selected, you can access the different Test Suites within the plan. Selecting a folder (or suite) within a Test Plan will show any Test Cases under that section. If a folder shows the "Add a test case" message in the middle of the screen you may need to look in a sub folder of that section to find the tests.
With Test Case(s) visible, click "Execute" in the top center bar to switch modes. While in execute mode, click the checkbox next to the test cases, followed by the "Run for web application" button to run them. A new window will appear that will outline the steps to follow. Next to each step will be 2 circles - pass and fail. As you follow the steps of the test you may select these buttons to track your steps or if the test is simple you can click on the dropdown in the top right to select an outcome for the entire test. Within this window you can use the left and right arrow buttons on the top bar to navigate between tests that you selected, and once finished with the group of test you can click save and close.
That's the gist of it, but if you need any help don't hesitate to ask.
Some Advice:
- Avoid editing/deleting any tests in your test suite as they are linked to the template that we use for regression testing.
- If a test says to "test for all item/file types", use your discretion to determine how many times you need to repeat the action.
- Keep in mind that the goal of this first test suite is to give you practice and help you understand Rubex, not to rush to the end.
First Month - Becoming a True Member of the QA Team
Goals
- You are confident testing Revver on your own by following ADO Test Plans
- You are comfortable navigating ADO Boards, Work Items, Test Plans, and other commonly used areas
- You are comfortable writing bug tickets
- You are comfortable investigating internal questions (ex. qa-verification slack channel)
Testing
At this point you should feel comfortable navigating the different areas of Revver and completing basic tasks needed for testing. You may still have questions about some of the more complicated sections like Workflows, but that is completely normal. You should be able to easily follow Regression Testing plans similar to your Onboarding Test Plan but a little more in depth.
Using ADO
Since ADO is used as the central hub for our daily work it's important to understand how to navigate the different areas and know what they're used for.
Test Plans
When manually testing you'll spend a lot of time in the test plans section, and you'll likely use it as a reference when writing automated tests. Navigation here is fairly basic, you mainly need to know how to swap between different Test plans, how to switch between defining and executing tests, and how to create/add to bug tickets when finding bugs during testing.
Tickets
Speaking of bug tickets, let's talk about them. Whenever you find unexpected behavior within Revver it needs to be reported to our Dev team with as much detail as possible. The key things needed are:
- A descriptive title - You can't just say "Preview doesn't work right"
- Steps for reproduction - If you find the bug while following a test case you can create a ticket within the test window, and it'll even add in the test case steps for you. If doing it this way, make sure to mark which individual step(s) passes/fails and add any additional information needed in the comment window.
- Environment - If your bug is specific to a certain environment, ex. it only happens in CA, then make note of that in your ticket. Additionally use a tag such as [Search] or [Deep-Link] if the item is related to something a dev team is actively working on.
- System Info - Include the version number that you are testing (can be found by clicking the ? icon in the top right of Revver, then click About.) If the bug is specific to a browser, include which browser you were using. In addition, if the bug is specific to an operating system, include which OS you were using.
To access existing bug tickets, navigate to the Backlogs section under Boards on ADO and filter by Bug as the Work Item Type. Search this area before reporting a bug just to make sure that it hasn't already been reported or fixed in a future build that hasn't been deployed yet. Using the search functionality in the top right of ADO is a great tool as well, as long as you use filters to prevent code snippets from showing up in your search results.
Boards
Boards are where you will find what's currently being worked on by the team. If you're unfamiliar with the Agile/Scrum process things here may sound a little foreign, so here's some basic terminology.
-
Work items - These can include tasks, bugs, features, or user stories. Basically items that need to be completed.
-
Boards - A visual "wall" of sorts that tracks what's being worked on by the team. These tasks can be viewed at 3 different levels: Epics, Features, and User Stories. Epics tend to be more of a "end goal" that we want to accomplish. The steps we take to complete these epics are divided into different Features, which in turn are specified in User Stories. The purpose of this is to break down a large effort into tangible weekly goals.
-
Backlogs - The area where all User Stories that are currently on our "To-Do" list live. If something needs to be done in the future, we create a User Story for it and it is placed here in the backlog. The backlog is sorted in order of priority, with urgent things placed at the top and less pressing (but still important) Stories placed at the bottom. This backlog is where we will pull in User Stories for our Sprints.
- Sprints - Sprints are simply periods of time where we work on specified Tasks that were decided on in Sprint Planning. Our Sprints currently run from Tuesday to Tuesday, with the goal of accomplishing all User Stories added to the sprint in this week long window. The sprint tab is where you can see what everyone is currently working on where you can find work that still needs completed if you finish your tasks. Our team has transitioned to more of a kanban-style system, so we no longer use sprints.
### Repos This has changed, now that Randy got the Selenium tests separated out from the rest of the Utopia code. For questions about our repo, talk to Randy Morris.
This is where the Repository (AKA Repo) for Rubex lives. It is called Utopia, and all of our C# automated tests can be found in these files as well. You'll initially clone a version of Utopia for writing tests on your local machine from here, but later on the Repos section can be used to check different branches, pull requests, and other git related things.
Overview
The first section listed is the last one I'll talk about. Recently we've implemented a Dashboard that gives an "at a glance" view of some important things. It's still a work in progress, so expect some more changes with it. The other important area in this section is the Wiki subsection. It contains a lot of helpful information on a variety of things, although some of it is likely outdated. Feel free to browse through these and make a mental note of which ones might be helpful in the future either for reference or troubleshooting.
Testing
Remote Desktop Instructions
Connecting to the QA Windows Machines (QA1-6):
- Open "Remote Desktop Connection"
- Click "Show Options"
- Computer: 10.10.0.6<remote desktop #>
- For example: "10.10.0.63" for QA 3
- The QA PC's are numbered 1 - 6
- User name: <your laptop's name>\localadmin
- For example: AzureAD\localadmin
- Computer: 10.10.0.6<remote desktop #>
- Click "Connect"
- Password: qaRocks1!
QA 1 uses different credentials:
- IP Address 10.10.0.61
- Username: Work Email
- Password: Work Email Password
Note: The new Mac is being set up and the new password is: qaRocks! (I really tried to push for the passwords to be the same, but apparently the reason it is different in the first place is the VNC Viewer requires that the password be 8 characters or less......) Also the new IP is 10.10.0.68
Connecting to the QA Mac:
- Download and open VNC Viewer
- Go to File > New Connection
- VNC Server: 10.10.0.67 (may be 10.10.0.68, depending on whether the new Mac has taken over or not)
- Name the connection something descriptive
- Go to Encryption > Prefer Off
- Prefer Off or Prefer On both work, just as long as it will allow an unencrypted connection
- Press OK
- Connect to the Connection you just created
- Password: QARocks! (qaRocks! if on QA8)
- This will bring you to the Mac's login screen
- Name: qa
- Password: QARocks!
Email Import Instructions
Note: These steps will assume that setup is happening with a eFileCabinet email address that has 2-factor authentication enabled
Email Setup
- Login to email account in browser
- Click Settings cog in top right corner, then "See all settings" button
- Click on the heading "Forwarding and POP/IMAP"
- Under the "IMAP access" section click the button next to "Enable IMAP"
- Return to the inbox of your email and create a new label for email imports. This can be done by:
- Clicking "Create New Label" in the left hand menu at the bottom of the top section (may need to click "more" before visible)
- Opening a message in the center pane and then in the top options bar clicking "Move to" (Folder icon with an arrow) and creating a new label in the pop up menu
Note - Email imports act on a first come first serve basis, it is handy to create multiple import labels (Production Imports, Staging Imports, Postgres Imports, etc.) so that existing imports don't interfere with each other.
Google Account Setup
Rubex Setup
Where to set up Import
Email imports can be set up in two locations - Admin and My Settings. Email Imports created in the Admin tab are account wide, while My Settings imports apply only to that specific user. Testing can (and should) be done separately on both of these locations.
Creating the Import Mapping
| Username / Email Address | Password | Email Server Address | Email Server Port |
|---|---|---|---|
| yourusername@efilecabinet.com | The 16 character password generated earlier | imap.gmail.com | 993 |
- Check the "Use SSL" box and click "Test Setting"
- If all setup has been performed correctly, a popup saying "Test Successful" will appear at the top of the screen
- Under the email setting box, click the refresh button next to the "Email Folder Path" dropdown
- After refreshing, choose the created label as your email source. As a suggestion, do not set your primary inbox as your source, or ALL of your emails will be imported and archived/trashed. Instead, create a separate folder in Gmail and set that as your source. That way, you can move emails there that you don't care about without impacting the more useful emails that you may receive.
- Set your import options (Only emails, only attachments, or both)
- Either keep imported emails with the Archive setting or have them be automatically deleted after import with Trash
- Click Create
- You should be returned to the previous page with your new mapping listed in the center pane
Importing your first emails
From your email browser window, add emails to the label that is set as your email import source. This location is periodically checked by Rubex (every 5 minutes or so) to see if emails are available to be imported.
You can verify that emails have been imported to Rubex if they are no longer listed under the label. Instead they can either be found under the label [imap]/Archive or in the trash depending on the setting you selected for moving imported emails.
Emails will appear in the destination location in Rubex once they have disappeared from the email label.
Troubleshooting
If you're having issues with email imports make sure that you don't have an existing import on any environment that is importing from the same location. Emails will only import to the first environment that grabs them, they won't be duplicated. Good practice is to delete your email import mapping after you are done testing it to prevent confusion in other environments.
Postman Instructions
Setting up a postman request
Go to https://www.postman.com/downloads/ and download postman.
- Click the New Request button (looks like a +)
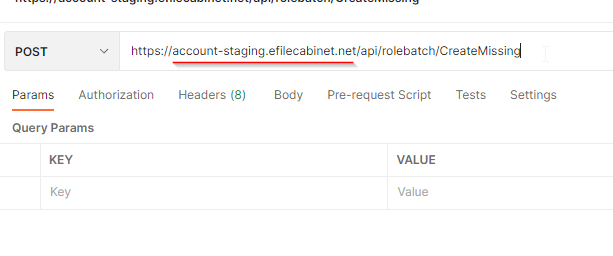
- You'll need to know what endpoint you are using, which are going to be located here: http://account-staging.efilecabinet.net/api/apihelp/index.html
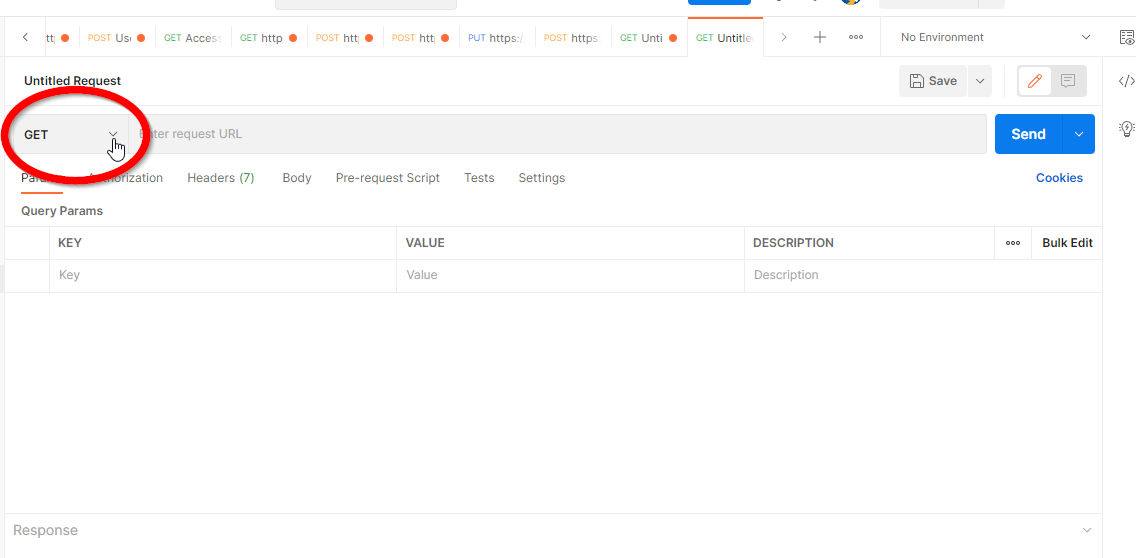
- Once you know what type of endpoint you are using, update the type (GET, POST, PUT, DELETE, etc...)

- Paste the endpoint into the Request URL box and make sure to update the URL to point to the desired environment (Staging, Prod, etc...)
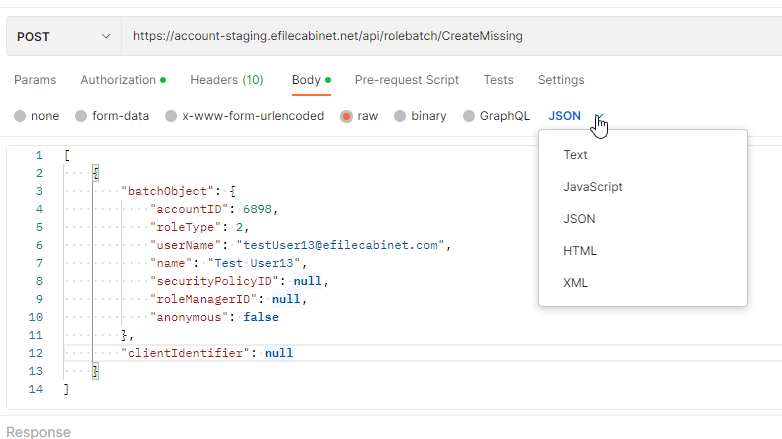
- Select Body and paste the needed info into the Request Body and make sure to select the type (in this case it is raw JSON)

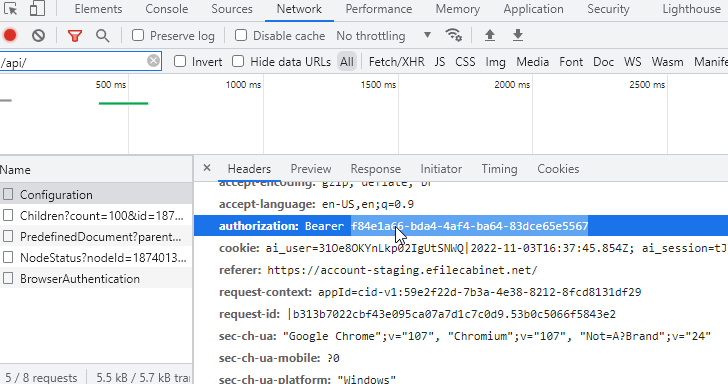
- Click Authorization
- Select Bearer Token
- Add a valid Token into the field
- The quickest way to grab an access token is to log in to the desired environment (Staging in this example)
- Open the dev tools and select Network -> Configuration and you'll find the Bearer token:
- Click Send
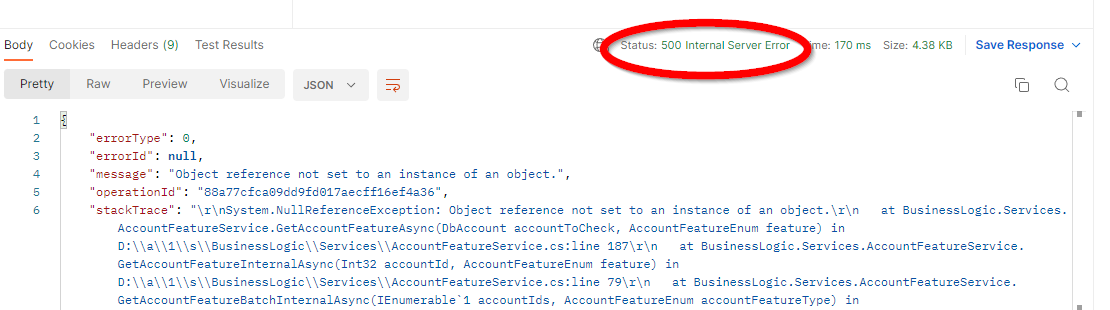
- Check the Response that will display at the bottom of Postman
- There are two main areas to ckeck, the Status and the Body. Those will give you all the info about the request you just sent:

- Be sure to check the responses in http://account-staging.efilecabinet.net/api/apihelp/index.html to validate that what response you are seeing is what is expected
- There are two main areas to ckeck, the Status and the Body. Those will give you all the info about the request you just sent:
- For each new test, you can click the three dots next to your collection or right-click it and add a request.
*You can save your requests and add comments for future reference and when re-running the tests during releases.


NYL Postman API Testing Setup & Tests
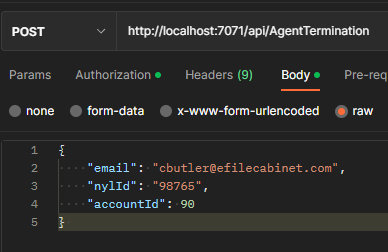
AgentTermination Request Test
* These tests require an authorization token. Please refer to the general Postman API instructions if needed.
**If testing in Staging, use Azure Portal NYL Interceptor page to change the values.
-
It is preferred to test with an account that is set up like NYL from the hub (Ask Peter, Michael or Royce for assistance)
- Elastic Search needs to be running.
-
Run the NYL Interceptor in Visual Studio and Utopia (Atlantis will replace Utopia eventually)
-
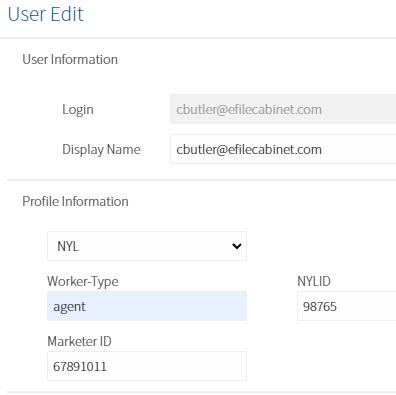
Add 3 profile items called NYLID, Marketer ID, and Worker-Type and add them to a profile.
-
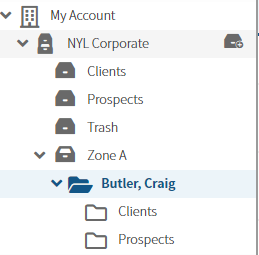
The folder structure needs to be set up with a drawer of agents from a certain region, then a folder with the agent's name, and two subfolders of Clients and Prospects.
-
Set up or edit a user and add the new profile and add in a number to both Marketer and NYL ID's (my example is 98765)

-
You will need the following database ID's:
- Account ID: Find it in User Sessions URL
- Profile Items ID's for Marketer ID: found in the URL of the profile item itself
- NYLID: found in the URL of the profile item itself
-
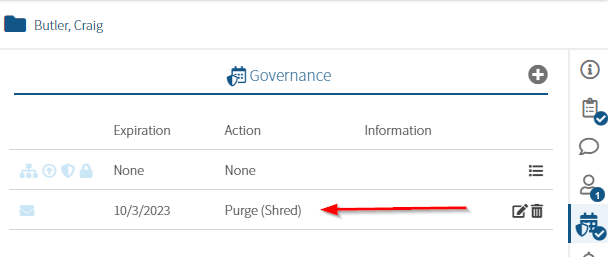
When an agent terminates from their system, they will emails us a marketer ID and email address. If they exist, it will locate the Marketer ID, then sets a purge governance 6 months from now on the agent's folder itself and applies to that item only.
-
In Visual Studio, open the local.settings.json and change the marketer ID and NYL ID to the ID's for your profile items.
-
Also change the environment URL if needed. I tested in local so I changed it to my local environment (only applicable in my environment):
"EnvironmentURL": "https://localhost:44334/",
"MarketerId": 397,
"NYLId": 395
-
Go to Postman API, and if needed, import the NYL Collection.json (Craig and Peter have copies or it can be found in a test plan ---Link coming soon)
-
Go to the Agent Termination folder, and test in the appropriate environment.
-
TBoth Marketer ID and NYL ID can be tested. For now, we will test with NYL ID. The NYL ID number you enter is not the DB ID obtained in step #6, it is the value you entered in the profile item itself in step # 5.
-
Send the request
-
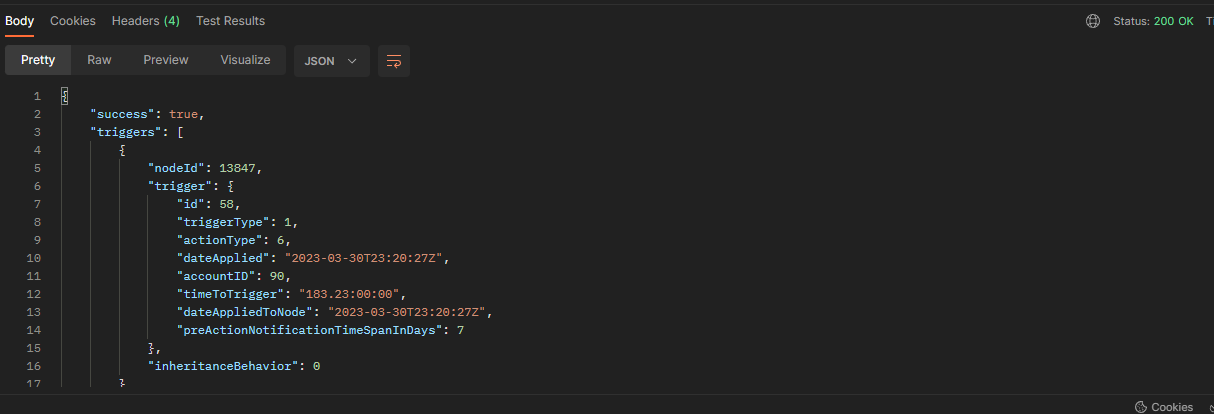
Make sure status 200 is good is returned.
- Make sure the response says something like this:

-
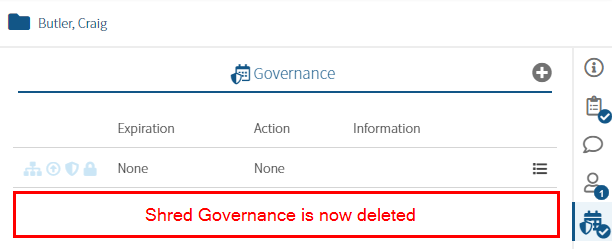
Return to Rubex and verify that a 6 month purge governance exists on the folder of the agent's name and applies to this item only.
-
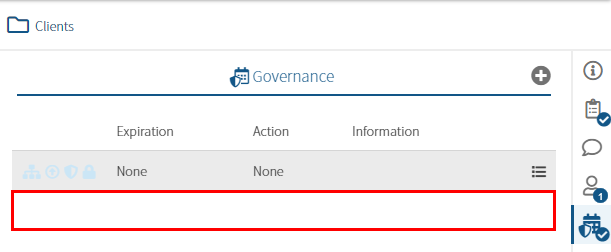
Make sure that the subfolders and files are not inheriting the profile value. The Clients and Prospects folders should only have the existing NYL governance (if you have an NYL type of account created from the hub)


Undo - AgentTermination Request Test
-
Copy the body from the AgentTermination request and paste into the Undo - AgentTermination Request
-
Send the request.
-
Open Rubex, and check the governance on the agent's name folder that you previously ran a termination request again.
-
The 6 Month Purge Governance should be deleted

CreateMissing Request Test
- Open Visual Studio and run the NYL Interceptor and Utopia (if running locally)
- The .json template mentioned at the beginning of this article should include a folder called "CreateMissing" with three POST tests for Local, Staging and Production.
- Choose the environment that you are testing.
- Update or add the Authorization token to the test.
- Post the following Body text below and update the accountId at the beginning and end with yours (found in Rubex - User Sessions) and update the userName and name and send the request. It will create a new user with those details in Rubex and will assign them as a full license user with these custom permissions:
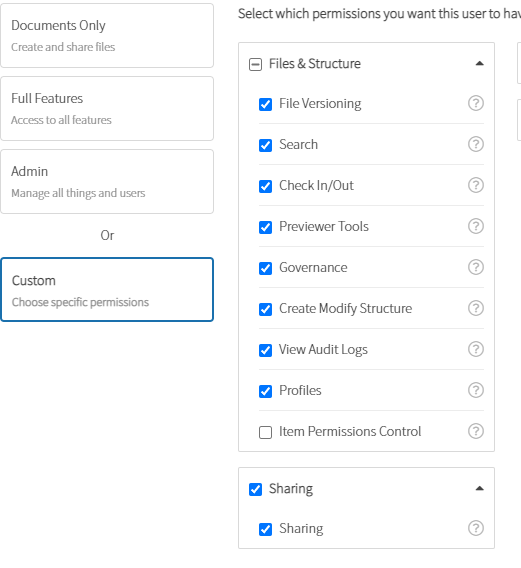
BODY TEST:[{"batchObject": {"roleType": "2","accountID": 90,"userName": "cbutler+NYLMAN@efilecabinet.com","name": "IgnoreMe NYL MAN (cbutler+NYLMAN@efilecabinet.com)","systemPermissions": {"users": {"enabled": false},"guests": {"enabled": false},"groups": {"enabled": false},"profiles": {"enabled": false},"nodeManagement": {"enabled": false},"templates": {"enabled": false},"systemSettings": {"enabled": false},"nodePermissionOverride": {"enabled": false},"licenseManagement": {"enabled": false},"retentionAdmin": {"enabled": false},"nodeExchange": {"enabled": true},"nodeExchangeManagement": {"enabled": false},"salesForceManagement": {"enabled": false},"workflow": {"enabled": false},"workflowManagement": {"enabled": false},"auditLogManagement": {"enabled": false},"retentionUnlock": {"enabled": false},"eSignatureManagement": {"enabled": false},"eSignature": {"enabled": false},"accessLinksManagement": {"enabled": false},"accessLinksUsage": {"enabled": false},"reporting": {"enabled": false},"accountID": 90}}}]

Bugs
Definition and Priority Guide
https://docs.google.com/document/d/17eI7qm98x1-iwYQtFNkbw5cDopIBuxckmrKSKHjSXCo/edit#
Automation
InitialInstanceSettings.txt
INSERT INTO "public"."DbInstanceSettings" ("SettingType", "SettingValue")
VALUES
(2, '0'),
(9, 'True'),
(12, '5'),
(13, '5'),
(14, '1'),
(15, '10'),
(38, '60'),
(39, 'http://127.0.0.1:9200'),
(62, '100'),
(63, '8'),
(64, '5000'),
(65, '5'),
(66, '100'),
(67, '8'),
(68, '1'),
(69, '1'),
(70, '1'),
(71, '1'),
(72, '1'),
(73, '1'),
(74, '00:10:00'),
(75, '4'),
(76, '5000'),
(77, '100'),
(78, '50'),
(79, 'EFileCabinet'),
(82, 'C:\\GdPicture.NET 14\\Redist\\OCR'),
(84, '4'),
(85, '100'),
(86, '50'),
(87, '/PreviewProxy'),
(88, '1500000'),
(89, '2'),
(90, '5000'),
(91, '2'),
(92, '2'),
(95, 'https://s3.amazonaws.com'),
(96, '600'),
(97, '2'),
(98, 'false'),
(99, ''),
(100, 'http://localhost:55512/'),
(102, 'AllDay'),
(103, ''),
(104, ''),
(105, ''),
(106, 'True');
Troubleshooting Automated UI Tests
Problems with running the Automated UI Tests?
Running the C# tests can be tricky, so this is a guide to help you out if you run into a common error. NOTE: These solutions will only work if you can at least build Utopia. If you cannot build Utopia, try reaching out to Dev via Royce or Quinn, and they will schedule time between you and one of the Devs to resolve the issue. You could also try reviewing the videos about setting up Utopia. In them, several common build errors are discussed and resolved.
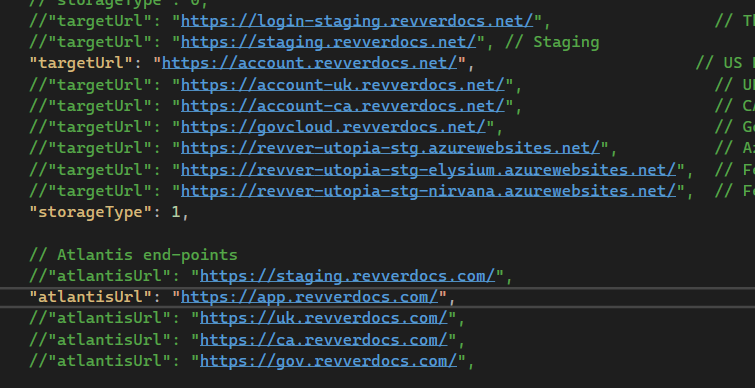
First, verify that your testSettings.Json (found in the AutomatedUITests Project) is pointing to the proper build.

Check the section titled // endpoint variables and make sure the correct variables are active (not commented out). It will be pointing to staging by default (i.e. after you pull from main).

-
Local:
"targetUrl": "https://localhost:44334/","storageType": 0, -
Staging:
"targetUrl": "https://account-staging.efilecabinet.net/","storageType": 1,
NOTE: Testing against any other environment will follow the same pattern
Running against local
Many common issues happen when running against local. However, they are usually simple to fix.
- Verify that Azure Storage Emulator is running. To do so, type in the search box on your machine's taskbar
Azure Storage Emulator.

Open the Microsoft Azure Storage Emulator app that comes up. You should see a command prompt window come up saying it's starting the Azure Storage Emulator (or that it was already running).

- Verify that you have the latest Utopia code and UtopiaAutomation code pulled from master. To do this, you need to open Git Changes in Visual Studio, and then you need to fetch and pull. To fetch, click the dotted down arrow. To pull, click the solid down arrow with a horizontal line below it. Fetching will grab the latest commits from Azure DevOps, and pulling will actually merge those commits into your local copy of the master branch. Also, make sure that you're for sure on the master branch by verifying the branch dropdown selector says master. Do this on both the Utopia solution and the UtopiaAutomation solution.

If you're working on your own branch, then a good idea would be to switch to master, fetch and pull, and then switch back to your branch and merge the newly updated master into your branch. If you find you're in this scenario, please feel free to reach out to Dev with any questions.
-
Verify that you have Utopia running via a separate Visual Studio window (you should see Rubex pop up in a Chrome window with the url of
https://localhost:44334/). -
Verify that your database is up to date. To do this, go to the Visual Studio window where you have the Utopia solution open. Find the DbMigratorEF project and right click on it. Select the option to "Set As Startup Project"

Once you have done this press the green play button at the top. This should bring up a window like this:

Go ahead and press enter. This will apply any database migrations that have happened since you updated last. It will print out the latest DB update state whether it needed to update or not, then you can close the window. If you run into errors with this, read on to the section below.
NOTE: Remember to set the startup project back to Utopia when you want to run it again.
Fixing Your Database
Sometimes your database gets into an unexpected state, or it was never configured properly to begin with. Here are the steps to flush it out.
First, let's double check you don't have any Rubex Private Cloud services interfering with your local environment. Open up the Task Manager. Go to the Services tab, and scroll down to anything that says eFileCabinet (the results are alphabetized by default). If you've ever run the Rubex Private Cloud installer on your machine, you'll see the following services:

Please make sure they're all set to stopped. If you've never tested Rubex Private Cloud, it still may be a good idea to double check these services either don't exist or are set to stopped.
One more thing to check dealing with Rubex Private Cloud is the C:/ProgramData/EFC/Configuration folder. If that folder exists, please delete it (or move it to a different location if you want to save its contents for later testing). Okay, now on to double check out database itself.
Open up pgAdmin, and open Databases.

As you see in the image above, I have only one database, and its name is postgres. That is the database we use locally.
We used to use UtopiaDB as the name of the database. If you have UtopiaDB please right click it and click delete/drop.
If you have errors deleting/dropping UtopiaDB, first make sure all query tabs accessing it are closed. If that doesn't work, then sadly you will need to restart your computer and try again.
Once you've verified that you only have postgres, open it up and you'll see Schemas, which should contain both public and workflow.

If you don't have a workflow schema, then your database isn't yet configured and we will need to run the DbMigratorEF. If inside of your public schema under Tables you don't have any tables, you'll also need to run the DbMigratorEF. Refer to Step 4 under "Running Against Local" above for instructions on how to do this.
Go back to pgAdmin and open the DbInstanceSettings table in the public schema of the postgres database. On that table right click, hover over View/Edit Data and click All Rows. If there is nothing there, please run this script: Initial Instance Settings.txt.
Then run the DB Instance Settings Local Config script from the root of the Utopia source code directory. If you open the table and the first two rows have settings types 2 and 9, then you haven't run the second script. So please run DB Instance Settings Local Config.
Other Errors
OneTimeSetup: System Exception: An error occurred while creating accounts

This error can mean a myriad of things. If you have checked all of the above, then the issue will likely need to be addressed with the Dev team, as it is probably an error in how the UtopiaAutomation code is hooking up to the Utopia code, and not anything to do with the tests themselves.
System.UnauthorizedAccessException : Access to the path '1.7GBvid.mp4' is denied
This error is because you don't have admin permissions on the Windows directory where you cloned the source code. It is strongly recommended that you clone the source code into the following directory: C:/src/Utopia. Possible solutions to this error:
- If your source code is not cloned to
C:/src/Utopia, please promptly move it there and try again. - Make sure your windows user has admin permissions to
C:/ProgramData/EFC. ProgramData is a hidden folder, so if you don't see it on the C drive in File Explorer, make sure you have hidden items marked as visible.
Unable to connect to web server "IIS Express"
I encountered this after updating Visual Studio. I went into ...\source\repos\Utopia\Utopia\.vs\Utopia\config\ and deleted the applicationhost.config file and restarted Visual Studio.
I got this fix from this Stack Overflow post, so if the fix doesn't work for you, there may be more detail here: https://stackoverflow.com/questions/35675747/asp-net-5-mvc-unable-to-connect-to-web-server-iis-express
Chromedriver / NuGet
If you get an error regarding Chromedriver, such as:
OneTimeSetUp: System.AggregateException : One or more errors occurred. (session not created: This version of ChromeDriver only supports Chrome version 96
Current browser version is 98.0.4758.82 with binary path C:\Program Files\Google\Chrome\Application\chrome.exe (SessionNotCreated))
  ----> System.InvalidOperationException : session not created: This version of ChromeDriver only supports Chrome version 96
Current browser version is 98.0.4758.82 with binary path C:\Program Files\Google\Chrome\Application\chrome.exe (SessionNotCreated)
or:
Chromedriver.exe is being used by another process
Then what you need to do is kill any currently running Chromedriver processes, and in the case of the first error, then update the Chromedriver.
To kill Chromedriver, in a Linux-like terminal such as Git Bash, run taskkill -im chromedriver.exe -f, or in Command Prompt run taskkill /F /IM chromedriver.exe, or find Chromedriver in your Task Manager and end the task that way.
To update Chromedriver, in Visual Studio go to Project > Manage NuGet Packages. Go to the Update tab, find the Selenium Chromedriver and update it. This should solve the error.
A Living Document
Please add new errors as they come up along with your discovered resolutions. The goal of this document is to avoid having to remember a long list of remedies.
Automated Test Help (In Progress)
[TOC]
Link to Remote QA machine login wiki
testSettings.json
To change the URL endpoint to be tested:
Go to testSettings.json
Lines 10 through 19 include all of the endpoints
Uncomment line 19: storageType : 1 - this will use cloud storage
Comment out line 13, if needed. storageType: 0 - this is used only for local storage when running locally
Uncomment the line with the desired endpoint - “targetUrl”: “https:// . . .”
Comment out the lines with the other endpoints
Adjusting Runtime Parameters
Timeout
In testSettings.json Line 33 is “timeoutInSec” : nn - We have found that running a timeout of 45 seconds works best
Parallel Threads
Constants.cs Line 12 - MaxThreadCount = n Set this value to 1, 2, or 3. In many cases, a value of ‘2’ works best.
Headless Mode
Line 13 - HEADLESS_MODE = true/false true for headless mode - the tests will run faster false for non-headless mode - the tests run a bit slower but you can watch the execution
testSettings.json

constants.cs

Troubleshooting
Selector Conventions (data-id-xxx)
Data-id-xxx Naming Conventions
- The data-id-xxx needs to be properly 'scoped'
- Use data-id-
scope
Scopes
- center
- profile
- user
- group
- etc
Selector Naming Conventions
- Be as brief and descriptive as possible while avoiding name collision
- Selectors will still be contained in separate areas, which will mitigate name collisions
- Some selectors will still require a passed in parameter => ex:
nodeName
[elemType abbrev][name] => ex: chkProfileItemIsRequireddata-id='[elemName]' => ex: data-id='chkProfileItemIsRequired'
Element Type Abbreviations
Style guide
All Selectors
- Declare as static (unless there is a reason not to)
- Use
=>notation instead of an assignment (i.e.=) - Use
By.XPath(), notBy.Css() - Use double quotes outside, single quotes inside (instead of escaped double quotes)
Parameterized Selectors
- Use string interpolation (i.e
$"My name is {firstName}."instead of"My name is " + firstName + ".") - Use a normal function definition (i.e
By Selector(firstName) => ...instead ofFunc<string, By> Selector => (firstName) => ...)
Examples
Do
private static By SignInButtonSelector => By.XPath("//*[contains(@data-id-login, 'btnSignIn')]");
public static By ContextMenuOptionSelector(string option) => By.XPath($"//*[contains(@data-id-workflow, 'btnContextMenuOption')][contains(text(), '{option}')]");
Don't
private By SignInButtonSelector = By.Css("[data-id-login=\"btnSignIn\"]");
public Func<string, By> ContextMenuOptionSelector => (string option) => By.XPath("//*[contains(@data-id-workflow, 'btnContextMenuOption')][contains(text(), '" + option + "')]");
XPATH
Running Automated Testing Locally
Step 1
- Clone Utopia to your local device (either with Tortoise GIT or through Visual Studio)
- Clone UtopiaAutomation to your local device (either with Tortoise GIT or through Visual Studio)
Step 2
- Open two instances of Visual Studio, one with the Utopia.sln solution, and the other with UtopiaAutomation.sln
Step 3
- Run the Microsoft Azure Storage Emulator which is located on your laptop.
Step 4
- In the Utopia.sln, right click Utopia then select "Set as Start Up Project"
- 'Utopia' will be selected in Visual Studio's project pulldown, and 'IIS Express' will be showing in Visual Studio's run pulldown
- Click on the green arrow next to 'IIS Express'
- Rubex will start running on localhost in a new browser instance
- Note: If you do not see the pulldown objects listed above go to View/Toolbars/ and click on 'Standard'
Step 5
- In testSettings.json (located in the VS instance with UtopiaAutomation.sln), locate the lines that control the end-point to be tested. Simply uncomment the lines associated with the end-point you want to test. To test locally:
- Uncomment the line "targetUrl": "https://localhost:44334/ ",
- Uncomment the line "storageType": 0,
- Comment all of the other lines with end-points
- Comment the line "storageType": 1,
- Finally, you can now run Automated Tests against your local instance of Rubex by taking the second instance of Visual Studio with UtopiaAutomation.sln and finding the Test Explorer then running any test by hitting play within the Test Explorer
Troubleshooting
- On occasion the Rubex database includes changes which need to be applied to your local storage. You will know this because an error message will be displayed when attempting to run Rubex or a test. Apply the changes by running DbMigratorEF.
- Select DbMigratorEF from the project pulldown
- Click the green start arrow
- A Windows command window will pop up showing progress
- When prompted, hit the Enter key to update to the latest database
- Close the window
- Select Utopia from the project pulldown and relaunch IIS Express
Automated UI Test Code Layout
Cloning Utopia
- Open Visual Studio
- At the top left of the window, click 'Git' then 'Clone Repository'
- Copy the URL below and paste it in the window under 'Repository location'
- For the directory, browse to C:\Users\<your user>\source\repos (should be the default)
- Press 'Clone' in the bottom right, and the clone will start
- It may take some time, so be prepared to wait
JMeter Load Testing Tutorial
For more in depth information on load testing written by the devs: Load Testing
Download JMeter
- Go to https://jmeter.apache.org/download_jmeter.cgi
- Download the .zip file for the current version of JMeter under "Binaries"
- Extract and move the resulting apache-jmeter-5.4.1 (or whatever is the current version) folder somewhere you can find it again easily, you will need to access it
Starting JMeter
- Go to the JMeter folder > bin > jmeter.bat (make sure the file type is a Windows Batch File)
- The JMeter batch file will start a script which will start the JMeter application
-- Note: You can start multiple instances of JMeter if desired
Download JMeter Plugin Manager
- Go to https://jmeter-plugins.org/install/Install/
- Download plugins-manager.jar and put it into lib/ext directory in the JMeter folder
- In order to see the Plugin Manager, restart JMeter and go to Options > Plugins Manager
Open ThroughputStressTest
Before doing this step, you should have Utopia cloned to your machine.
- In JMeter, click File > Open
- Browse to the Utopia base folder > Utopia Testing > Tests > LoadTests > ThroughputStressTest.jmx
- If you have the Plugin Manager installed correctly, it will ask if you want to install the plugins needed
Change Settings
- Click on "User Defined Variables" in the left pane
- Change BASE_URL_1 to whichever url you are testing against (i.e. - account-staging.efilecabinet.net )
- Change SOURCE_RESOURCE_PATH to point to wherever Resources\Test Data\CSV is on your machine
- For example: C:\Users\JoshReese\source\repos\Utopia\UtopiaTesting\Resources\Test Data\CSV
- You can also create your own .csv file of users to use and point to that
- Change USER_THREAD_COUNT to the number of concurrent users you want to test
- 3 for a smaller test
- No more than 500 for a larger test because there are only 500 test accounts in the .csv
- Expand the "User Specific Setup" section
- Click on "BrowserAuthentication_Authenticate_Execute-Setup"
- Change the "0" after "authenticationRequestType" to "1"
- Click on "BrowserAuthentication_Authenticate_Execute-Setup"
Running the Test
Before you run the tests:
- Check with James or one of the Devs to make sure the load on the servers will not mess anything up
- Make sure only one instance of the test is running against a given endpoint at a time
TODO: Add Section about using the CLI
TODO: Add Section about getting a manual login to see how it responds under stress
- In order to run the test, you simply press play
- Clicking on "View Results Tree - Full" will show you all the results as they appear. Likewise "View Results Tree - Errors" will show all error results, and "View Results Tree - Successes" will show all success results
- There will be a number of tests that fail because of outdated UI elements and other issues. This is expected, and as long as most tests are passing it will accomplish the intended purpose which is to simulate a large load on the servers
- It may take up to 2 hours to complete, so running it at the end of the day may be a good option
Release Testing - Atlantis
All Releases are Atlantis Releases
All new users are automatically opted in as Atlantis / New Experience users. As such, all release testing must use tests tuned for Atlantis.
For each endpoint, do the following:
- Set up based on the instructions for each endpoint below
- Run AtlantisSmokeTests.playlist
- This is a suite of 14 tests, each of which should run to completion
US Prod Setup
- testSettings.json
2. Constants.cs

UK Setup
- testSettings.json
2. Constants.cs
CA Setup
- testSettings.json
2. Constants.cs
GOV Setup
- testSettings.json

2. Constants.cs
Selenium Automated UI Tests
Running Against Staging and Test Settings Description
Two Important Files
Two files control how the automated UI tests are run.
- testsettings.json
- Constants.cs
A good practice would be to open these two files in your Visual Studio IDE and pin them open.
testsettings.json
{
"testSettings": {
Change these values to modify which browser is in control
// browser variables
"testChrome": true,
"testFirefox": false,
"testEdge": false,
"testSafari": false,
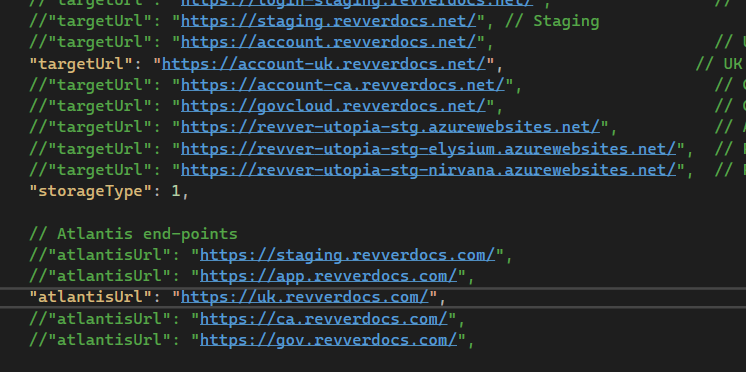
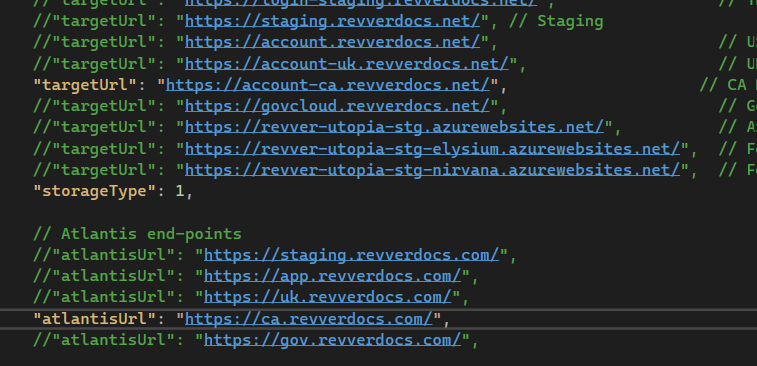
Change the endpoint for testing by modifying the comments below.
Note: 'storageType' is set to 0 for testing against a local copy of Rubex. Set 'storageType' to 1 when testing against all other endpoints.
// endpoint variables
"hubUrl": "https://hub.efilecabinet.net/",
//"targetUrl": "https://localhost:44334/",
//"storageType": 0,
"targetUrl": "https://account-staging.efilecabinet.net/",
//"targetUrl": "https://account.efilecabinet.net/",
//"targetUrl": "https://account-uk.efilecabinet.net/",
//"targetUrl": "https://account-ca.efilecabinet.net/",
//"targetUrl": "https://govcloud.efilecabinet.net/",
"storageType": 1,
For the most part, these values remain unchanged.
// file variables
"baseDownloadsPath": "C:\\ProgramData\\EFC\\downloads\\",
"baseFilePath": "C:\\ProgramData\\EFC\\automationDocs\\",
"s3Url": "https://downloads.efilecabinet.com/",
"s3BucketName": "SanitizedSampleFiles",
"s3ZipFileName": "automationDocs.zip",
"s3AccessId": "AKIA2LJW7OCU3QZIVOGD",
"s3Secret": "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",
For the most part, these values remain unchanged. Reducing the value of 'timeoutInSecs' from 45 to 30 may speed up testing (because failing tests will fail faster).
// wait time variables
"defaultFileInteractionWait": 45,
"roleSelectorSearchWaitTimeInMS": 500,
"timeoutInSecs": 45,
"workflowTimeoutInSecs": 20,
// other variables
"verificationEmailAddress": ""
}
}
Constants.cs
using System;
namespace AutomatedUITests.Configuration.SharedConstants
{
public static class Constants
{
public static TimeSpan DefaultImplicitWait { get; } = TimeSpan.FromSeconds(0.5);
public static TimeSpan SmallImplicitWait { get; } = TimeSpan.FromSeconds(1.0);
public static TimeSpan MediumImplicitWait { get; } = TimeSpan.FromSeconds(2.0);
public static TimeSpan LargeImplicitWait { get; } = TimeSpan.FromSeconds(3.0);
MaxThreadCount controls the number of tests that are run simultaneously. '2' is a good number. '3' is the maximum value to use.
HEADLESS_MODE = true; -> run a headless (invisible) browser. This results in much faster test runs.
HEADLESS_MODE = false; -> run a visible browser.
public const int MaxThreadCount = 2;
public const bool HEADLESS_MODE = false;
public const string CABINET_PREFIX = "CABINET-";
public const string DRAWER_PREFIX = "DRAWER-";
public const string FOLDER_PREFIX = "FOLDER-";
public const string FILE_PREFIX = "FILE-";
public const string ADMIN_USER_PREFIX = "ADMIN-";
public const string STANDARD_USER_PREFIX = "STANDARD-";
public const string SHARING_USER_PREFIX = "SHARING-";
public const string CUSTOM_USER_PREFIX = "CUSTOM-";
public const string GUEST_USER_PREFIX = "GUEST-";
public const string USER_SUFFIX = "@efilecabinet.com";
public const string GROUP_PREFIX = "GROUP-";
public const string PROFILE_PREFIX = "PROFILE-";
public const string TEMPLATE_PREFIX = "TEMPLATE-";
public const string SALESFORCE_PREFIX = "SALESFORCE-";
public const string MAIN_STRUCTURE_PREFIX = "MAIN-";
public const string SEARCH_STRING = "-eFile";
public const string UNIQUE_SEARCH_STRING = "-rubex";
}
}
Terminating Old Web Drivers
Any time your automation exits on an error it will leave its drivers running, and those will prevent your project from being able to build successfully.
You can terminate old drivers by opening Powershell and running the following script:
Stop-Process -Name "chromedriver" -Force
Alternatively, you can stop all chromedriver processes by opening Powershell or a Command window and typing:
taskkill /im chromedriver.exe /f
You can change "chromedriver" to whichever drivers you have been running (edgedriver, firefoxdriver, etc).
Selenium
Selenium Commands
Selectors
You can use Chrome DevTools to test selector and see if they work before putting them into your program.
- To test a potential CssSelector, open the devtools console and type $$() with your css selector in the parentheses. For example, $$("[ng-if="!node.nodeListRenaming"]")
- For xpath, do the same but instead of $$ at the beginning, do $x. For example, $x("//div[@ng-if="!node.nodeListRenaming"][contains(text(), "1.")]")
XPath
- XPath Cheat Sheet
- XPath Tester
- Keep in mind you can search the html tree using XPath using chromium browser dev tools.

- Keep in mind you can search the html tree using XPath using chromium browser dev tools.
Browser Extensions
https://dzone.com/articles/10-of-the-best-chrome-extensions-to-find-xpath-in?edition=658397
CSS
Postman API Tests
Editing the Utopia Pipeline Postman Tests
- In Postman, export the collection and replace the file located at C:\Projects\Utopia\Utopia\Postman\Tests\Regression Test and create a pull request and get the necessary approvals.
- In Postman, export the environment variable (if any changes were made, if not, no need to re-upload it) to later upload it to the Azure Pipeline Library.
*Once the new branch comes through and is approved, you'll want to then replace the environment file if needed following the steps below. If not, skip to step #3.- (Currently Royce and Quinn have this permission. If this changes, please update this document) Go to Azure DevOps Utopia Library > Secure Files (https://dev.azure.com/eFileCabinet/Utopia/_library?itemType=SecureFiles)
- Find the Utopia Regression Tests - Staging.postman_environment.json secure file and delete it. Then upload the exported file with the same name.
- Edit the pipeline and edit the "Run Postman Tests" job.
- Reselect Utopia Regression Tests - Staging.postman_environment.json in the "Secure File" field and save.
- If you need to rerun the tests that failed due to an error, You will want to edit the Release instead and then redeploy it.
- Once a Utopia Release is deployed, the pipeline will then run the postman tests automatically when Staging is released. Check for any errors in the pipeline and if there are any, you can see which ones failed by reading the report: https://internal.revverdocs.com/books/qa/page/reading-the-error-log-in-the-postman-auto-tests-in-the-pipeline
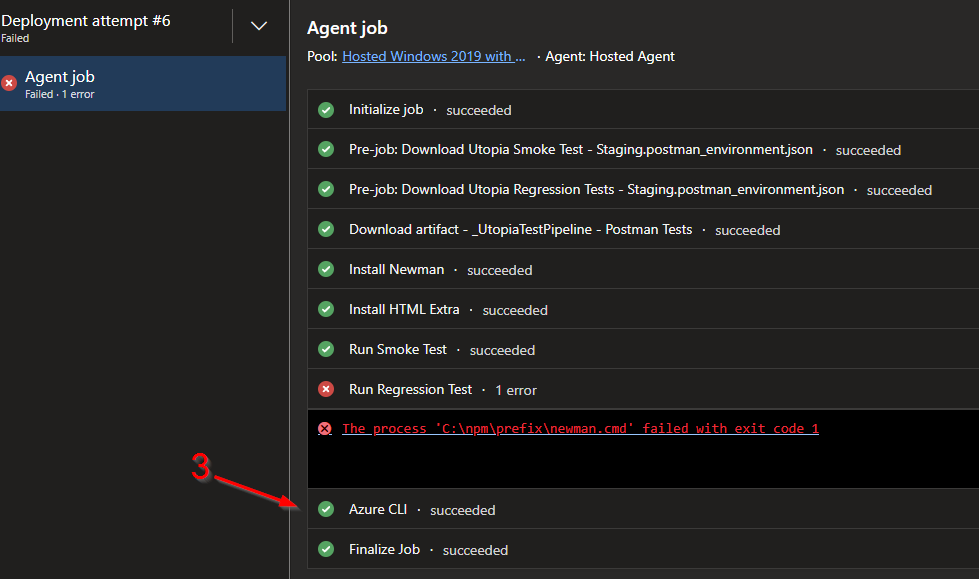
Reading the Error Log in the Postman Auto-Tests in the Pipeline
- Click on the Run Postman Tests job.
- Click on the Deployment Failed task

-
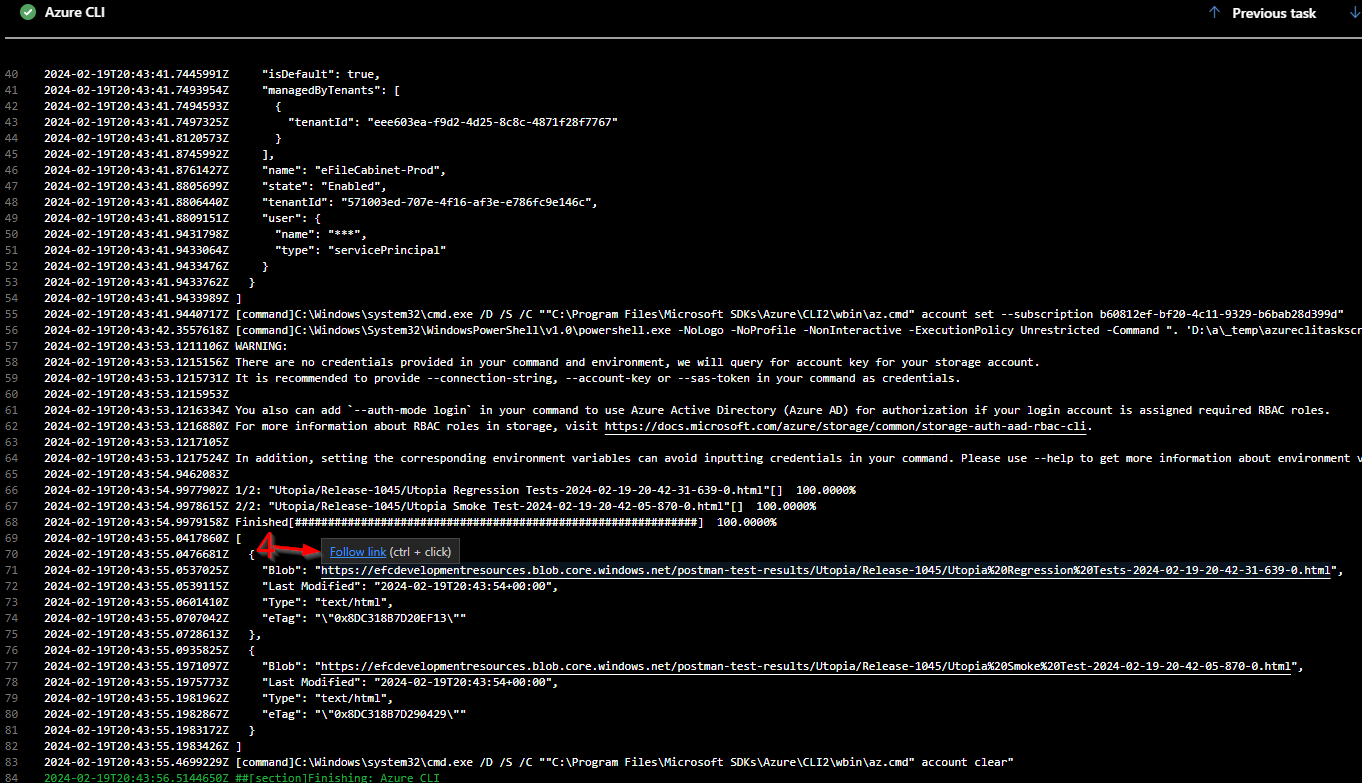
Click to open the Azure CLI step.

4. Scroll toward the bottom of the log and you'll see a Blob link for the Utopia Regression Tests. Hover over it, and a toast message will appear with a "Follow Link" option. Click it.
5. A Newman Run Dashboard page will appear with the results of each test. Click on the "Failed Tests" tab and then click on each item to see the error as to why. You may need to run these tests locally again to see why they are failing exactly and see if it is an issue with the newly released code or your tests/setup.