# Testing
# Remote Desktop Instructions
### Connecting to the QA Windows Machines (QA1-6):
- Open "Remote Desktop Connection"
- Click "Show Options"
- Computer: 10.10.0.6<remote desktop #>
- For example: "10.10.0.63" for QA 3
- The QA PC's are numbered 1 - 6
- User name: <your laptop's name>\\localadmin
- For example: AzureAD\\localadmin
- Click "Connect"
- Password: qaRocks1!
QA 1 uses different credentials:
- IP Address 10.10.0.61
- Username: Work Email
- Password: Work Email Password
Note: The new Mac is being set up and the new password is: qaRocks! (I really tried to push for the passwords to be the same, but apparently the reason it is different in the first place is the VNC Viewer requires that the password be 8 characters or less......) Also the new IP is 10.10.0.68
### Connecting to the QA Mac:
- Download and open [VNC Viewer](https://letmegooglethat.com/?q=VNC%20Viewer)
- Go to File > New Connection
- VNC Server: 10.10.0.67 (may be 10.10.0.68, depending on whether the new Mac has taken over or not)
- The old QA Mac is QA Machine [\#7](https://dev.azure.com/eFileCabinet/b3fb963c-f585-4dc2-b679-368aaf429c53/_workitems/edit/7)
- The new QA Mac is QA Machine [\#8](https://dev.azure.com/eFileCabinet/b3fb963c-f585-4dc2-b679-368aaf429c53/_workitems/edit/8)
- Name the connection something descriptive
- Go to Encryption > Prefer Off
- Prefer Off or Prefer On both work, just as long as it will allow an unencrypted connection
- Press OK
- Connect to the Connection you just created
- Password: QARocks! (qaRocks! if on QA8)
- This will bring you to the Mac's login screen
- Name: qa
- Password: QARocks!
# Email Import Instructions
*Note:* These steps will assume that setup is happening with a eFileCabinet email address that has 2-factor authentication enabled
### Email Setup
1. Login to email account in browser
2. Click Settings cog in top right corner, then "See all settings" button
3. Click on the heading "Forwarding and POP/IMAP"
4. Under the "IMAP access" section click the button next to "Enable IMAP"
5. Return to the inbox of your email and create a new label for email imports. This can be done by:
- Clicking "Create New Label" in the left hand menu at the bottom of the top section (may need to click "more" before visible)
- Opening a message in the center pane and then in the top options bar clicking "Move to" (Folder icon with an arrow) and creating a new label in the pop up menu
*Note* - Email imports act on a first come first serve basis, it is handy to create multiple import labels (Production Imports, Staging Imports, Postgres Imports, etc.) so that existing imports don't interfere with each other.
### Google Account Setup
1. Navigate to [myaccount.google.com](http://myaccount.google.com/)
2. Click "Security" in the left bar
3. In the "Signing in to Google" section, click "App passwords"
4. Follow sign in prompt
5. At the bottom of the box there will be a section to "Select app". Choose other and give it an appropriate name (e.g. Rubex Staging Import)
6. Click "Generate" button
7. A new Generate app password box will appear
8. Copy the 16 character password in the yellow box. This will be the password used when creating your import on Rubex
### Rubex Setup
#### Where to set up Import
Email imports can be set up in two locations - Admin and My Settings. Email Imports created in the Admin tab are account wide, while My Settings imports apply only to that specific user. Testing can (and should) be done separately on both of these locations.
#### Creating the Import Mapping
1. Navigate to the chosen mapping location and click the "Add New Mapping" button at the bottom of the screen.
2. Select a destination for the emails to import into. If you'd like you can create a new drawer/folder beforehand to have as a clean destination without any other items in it.
3. After selecting a destination you can now set your email settings. For this purpose you'll enter
Username / Email Address | Password | Email Server Address | Email Server Port |
---|
*yourusername*@efilecabinet.com | The 16 character password generated earlier | [imap.gmail.com](http://imap.gmail.com/) | 993 |
4. Check the "Use SSL" box and click "Test Setting"
5. If all setup has been performed correctly, a popup saying "Test Successful" will appear at the top of the screen
6. Under the email setting box, click the refresh button next to the "Email Folder Path" dropdown
7. After refreshing, choose the created label as your email source. As a suggestion, do not set your primary inbox as your source, or ALL of your emails will be imported and archived/trashed. Instead, create a separate folder in Gmail and set that as your source. That way, you can move emails there that you don't care about without impacting the more useful emails that you may receive.
8. Set your import options (Only emails, only attachments, or both)
9. Either keep imported emails with the Archive setting or have them be automatically deleted after import with Trash
10. Click Create
11. You should be returned to the previous page with your new mapping listed in the center pane
#### Importing your first emails
From your email browser window, add emails to the label that is set as your email import source. This location is periodically checked by Rubex (every 5 minutes or so) to see if emails are available to be imported.
You can verify that emails have been imported to Rubex if they are no longer listed under the label. Instead they can either be found under the label \[imap\]/Archive or in the trash depending on the setting you selected for moving imported emails.
Emails will appear in the destination location in Rubex once they have disappeared from the email label.
### Troubleshooting
If you're having issues with email imports make sure that you don't have an existing import on any environment that is importing from the same location. Emails will only import to the first environment that grabs them, they won't be duplicated. Good practice is to delete your email import mapping after you are done testing it to prevent confusion in other environments.
# Postman Instructions
**Setting up a postman request**
Setting up Postman API for the First TIme:
Go to [https://www.postman.com/downloads/](https://www.postman.com/downloads/) and download postman.
**Sending a Request:**
- Click the New Request button (looks like a +)
- You'll need to know what endpoint you are using, which are going to be located here: [http://account-staging.efilecabinet.net/api/apihelp/index.html](http://account-staging.efilecabinet.net/api/apihelp/index.html)
- Once you know what type of endpoint you are using, update the type (GET, POST, PUT, DELETE, etc...)
[](https://internal.efilecabinet.com/uploads/images/gallery/2022-11/v7lkO3PHhbrh0FPa-image.png)
- Paste the endpoint into the Request URL box and make sure to update the URL to point to the desired environment (Staging, Prod, etc...)
[](https://internal.efilecabinet.com/uploads/images/gallery/2022-11/GofBMf4GqqY0g7GQ-image.png)
- Select Body and paste the needed info into the Request Body and make sure to select the type (in this case it is raw JSON)
[](https://internal.efilecabinet.com/uploads/images/gallery/2022-11/Riq0zBOaPItTmLEH-image.png)
- Click Authorization
- Select Bearer Token
- Add a valid Token into the field
- The quickest way to grab an access token is to log in to the desired environment (Staging in this example)
- Open the dev tools and select Network -> Configuration and you'll find the Bearer token:
[](https://internal.efilecabinet.com/uploads/images/gallery/2022-11/E1IJefMmRKiYXesh-image.png)
- Click Send
- Check the Response that will display at the bottom of Postman
- There are two main areas to ckeck, the Status and the Body. Those will give you all the info about the request you just sent:
[](https://internal.efilecabinet.com/uploads/images/gallery/2022-11/vVPWL7uFFszsOtvR-image.png)
- Be sure to check the responses in [http://account-staging.efilecabinet.net/api/apihelp/index.html](http://account-staging.efilecabinet.net/api/apihelp/index.html) to validate that what response you are seeing is what is expected
- For each new test, you can click the three dots next to your collection or right-click it and add a request.
\*You can save your requests and add comments for future reference and when re-running the tests during releases.
# NYL Postman API Testing Setup & Tests
### AgentTermination Request Test
\* These tests require an authorization token. Please refer to the [general Postman API instructions ](https://internal.efilecabinet.com/books/qa/page/postman-instructions)if needed.
\*\*If testing in Staging, use [Azure Portal NYL Interceptor page](https://portal.azure.com/#@efilecabinet.com/resource/subscriptions/fe1ed8a0-c732-4d02-ba86-c94b8f01b5ce/resourceGroups/NYL-Interceptor-stg-rg/providers/Microsoft.Web/sites/NYLInterceptor-stg/configuration) to change the values.
1. It is preferred to test with an account that is set up like NYL from the hub (Ask Peter, Michael or Royce for assistance)
2. Elastic Search needs to be running.
3. Run the NYL Interceptor in Visual Studio and Utopia (Atlantis will replace Utopia eventually)
4. Add 3 profile items called NYLID, Marketer ID, and Worker-Type and add them to a profile.
5. The folder structure needs to be set up with a drawer of agents from a certain region, then a folder with the agent's name, and two subfolders of Clients and Prospects.

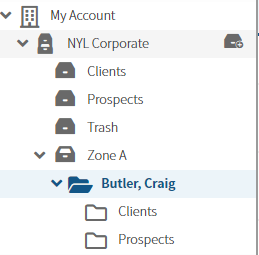
6. Set up or edit a user and add the new profile and add in a number to both Marketer and NYL ID's (my example is 98765)
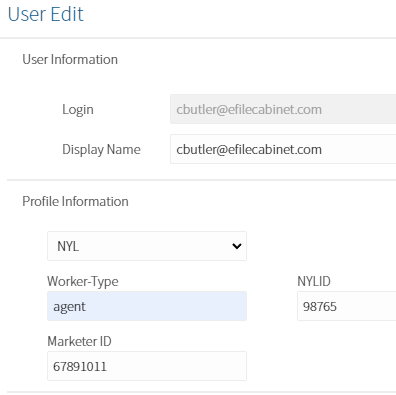
[](https://internal.efilecabinet.com/uploads/images/gallery/2023-04/AgeeKChJjvyR4Vzd-image.png)
7. You will need the following database ID's:
- Account ID: Find it in User Sessions URL
- Profile Items ID's for Marketer ID: found in the URL of the profile item itself
- NYLID: found in the URL of the profile item itself
8. When an agent terminates from their system, they will emails us a marketer ID and email address. If they exist, it will locate the Marketer ID, then sets a purge governance 6 months from now on the agent's folder itself and applies to that item only.
9. In Visual Studio, open the local.settings.json and change the marketer ID and NYL ID to the ID's for your profile items.
10. Also change the environment URL if needed. I tested in local so I changed it to my local environment (only applicable in my environment):
"EnvironmentURL": "[https://localhost:44334/](https://localhost:44334/)",
"MarketerId": 397,
"NYLId": 395
11. Go to Postman API, and if needed, import the NYL Collection.json (Craig and Peter have copies or it can be found in a test plan ---Link coming soon)
12. Go to the Agent Termination folder, and test in the appropriate environment.
13. TBoth Marketer ID and NYL ID can be tested. For now, we will test with NYL ID. The NYL ID number you enter is not the DB ID obtained in step #6, it is the value you entered in the profile item itself in step # 5.

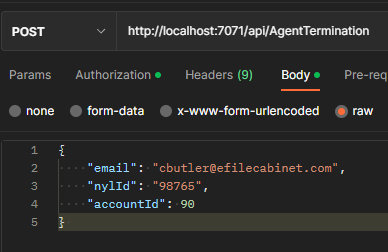
14. Send the request
15. Make sure status 200 is good is returned.
16. Make sure the response says something like this:
[](https://internal.efilecabinet.com/uploads/images/gallery/2023-04/A4gPuexCOzH6GzaJ-image.png)
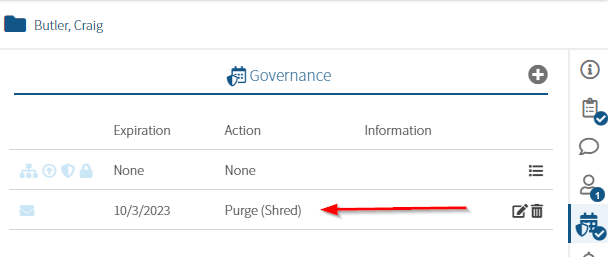
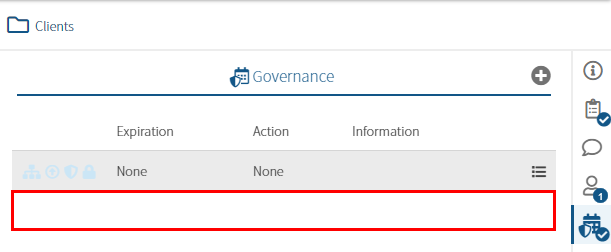
17. Return to Rubex and verify that a 6 month purge governance exists on the folder of the agent's name and applies to this item only.
[](https://internal.efilecabinet.com/uploads/images/gallery/2023-04/ohkMyenF9sVhKIcb-image.png)
18. Make sure that the subfolders and files are not inheriting the profile value. The Clients and Prospects folders should only have the existing NYL governance (if you have an NYL type of account created from the hub)
[](https://internal.efilecabinet.com/uploads/images/gallery/2023-04/0DiQXpADLqDB4OPn-image.png)
### Undo - AgentTermination Request Test
1. Copy the body from the AgentTermination request and paste into the Undo - AgentTermination Request
2. Send the request.
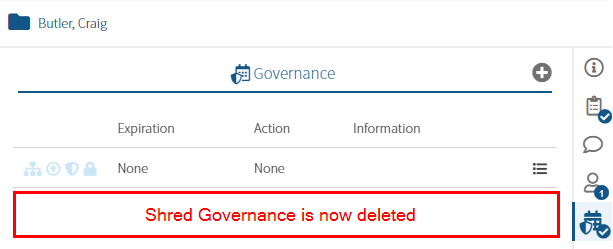
3. Open Rubex, and check the governance on the agent's name folder that you previously ran a termination request again.
4. The 6 Month Purge Governance should be deleted
[](https://internal.efilecabinet.com/uploads/images/gallery/2023-04/jem7BEYe4nZ0bLMq-image.png)
### CreateMissing Request Test
1. Open Visual Studio and run the NYL Interceptor and Utopia (if running locally)
2. The .json template mentioned at the beginning of this article should include a folder called "CreateMissing" with three POST tests for Local, Staging and Production.
3. Choose the environment that you are testing.
4. Update or add the Authorization token to the test.
5. Post the following Body text below and update the accountId at the beginning and end with yours (found in Rubex - User Sessions) and update the userName and name and send the request. It will create a new user with those details in Rubex and will assign them as a full license user with these custom permissions:[](https://internal.efilecabinet.com/uploads/images/gallery/2023-04/aQR8FBxtxLNEscua-image.png)
**BODY TEST:**[
{
"batchObject": {
"roleType": "2",
"accountID": 90,
"userName": "cbutler+NYLMAN@efilecabinet.com",
"name": "IgnoreMe NYL MAN (cbutler+NYLMAN@efilecabinet.com)",
"systemPermissions": {
"users": {
"enabled": false
},
"guests": {
"enabled": false
},
"groups": {
"enabled": false
},
"profiles": {
"enabled": false
},
"nodeManagement": {
"enabled": false
},
"templates": {
"enabled": false
},
"systemSettings": {
"enabled": false
},
"nodePermissionOverride": {
"enabled": false
},
"licenseManagement": {
"enabled": false
},
"retentionAdmin": {
"enabled": false
},
"nodeExchange": {
"enabled": true
},
"nodeExchangeManagement": {
"enabled": false
},
"salesForceManagement": {
"enabled": false
},
"workflow": {
"enabled": false
},
"workflowManagement": {
"enabled": false
},
"auditLogManagement": {
"enabled": false
},
"retentionUnlock": {
"enabled": false
},
"eSignatureManagement": {
"enabled": false
},
"eSignature": {
"enabled": false
},
"accessLinksManagement": {
"enabled": false
},
"accessLinksUsage": {
"enabled": false
},
"reporting": {
"enabled": false
},
"accountID": 90
}
}
}
]