Automation
- InitialInstanceSettings.txt
- Troubleshooting Automated UI Tests
- Automated Test Help (In Progress)
- Selector Conventions (data-id-xxx)
- XPATH
- Running Automated Testing Locally
- Automated UI Test Code Layout
- Cloning Utopia
- JMeter Load Testing Tutorial
- Release Testing - Atlantis
InitialInstanceSettings.txt
INSERT INTO "public"."DbInstanceSettings" ("SettingType", "SettingValue")
VALUES
(2, '0'),
(9, 'True'),
(12, '5'),
(13, '5'),
(14, '1'),
(15, '10'),
(38, '60'),
(39, 'http://127.0.0.1:9200'),
(62, '100'),
(63, '8'),
(64, '5000'),
(65, '5'),
(66, '100'),
(67, '8'),
(68, '1'),
(69, '1'),
(70, '1'),
(71, '1'),
(72, '1'),
(73, '1'),
(74, '00:10:00'),
(75, '4'),
(76, '5000'),
(77, '100'),
(78, '50'),
(79, 'EFileCabinet'),
(82, 'C:\\GdPicture.NET 14\\Redist\\OCR'),
(84, '4'),
(85, '100'),
(86, '50'),
(87, '/PreviewProxy'),
(88, '1500000'),
(89, '2'),
(90, '5000'),
(91, '2'),
(92, '2'),
(95, 'https://s3.amazonaws.com'),
(96, '600'),
(97, '2'),
(98, 'false'),
(99, ''),
(100, 'http://localhost:55512/'),
(102, 'AllDay'),
(103, ''),
(104, ''),
(105, ''),
(106, 'True');
Troubleshooting Automated UI Tests
Problems with running the Automated UI Tests?
Running the C# tests can be tricky, so this is a guide to help you out if you run into a common error. NOTE: These solutions will only work if you can at least build Utopia. If you cannot build Utopia, try reaching out to Dev via Royce or Quinn, and they will schedule time between you and one of the Devs to resolve the issue. You could also try reviewing the videos about setting up Utopia. In them, several common build errors are discussed and resolved.
First, verify that your testSettings.Json (found in the AutomatedUITests Project) is pointing to the proper build.

Check the section titled // endpoint variables and make sure the correct variables are active (not commented out). It will be pointing to staging by default (i.e. after you pull from main).

-
Local:
"targetUrl": "https://localhost:44334/","storageType": 0, -
Staging:
"targetUrl": "https://account-staging.efilecabinet.net/","storageType": 1,
NOTE: Testing against any other environment will follow the same pattern
Running against local
Many common issues happen when running against local. However, they are usually simple to fix.
- Verify that Azure Storage Emulator is running. To do so, type in the search box on your machine's taskbar
Azure Storage Emulator.

Open the Microsoft Azure Storage Emulator app that comes up. You should see a command prompt window come up saying it's starting the Azure Storage Emulator (or that it was already running).

- Verify that you have the latest Utopia code and UtopiaAutomation code pulled from master. To do this, you need to open Git Changes in Visual Studio, and then you need to fetch and pull. To fetch, click the dotted down arrow. To pull, click the solid down arrow with a horizontal line below it. Fetching will grab the latest commits from Azure DevOps, and pulling will actually merge those commits into your local copy of the master branch. Also, make sure that you're for sure on the master branch by verifying the branch dropdown selector says master. Do this on both the Utopia solution and the UtopiaAutomation solution.

If you're working on your own branch, then a good idea would be to switch to master, fetch and pull, and then switch back to your branch and merge the newly updated master into your branch. If you find you're in this scenario, please feel free to reach out to Dev with any questions.
-
Verify that you have Utopia running via a separate Visual Studio window (you should see Rubex pop up in a Chrome window with the url of
https://localhost:44334/). -
Verify that your database is up to date. To do this, go to the Visual Studio window where you have the Utopia solution open. Find the DbMigratorEF project and right click on it. Select the option to "Set As Startup Project"

Once you have done this press the green play button at the top. This should bring up a window like this:

Go ahead and press enter. This will apply any database migrations that have happened since you updated last. It will print out the latest DB update state whether it needed to update or not, then you can close the window. If you run into errors with this, read on to the section below.
NOTE: Remember to set the startup project back to Utopia when you want to run it again.
Fixing Your Database
Sometimes your database gets into an unexpected state, or it was never configured properly to begin with. Here are the steps to flush it out.
First, let's double check you don't have any Rubex Private Cloud services interfering with your local environment. Open up the Task Manager. Go to the Services tab, and scroll down to anything that says eFileCabinet (the results are alphabetized by default). If you've ever run the Rubex Private Cloud installer on your machine, you'll see the following services:

Please make sure they're all set to stopped. If you've never tested Rubex Private Cloud, it still may be a good idea to double check these services either don't exist or are set to stopped.
One more thing to check dealing with Rubex Private Cloud is the C:/ProgramData/EFC/Configuration folder. If that folder exists, please delete it (or move it to a different location if you want to save its contents for later testing). Okay, now on to double check out database itself.
Open up pgAdmin, and open Databases.

As you see in the image above, I have only one database, and its name is postgres. That is the database we use locally.
We used to use UtopiaDB as the name of the database. If you have UtopiaDB please right click it and click delete/drop.
If you have errors deleting/dropping UtopiaDB, first make sure all query tabs accessing it are closed. If that doesn't work, then sadly you will need to restart your computer and try again.
Once you've verified that you only have postgres, open it up and you'll see Schemas, which should contain both public and workflow.

If you don't have a workflow schema, then your database isn't yet configured and we will need to run the DbMigratorEF. If inside of your public schema under Tables you don't have any tables, you'll also need to run the DbMigratorEF. Refer to Step 4 under "Running Against Local" above for instructions on how to do this.
Go back to pgAdmin and open the DbInstanceSettings table in the public schema of the postgres database. On that table right click, hover over View/Edit Data and click All Rows. If there is nothing there, please run this script: Initial Instance Settings.txt.
Then run the DB Instance Settings Local Config script from the root of the Utopia source code directory. If you open the table and the first two rows have settings types 2 and 9, then you haven't run the second script. So please run DB Instance Settings Local Config.
Other Errors
OneTimeSetup: System Exception: An error occurred while creating accounts

This error can mean a myriad of things. If you have checked all of the above, then the issue will likely need to be addressed with the Dev team, as it is probably an error in how the UtopiaAutomation code is hooking up to the Utopia code, and not anything to do with the tests themselves.
System.UnauthorizedAccessException : Access to the path '1.7GBvid.mp4' is denied
This error is because you don't have admin permissions on the Windows directory where you cloned the source code. It is strongly recommended that you clone the source code into the following directory: C:/src/Utopia. Possible solutions to this error:
- If your source code is not cloned to
C:/src/Utopia, please promptly move it there and try again. - Make sure your windows user has admin permissions to
C:/ProgramData/EFC. ProgramData is a hidden folder, so if you don't see it on the C drive in File Explorer, make sure you have hidden items marked as visible.
Unable to connect to web server "IIS Express"
I encountered this after updating Visual Studio. I went into ...\source\repos\Utopia\Utopia\.vs\Utopia\config\ and deleted the applicationhost.config file and restarted Visual Studio.
I got this fix from this Stack Overflow post, so if the fix doesn't work for you, there may be more detail here: https://stackoverflow.com/questions/35675747/asp-net-5-mvc-unable-to-connect-to-web-server-iis-express
Chromedriver / NuGet
If you get an error regarding Chromedriver, such as:
OneTimeSetUp: System.AggregateException : One or more errors occurred. (session not created: This version of ChromeDriver only supports Chrome version 96
Current browser version is 98.0.4758.82 with binary path C:\Program Files\Google\Chrome\Application\chrome.exe (SessionNotCreated))
  ----> System.InvalidOperationException : session not created: This version of ChromeDriver only supports Chrome version 96
Current browser version is 98.0.4758.82 with binary path C:\Program Files\Google\Chrome\Application\chrome.exe (SessionNotCreated)
or:
Chromedriver.exe is being used by another process
Then what you need to do is kill any currently running Chromedriver processes, and in the case of the first error, then update the Chromedriver.
To kill Chromedriver, in a Linux-like terminal such as Git Bash, run taskkill -im chromedriver.exe -f, or in Command Prompt run taskkill /F /IM chromedriver.exe, or find Chromedriver in your Task Manager and end the task that way.
To update Chromedriver, in Visual Studio go to Project > Manage NuGet Packages. Go to the Update tab, find the Selenium Chromedriver and update it. This should solve the error.
A Living Document
Please add new errors as they come up along with your discovered resolutions. The goal of this document is to avoid having to remember a long list of remedies.
Automated Test Help (In Progress)
[TOC]
Link to Remote QA machine login wiki
testSettings.json
To change the URL endpoint to be tested:
Go to testSettings.json
Lines 10 through 19 include all of the endpoints
Uncomment line 19: storageType : 1 - this will use cloud storage
Comment out line 13, if needed. storageType: 0 - this is used only for local storage when running locally
Uncomment the line with the desired endpoint - “targetUrl”: “https:// . . .”
Comment out the lines with the other endpoints
Adjusting Runtime Parameters
Timeout
In testSettings.json Line 33 is “timeoutInSec” : nn - We have found that running a timeout of 45 seconds works best
Parallel Threads
Constants.cs Line 12 - MaxThreadCount = n Set this value to 1, 2, or 3. In many cases, a value of ‘2’ works best.
Headless Mode
Line 13 - HEADLESS_MODE = true/false true for headless mode - the tests will run faster false for non-headless mode - the tests run a bit slower but you can watch the execution
testSettings.json

constants.cs

Troubleshooting
Selector Conventions (data-id-xxx)
Data-id-xxx Naming Conventions
- The data-id-xxx needs to be properly 'scoped'
- Use data-id-
scope
Scopes
- center
- profile
- user
- group
- etc
Selector Naming Conventions
- Be as brief and descriptive as possible while avoiding name collision
- Selectors will still be contained in separate areas, which will mitigate name collisions
- Some selectors will still require a passed in parameter => ex:
nodeName
[elemType abbrev][name] => ex: chkProfileItemIsRequireddata-id='[elemName]' => ex: data-id='chkProfileItemIsRequired'
Element Type Abbreviations
Style guide
All Selectors
- Declare as static (unless there is a reason not to)
- Use
=>notation instead of an assignment (i.e.=) - Use
By.XPath(), notBy.Css() - Use double quotes outside, single quotes inside (instead of escaped double quotes)
Parameterized Selectors
- Use string interpolation (i.e
$"My name is {firstName}."instead of"My name is " + firstName + ".") - Use a normal function definition (i.e
By Selector(firstName) => ...instead ofFunc<string, By> Selector => (firstName) => ...)
Examples
Do
private static By SignInButtonSelector => By.XPath("//*[contains(@data-id-login, 'btnSignIn')]");
public static By ContextMenuOptionSelector(string option) => By.XPath($"//*[contains(@data-id-workflow, 'btnContextMenuOption')][contains(text(), '{option}')]");
Don't
private By SignInButtonSelector = By.Css("[data-id-login=\"btnSignIn\"]");
public Func<string, By> ContextMenuOptionSelector => (string option) => By.XPath("//*[contains(@data-id-workflow, 'btnContextMenuOption')][contains(text(), '" + option + "')]");
XPATH
Running Automated Testing Locally
Step 1
- Clone Utopia to your local device (either with Tortoise GIT or through Visual Studio)
- Clone UtopiaAutomation to your local device (either with Tortoise GIT or through Visual Studio)
Step 2
- Open two instances of Visual Studio, one with the Utopia.sln solution, and the other with UtopiaAutomation.sln
Step 3
- Run the Microsoft Azure Storage Emulator which is located on your laptop.
Step 4
- In the Utopia.sln, right click Utopia then select "Set as Start Up Project"
- 'Utopia' will be selected in Visual Studio's project pulldown, and 'IIS Express' will be showing in Visual Studio's run pulldown
- Click on the green arrow next to 'IIS Express'
- Rubex will start running on localhost in a new browser instance
- Note: If you do not see the pulldown objects listed above go to View/Toolbars/ and click on 'Standard'
Step 5
- In testSettings.json (located in the VS instance with UtopiaAutomation.sln), locate the lines that control the end-point to be tested. Simply uncomment the lines associated with the end-point you want to test. To test locally:
- Uncomment the line "targetUrl": "https://localhost:44334/ ",
- Uncomment the line "storageType": 0,
- Comment all of the other lines with end-points
- Comment the line "storageType": 1,
- Finally, you can now run Automated Tests against your local instance of Rubex by taking the second instance of Visual Studio with UtopiaAutomation.sln and finding the Test Explorer then running any test by hitting play within the Test Explorer
Troubleshooting
- On occasion the Rubex database includes changes which need to be applied to your local storage. You will know this because an error message will be displayed when attempting to run Rubex or a test. Apply the changes by running DbMigratorEF.
- Select DbMigratorEF from the project pulldown
- Click the green start arrow
- A Windows command window will pop up showing progress
- When prompted, hit the Enter key to update to the latest database
- Close the window
- Select Utopia from the project pulldown and relaunch IIS Express
Automated UI Test Code Layout
Cloning Utopia
- Open Visual Studio
- At the top left of the window, click 'Git' then 'Clone Repository'
- Copy the URL below and paste it in the window under 'Repository location'
- For the directory, browse to C:\Users\<your user>\source\repos (should be the default)
- Press 'Clone' in the bottom right, and the clone will start
- It may take some time, so be prepared to wait
JMeter Load Testing Tutorial
For more in depth information on load testing written by the devs: Load Testing
Download JMeter
- Go to https://jmeter.apache.org/download_jmeter.cgi
- Download the .zip file for the current version of JMeter under "Binaries"
- Extract and move the resulting apache-jmeter-5.4.1 (or whatever is the current version) folder somewhere you can find it again easily, you will need to access it
Starting JMeter
- Go to the JMeter folder > bin > jmeter.bat (make sure the file type is a Windows Batch File)
- The JMeter batch file will start a script which will start the JMeter application
-- Note: You can start multiple instances of JMeter if desired
Download JMeter Plugin Manager
- Go to https://jmeter-plugins.org/install/Install/
- Download plugins-manager.jar and put it into lib/ext directory in the JMeter folder
- In order to see the Plugin Manager, restart JMeter and go to Options > Plugins Manager
Open ThroughputStressTest
Before doing this step, you should have Utopia cloned to your machine.
- In JMeter, click File > Open
- Browse to the Utopia base folder > Utopia Testing > Tests > LoadTests > ThroughputStressTest.jmx
- If you have the Plugin Manager installed correctly, it will ask if you want to install the plugins needed
Change Settings
- Click on "User Defined Variables" in the left pane
- Change BASE_URL_1 to whichever url you are testing against (i.e. - account-staging.efilecabinet.net )
- Change SOURCE_RESOURCE_PATH to point to wherever Resources\Test Data\CSV is on your machine
- For example: C:\Users\JoshReese\source\repos\Utopia\UtopiaTesting\Resources\Test Data\CSV
- You can also create your own .csv file of users to use and point to that
- Change USER_THREAD_COUNT to the number of concurrent users you want to test
- 3 for a smaller test
- No more than 500 for a larger test because there are only 500 test accounts in the .csv
- Expand the "User Specific Setup" section
- Click on "BrowserAuthentication_Authenticate_Execute-Setup"
- Change the "0" after "authenticationRequestType" to "1"
- Click on "BrowserAuthentication_Authenticate_Execute-Setup"
Running the Test
Before you run the tests:
- Check with James or one of the Devs to make sure the load on the servers will not mess anything up
- Make sure only one instance of the test is running against a given endpoint at a time
TODO: Add Section about using the CLI
TODO: Add Section about getting a manual login to see how it responds under stress
- In order to run the test, you simply press play
- Clicking on "View Results Tree - Full" will show you all the results as they appear. Likewise "View Results Tree - Errors" will show all error results, and "View Results Tree - Successes" will show all success results
- There will be a number of tests that fail because of outdated UI elements and other issues. This is expected, and as long as most tests are passing it will accomplish the intended purpose which is to simulate a large load on the servers
- It may take up to 2 hours to complete, so running it at the end of the day may be a good option
Release Testing - Atlantis
All Releases are Atlantis Releases
All new users are automatically opted in as Atlantis / New Experience users. As such, all release testing must use tests tuned for Atlantis.
For each endpoint, do the following:
- Set up based on the instructions for each endpoint below
- Run AtlantisSmokeTests.playlist
- This is a suite of 14 tests, each of which should run to completion
US Prod Setup
- testSettings.json
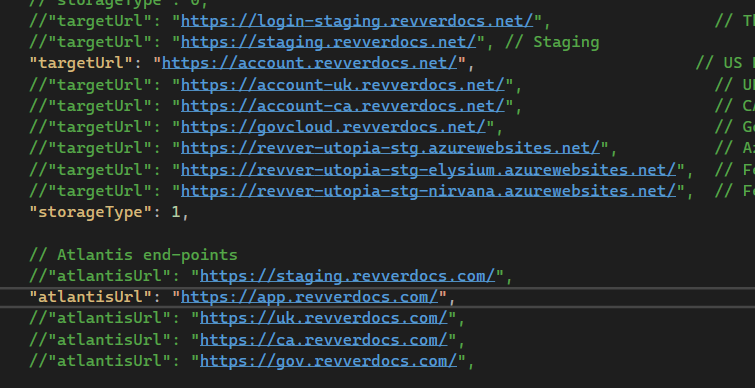
2. Constants.cs

UK Setup
- testSettings.json
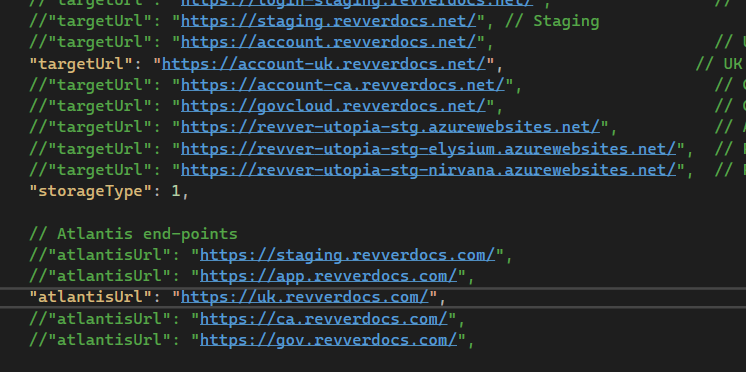
2. Constants.cs
CA Setup
- testSettings.json
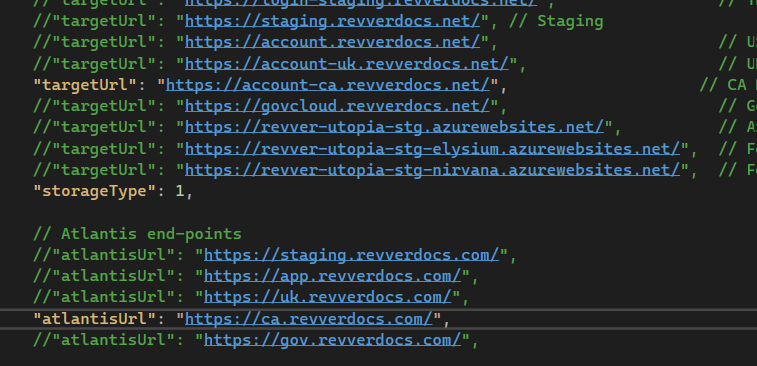
2. Constants.cs
GOV Setup
- testSettings.json

2. Constants.cs