Utopia
- Windows File Encryption
- Open Source Software List
- First Time Setup - Utopia (Work in Progress)
- Utopia Articles of Permissions (2020)
- Utopia Architecture Notes (2020) Has Changed
- File OCR Worker debugging (2021)
- Utopia Bundle Installer build instruction
- Azure Active Directory SAML Configuration (2020)
- OneLogin SAML SSO Configuration
- Okta SAML SSO Configuration
- Entity Framework Code First
- Code First Training Video
- Entity Framework Optimizations
- Adding a new Email Type
- Utopia External Login Instructions and Options
- Test Against Production Read Replica
- How to run local Utopia over LAN/connect from outside network
- How to create a new user license type
- Concurrent Licenses
Windows File Encryption
Decryption
- download PSTools from: https://docs.microsoft.com/en-us/sysinternals/downloads/psexec
- This can be used to run commands as the SYSTEM user
- You need to do this to decrypt the database data files / elastic search data files
- Cmmand to decrypt folder and all contents as system user:
PsExec.exe -i -s cipher /d /s"fullPathToFolder"(documentation for the cipher command can be found here
Open Source Software List
Correct as of 8/23/2021
Server-Side: ElasticSearch, Postgresql, iTextSharp - LGPL, MailKit, BouncyCastle, AutoMapper, DeviceId, dotLess.Core, FluentValidation, .Net 5, MimeTypes, NUglify, Chutzpah, Ninject, Serilog, Swashbuckle, SkiaSharp, OpenIddict, StackExchange.Redis, LigerShark.WebOptimizer
Client-Side: AngularJS, Angular-UI (various sub-libraries), Font-Awesome, Bootstrap, ngDialog, daterangepicker, Cytoscape, jasmine, jquery, less, lodash, moment.js, signalr, split.js
First Time Setup - Utopia (Work in Progress)
Step 1: Postgresql
- download and install the latest version of postgres from https://www.enterprisedb.com/downloads/postgres-postgresql-downloads
- use the password 'pass@word1' if you don't want to have to change config settings every time you work on the Utopia project
- pgAdmin should be installed with postgresql, and it is a useful to to have on hand to monitor and access you postgres db
- no need to install stack builder
After install is complete - Run the DbMigratorEF and update to latest migration
Apply the "DB InstanceSettings Local Config.sql" file to the local db - this is found in the top level folder inside the Utopia repo
Step 2: Install Elastic Search
ElasticSearch Installer In Rubex
ElasticSearch Direct Download
Step 3: Install Azure Storage Emulator
Step 4: Run the UtopiaBatchWorker to pull down local accounts
Utopia Articles of Permissions (2020)
Utopia Articles of Permissions
This file is to explain the over-arching permissions strategy
Node Permissions
-
Every node inherits it's permission set from it's parent by default.
-
a. A node's permission set consists of accumulating all permissions on and above the given node.
b. The permission set requires that the roles be unique. (One permission per role in the permission set collection)
c. In the case that more than one permission per role is found, (e.g. group has a permission on the cabinet and a different permission on the drawer) the closest permission is taken for evaluation.
-
Only member/personal roles can have the override/enforce permission.
-
The Override/Enforce permission, when checked on a member/personal role, results in all other permissions being ignored for evaluation.
a. If multiple permissions are found with override checked, the nearest permission is choosen for evaluation.
-
Pushdown is an action offered when a permission is added, updated, or removed.
a. When taken, it removes all permissions on descendants that have a matching role.
System Permissions
- These are permissions for a specific role to access certain system features. (e.g. workflow, manage users, recycle bin, etc.)
- A particular users' total system permission set consists of any system permissions assigned to their personal role, or any roles they are a member of.
Non-Inheritable (Only this item) Behavior
Expected behavior for various parent folder with inheritable permission and a sub folder w/ non-inheritance(Only this item) relationships.
Vocabulary:
Parent = Parent with inheritable permissions
Child = Child with NotInerhitable(Only this item) permission
RWD = Permissions (Read/Write/Delete)
Behaviors:
E = Edit/Rename Child
D = Delete Child
V = View Children of Child
C = Create folder or Upload File into Child
L = Delete children of Child
| No Parent Permissions | Parent-R | Parent-RW | Parent-RWD | |
|---|---|---|---|---|
| Child-R | V | VC | VCL | |
| Child-RW | E | EV | EVC | EVCL |
| Child-RWD | ED | EDV | EDVC | EDVCL |
Utopia Architecture Notes (2020) Has Changed

Download link: Utopia Architecture Notes.docx
DataAccess Notes
- Contains DB entities
- Method Classes
- Used for uniform retrieval of data from the database that doesn't require knowledge of business rules
- Used by BusinessLogic to compous various, reusable IQueryables to get informationit needs for a given operation
- Used for updating in case of additional database specific work. i.e. When adding a DbNode, it sets the CreatedOn and ModifiedOn values prior to adding them to the DbContext
- The primary goals for the Method classes in DataAccess are to make Get, Add, Update, and Delete reusable and abstract so any change to the Database layer (i.e. going to NoSQL) will require far less work
- Contains common extension methods for any of the DB entities
- Contains any classes that are required to do optimized batch queries (i.e. Retrieving permissions by NodeID, although this could probably be converted to some form of IGrouping in the future)
BusinessLogic Notes
-
Contains all Business Logic
-
Split into three layers: BaseLogic, Logic, FacadeLogic
BaseLogic Layer
- Used for sharing reusable logic
- Getting permissions for nodes for NodeLogic operations
- Used for intercommunication between logics
- Think Validation operations
- These logics act as parent objects for their corresponding Logic layer counterparts. This allows logic that needs to be reused in both the Logic and Base Logic layers to be a part of that logic only.
- For example: A method in NodeBaseLogic is marked as private, enabling it's use by NodeLogic due to NodeLogic inheriting from NodeBaseLogic. This ensures that the method can only be used from these two classes.
- This layer is up for debate.
- We have also considered a Logic Components section that contains the reusable logic, as well as a Validation section that contains all the logic required for validation in a formal format (most cross-logic communication occurs due to validation requirements).
Logic Layer
- Primary layer containing most logic
- There is no cross-communication between the Logics
- Utilizes Base Logics for reusable logic
- Utilizes DataAccess Methods for DB interactions as much as possible
- Should avoid accessing the DbContext directly, where possible
FacadeLogic Layer
- Used primarily by External Node Providers
- A transparent layer to whatever wishes to support external Node Providers (Google Drive, OneDrive, etc.)
- Does no other logic than getting the correct provider for the given ID/Operation
- Bypassed by any operation that is not supported for external providers
- Currently everything except Node Operations, File Download Operations, and File Upload Operations bypasses this layer and goes directly to the Logic layer
- Used for sharing reusable logic
EventSystem Notes
- Lives in BusinessLogic
- Consists of 3 parts: Events, Listeners, EventManager
- Any call to the EventManager, regardless of location, will initialize the Manager and invoke all BusinessLogic level listeners. This allows for Audit Logging, EventTrigger Servicing, Notification Creation, and other "reactions" to system events to occur transparently
- Events are handled Asynchronously to allow original requests to process as quickly as possible while another thread handles all "reactions"
- Listeners can be hooked up from upper layers
- i.e. SignalR on the App Server
UtopiaSharedClass Notes
Security
File OCR Worker debugging (2021)
This is the instruction how to debug OCR worker.
a. If you no need to use FREngine
- In Program.cs comment row `FREngineOCRWorker.Initialize(Configuration);
- Put breakpoints
- Run File OCR Worker in Debug mode
b. If you need to use FREngine
- FREngine can't initialize correctly if you trying to run File OCR Worker in debug mode, so DO NOT PUT BREAKPOINTS AND DO NOT RUN IT IN DEBUG MODE. For debugging purposes you can print debug information in logs and analyze it.
Utopia Bundle Installer build instruction
- Build all components which should be included into installer
1a. If PrizmDoc should be included, PrizmInstaller project should be built as well. Do not forget to specify PrizmServer license key into the Strings resource of PrizmInstaller.
1b. If ElasticSearch should be included, UtopiaSearchServiceWrapper project should be built as well
NOTE: For build installer locally you need to make sure that each project that is going to be installed as a component, that in the appsettings.json both the "RunAsService" needs to be true and the ConnectionString needs to be updated/accurate to their DB (or Utopia)
- Open Utopia installer project and navigate to appsettings.json file
- Specify all components which should be included into installer in this configuration file. By default it contains configuration for including all Utopia componets, but it can be easily changed. If some component should be excluded from installer, it just should be removed from Components section in appsettings.json. This is the appsettings.json structure:
  "BundleTargetDirectory": "[ProgramFilesFolder]eFileCabinet",- Default installation directory for bundle
  "ProjectTargetDirectory": "%ProgramFiles%\\eFileCabinet",   - Default installation directory for msi
  "BundleName": "Utopia Bundle",                              - Bundle name
  "BundleVersion": "1.0.0",                                   - Bundle version
  "ProjectName": "Utopia Solution",                           - Installer name (will be included into bundle)
  "Components": [                                             - List of components
    {
      "Identifier": "ce279e3c-8c3e-469c-9454-6f4b9035eae8",   - Unique component identifier (GUID), it is used by windows to detect if this component already installed.
      "SourceDirectory": "..\\..\\pgsql",                     - Root directory with component's files
      "ApplicationFolder": "eFileCabinetDatabaseService",     - Target component directory in installation path
      "ServiceName": "eFileCabinet Database Service",         - Feature / Service name
      "Required": true,                                       - Required for installation
      "IncludeIntoBundle" : true,                             - If true then msi will be included into the bundle
      "AfterInstall": {                                       - After install block
        "DirectoryForCheck": "data",                          - If this directory DOESN'T exist, after install actions will be executed
        "Actions": [                                          - After install actions
          {
            "File": "bin\\initdb.exe",                        - File to execute
            "Arguments": "-D ../data -U postgres -A trust",   - Execution arguments
            "WaitForExit": true                               - Sync or async execution (in current example - sync),
            "Local": true                                     - if true then full installation path will be added to the file
          }
        ]
      },
      "BeforeUninstall": {                                    - Before Uninstall block
        "Actions": [
          {
            "Local": false,
            "File": "cmd.exe",
            "Arguments": "/C \"net.exe stop ^\"eFileCabinet Database Service^\"\"",
            "WaitForExit": true
          },
          {
            "Local": false,
            "File": "cmd.exe",
            "Arguments": "/C \"sc.exe delete ^\"eFileCabinet Database Service^\"\"",
            "WaitForExit": true
          }
        ]
      }
      "DependsOn": [                                           - List of required for installation components. It WILL NOT be displayed in Feature select list
        {
          "SourceDirectory": "..\\..\\Prizm",                  - Root directory with component's files
          "ApplicationFolder": "PrizmDoc",                     - Target component directory in installation
          "AfterInstall": {                                    - After install block
            "DirectoryForCheck": "PrizmServer",                - If this directory DOESN'T exist, after install actions will be executed
            "Actions": [
              {
                "File": "PrizmInstaller.exe",                  - File to execute
                "WaitForExit": false                           - Sync or async execution (in current example - async)
              }
            ]
          }
        }
      ]
    }
]
3a. If AccusoftPreviewer (PrizmDoc) should be included, do the following steps:
3a1. Put PrizmDoc Server Installer, PrizmDoc Client installer and PrizmInstaller.exe (result of 1a) into the one directory.
3a2. Rename PrizmDoc Server Installer from PrizmDocServer-<version>.exe to PrizmDocServer.exe and PrizmDoc Client installer from PrizmDocClient-<version>.exe to PrizmDocClient.exe
3b. If ElasticSearch should be included, do the following steps:
3b1. Download OpenJDK8 (https://github.com/AdoptOpenJDK/openjdk8-binaries/releases/download/jdk8u292-b10/OpenJDK8U-jdk_x64_windows_hotspot_8u292b10.zip ) and elasticsearch 6.* (https://artifacts.elastic.co/downloads/elasticsearch/elasticsearch-6.8.11.zip )
3b2. Unzip elasticsearch into the new folder
3b3. Unzip java into the folder from 3b2
3b4. Rename jdk8u292-b10 folder to java.
Result of 3b1 - 3b4 should be like on the screenshot below
4. Build project (It can takes more than 10 minutes). During the build installer with name <BundleName>.exe will be created. (This project can't be run, only build action is required)
Local build Issues
Missing assembly: System.Drawing
- The folder that this assembly sits in is mega hidden. The only way to access it is by entering the run tool (Windows + R) and then type
C:\Windows\assembly\GAC_MSIL - Check this repository. You're looking for System, System.Core, System.Drawing, and System.Windows.Forms
- Add any missing folders from here
Azure Active Directory SAML Configuration (2020)
- In Azure search for "Enterprise applications"
- On "Enterprise applications" click "New application". Then click "Non-gallery application"
- Put whatever you want to the name field (I named it "TestSaml") and press "Add"
- On your app page select "Single sign-on" and then select "SAML"

- You should see SAML settings and configurations. You will need "Certificate" (base64), "Login URL (Azure)" and "Azure AD Identifier"

- Go to Rubex -> Hamburger menu -> Admin -> Settings -> Single Sign-On Settings -> Create Saml Configuration.
Name: Whatever you like
Issuer: Copy contents of "Azure AD Identifier"
Entity ID: Whatever valid URL you like
Saml Endpoint: "Login URL (Azure)"
Certificate: Load "Certificate" file

- Click Create/Update. You will need "Login URL (Rubex)"
THIS URL SHOULD BE HTTPS!!! Otherwise, it will not work with Azure

- Go back to Azure app settings.
Identifier (Entity ID): Put the same Entity ID as in Rubex
Reply URL: Copy "Login URL (Rubex)"
Save everything. You can also press the Test button to test auth from Identity Provider

- To add users to Active Directory search for "Users" in top search bar.
- To add groups to Active Directory search for "Groups" in top search bar. Set type as "Security" and add some users during creation.
- To add users to SAML application go back to the Enterprise application, select users and groups and add existing AD users

- To import groups select "Single Sign-on" -> "User attributes & claims"

- Then click "add a group claim", check "Customize the name...", Name: "groups" or something else. The namespace should be empty. Source attribute needs to be checked for different values, because ID returns... ID! Save everything

- Put the same name ("groups") to Rubex saml settings

OneLogin SAML SSO Configuration
- Create developers OneLogin Account.
- After the registration go to Applications page and push Add App button.

- In the search field print "SAML" and select SAML Test Connector (Advanced).

- Save application.
- Navigate to SSO tab. There are three URLs and certificate on this page. We need two of these URLs (Issuer URL and SAML 2.0 Endpoint (HTTP)) and certificate.


-
Open Rubex on another tab (or browser) and navigate to SAML configuration (Admin -> Settings -> Single Sign-On Settings).
-
Create new SAML configuration.
-
Fill Issuer field with value from OneLogin Issuer URL, Saml Endpoint with value from SAML 2.0 Endpoint (HTTP), Entity ID with any url. Aslo specify SAML Attribute Name for Groups (attribute where all user groups will be listed, usually Group) and upload OneLogin certificate downloaded on step 5

-
Save configuration and open it again. Save Login URL from the bottom of this page.
-
Back to OneLogin. Navigate to Configuration tab.
-
Fill Audience (EntityID) with the same URL like in Entity ID Rubex SAML Configuration, Recipient, ACS (Consumer) URL and Login URL with Login URL from Rubex SAML Configuration. Save configuration.

-
Navigate to Parameters tab and add Group attribute (Do not forget to select Include in SAML Assertion)
 .
.
Push Save button. On the next window select default value for this attribute (It can be any user attribute (default or custom)) and save it again. -
Save all configuration again.
Okta SAML SSO Configuration
Setting up Okta
- Go to the Admin Dashboard and create an app integration.
- Select SAML 2.0
- Have the fields match as to what is shown in the below screenshots for the Configure SAML section
- Keep in mind that the Single-sign on URL will be dependent on the environment you're setting this up for, and the ID at the end will be dependent on your Revver SAML Config (once the config is created in Revver, edit it and the URL will contain the ID)
- The SAML Issuer Id needs to begin with http://www.okta.com/ but anything after that is up to you. It does need something and it needs to be unique, but it is something that you can make up if you'd like

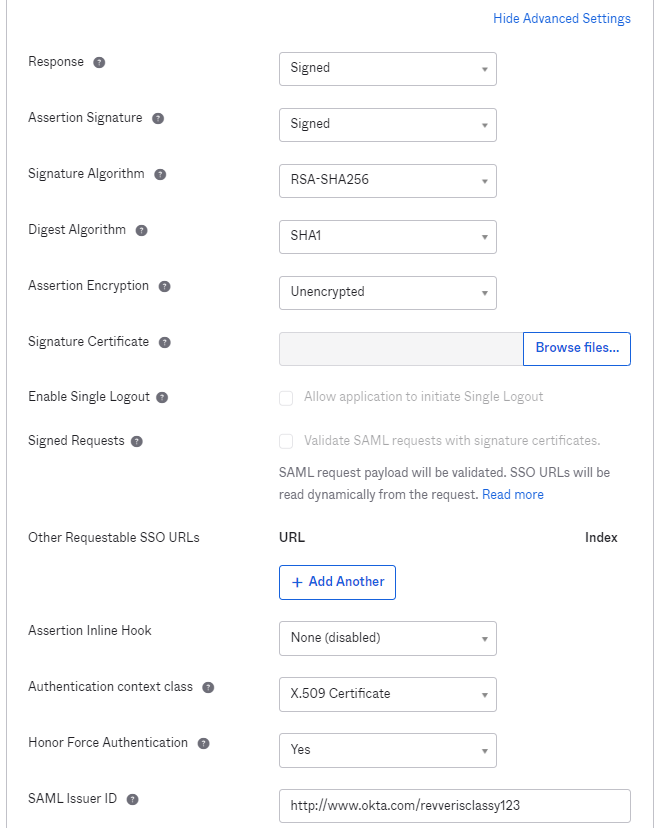
- Once it's been configured and the app is up and running, you'll need to get the SAML signing certificate
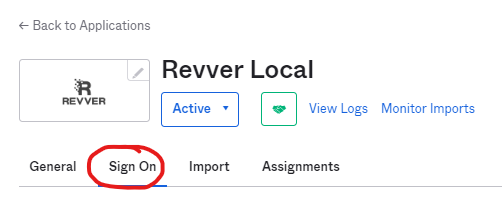
- Inside the app, go to the Sign On tab
- Find and download the SHA-1 Certificate (note you may need to activate it first. In which case ignore the warning and continue)
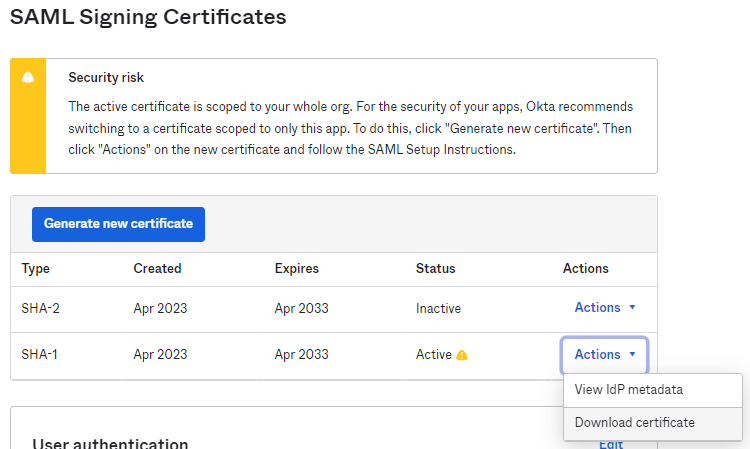
- You will receive a .cert file. Change the extension type to .cer
- Inside the app, go to the Sign On tab


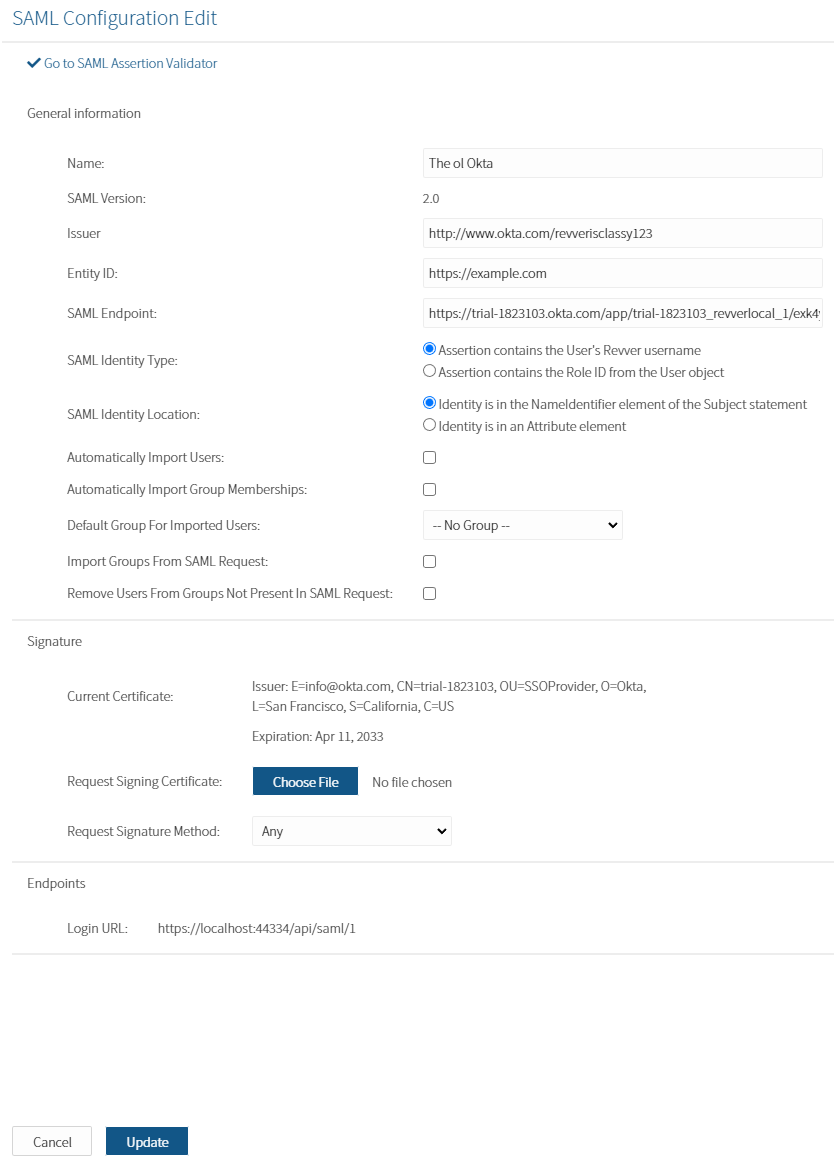
Configuring SAML in Revver
- Configure the name
- The Issuer is the Issuer Id configured above
- You can find this in Okta by going to going to the Sign On tab => Scroll to the Settings section => Click More Details => Issuer
- The Entity ID will match the Audience Restriction area in Okta's app by going to General => SAML Settings => Audience Restriction
- Be careful when using the SAML Endpoint as Okta has some misleading areas to find this
- This can be found in Sign On => Settings => More Details => Sign on URL
- Leave the rest blank (or configure as needed)
- For the Signature, Choose File => Select the .cer file (formerly a .cert file) that was downloaded (see the above Setting Up Okta section)
- Click save
Here's an example Config:
Entity Framework Code First
Difference between code first and DB first
In code first approach we have
- entity to tables mapping in the C# code instead of .edmx XML file
- use a general connection string. We don't need to specify configuration files in the connection string
- We create all entities and mapping manually instead of code generation in DB first
- EF can update DB with using our mapping
Entities and mapping
We create entities as general C# objects. Most of them are the same as
Mapping will bind entities to the DB tables. We can apply mapping in two ways:
- Use code annotations attributes
- Use fluent API with DbModelBuilder
- We can combine these two approaches in the same context. (we apply this approach in the Utopia)
- Use separately classes with mapping for each entity. (This approach we used in workflows.)
mapping example:
Mapping by attributes
public partial class DbNode
    {
        [Key]
        public long Id { get; set; }

        [Required]
        [StringLength(255)]
        public string Name { get; set; }
Mapping by modelBuilder
 public partial class UtopiaDB : DbContext
    {
        protected override void OnModelCreating(DbModelBuilder modelBuilder)
        {
            // map foreign key.One to many
            modelBuilder.Entity<DbNode>()
                            .HasMany(e => e.DbEmailQueueAttachmentNodes)
                            .WithRequired(e => e.DbNode)
                            .HasForeignKey(e => e.NodeID)
                            .WillCascadeOnDelete(false);

            // map foreign key. many to many
            modelBuilder.Entity<DbSearchCriteria>()
                .HasMany(e => e.DbTriggers)
                .WithMany(e => e.DbSearchCriterias)
                .Map(m => m.ToTable("DbTriggerToSearchCriteria")
                                    .MapLeftKey("SearchCriteriaId")
                                    .MapRightKey("TriggerId"));

            // map complex primary key
            modelBuilder.Entity<DbTriggerInfoNodes>()
                .HasKey(e => new {e.TriggerID, e.NodeInfoType});
        }
    }
Mapping by mapping class (used in WF)
public class DbWorkflowMap : EntityTypeConfiguration<Workflow>
    {
        public DbWorkflowMap(string tablePrefix)
        {
            ToTable(tablePrefix + "DbWorkflows");

            HasKey(t => t.Id);
            Property(t => t.Id).HasDatabaseGeneratedOption(DatabaseGeneratedOption.Identity);

            HasMany(t => t.Owners).WithMany().Map(a => a.MapLeftKey("WorkflowID")
                                                        .MapRightKey("UserID")
                                                        .ToTable(tablePrefix + "DbWorkflowOwners"));
Migration
To update the DB structure we use migration.
- Migration is a C# class that contains updating instruction.
- EF can generate migrations automatically
How to change structure
- Add changes to entities and mapping if it needed
- Create a migration for this changes. To make it automatically create a migration, run this command in the Package Manager Console:
Add-Migration "MigrationNameHere" -ProjectName DataAccess -ConnectionString "data source=(localdb)\MSSQLLocalDB;initial catalog=UtopiaDB;integrated security=True;MultipleActiveResultSets=True;App=EntityFramework" -ConnectionProviderName System.Data.SqlClient -ConfigurationTypeName UtopiaDBMigrationConfiguration
- After this command EF will generate C# class for this migration. Please check it
        public partial class InitialMigration : DbMigration
            {
                public override void Up()
                {
                   //Some instructions
                }

                public override void Down()
                {
                }
            }
- To apply migration to the DB you can run next command:
Update DB to the last state
update-database -verbose -ProjectName DataAccess -ConnectionString "data source=(localdb)\MSSQLLocalDB;initial catalog=UtopiaDB;integrated security=True;MultipleActiveResultSets=True;App=EntityFramework" -ConfigurationTypeName UtopiaDbMigrationConfiguration -ConnectionProviderName System.Data.SqlClient
Update/Downgrade db to a specific migration.
update-database -TargetMigration:<Insert migration name> -verbose -ProjectName DataAccess -ConnectionString "data source=(localdb)\MSSQLLocalDB;initial catalog=UtopiaDB;integrated security=True;MultipleActiveResultSets=True;App=EntityFramework" -ConfigurationTypeName UtopiaDbMigrationConfiguration -ConnectionProviderName System.Data.SqlClient
Update for updating remote DB's/connections that require authentication:
update-database -verbose -ProjectName DataAccess -ConnectionString "data source={databaseserveraddress};User={databaseUsername};password={password};initial catalog={schemaName};integrated security=False;MultipleActiveResultSets=True;App=EntityFramework" -ConfigurationTypeName UtopiaDbMigrationConfiguration -ConnectionProviderName System.Data.SqlClient
- Applied migrations are stored in
__MigrationHistorytable
PostgreSQL process
There are several things that are different during PostgreSQL Code-First Migration process:
- Update DB to the last state
update-database -verbose -ProjectName DataAccess -ConnectionString "Host=localhost;Database=UtopiaDB;Integrated Security=False;Username=postgres;Password=pass@word1;Port=5432" -ConfigurationTypeName UtopiaDbMigrationConfiguration -ConnectionProviderName Npgsql
-
If Package Manager Console cannot update database, DbMigratorEF project can be used. Pay attention to constants and main method before running it, main methods are UpdateDatabase(config) and ScaffoldNewMigration(config)
-
During master merging into feature/OnPremiseMaster new migrations should be deleted and rescafolded. If "dbo" scheme appears after migration, that means one or more migrations are not deleted.
Code First Training Video
https://youtu.be/goRtW-1c_BY
Entity Framework Optimizations
Entity framework does not have great performance when dealing with large batches of data. We've compiled this list as a reference so that our batch operations can be efficient as possible.
Please Read these Articles
https://weblog.west-wind.com/posts/2014/dec/21/gotcha-entity-framework-gets-slow-in-long-iteration-loops
https://weblog.west-wind.com/posts/2013/Dec/22/Entity-Framework-and-slow-bulk-INSERTs
Disable Auto Detecting Changes
see https://docs.microsoft.com/en-us/ef/ef6/saving/change-tracking/auto-detect-changes
using (var context = new BloggingContext())
{
    try
    {
        context.Configuration.AutoDetectChangesEnabled = false;

        // Make many calls in a loop
        foreach (var blog in aLotOfBlogs)
        {
            context.Blogs.Add(blog);
        }
    }
    finally
    {
        // make sure you re enable AutoDetectChangesEnabled before calling SaveChanges
        context.Configuration.AutoDetectChangesEnabled = true;
        await context.SaveChangesAsync();
    }
}
Bloated DbContext
With Entity Framework, you have a dbContext object that tracks all the entities you've read from the database and changes that have been made to them. If it starts to track too many entities you can start getting pretty slow performance.
There a several thanks that can be done to address this issue.
.AsNoTracking()
List<DbNodes> childNodes = UtopiaDB.DbNodes.Where(i => i.ParentID = 1).AsNoTracking().ToListAsync();
When you use .AsNoTracking() the entities that get returned will not be tracked by the dbContext. You should use this when you are querying data from the db that is read only.
Re-Create DbContext Object
The easiest way to get past a bloated dbContext is to create a new dbContext object.
This is difficult in our Utopia solution because create one dbContext object per session, so unless a new session is created, a new dbContext object cannot be created.
To address this we have added code to to detach all entities from the dbContext
UtopiaDB.DetachEntitiesFromUtopiaDB();
The intent behind this code was to have the same effect as creating a new DbContext object.
Smaller Batches
Typically we've seen better performance when we process things in smaller batches (500 items or less), call 'SaveChangesAsync()', then detach all entities from the DbContext object, and process another small batch.
Adding a new Email Type
Steps required to add a new email type
- Add the new email type to the EmailEnum in UtopiaSharedClasses
- Add the new email template inside of UtopiaSharedResources
You must add both an efilecabinet and a SecureDrawer version of name format:
xx_eFileCabinet.html
xx_SecureDrawer.html - Change VS property "Copy to Output Directory" to "Copy Always" on those html files
- The Hub must be published and any partners must have their own templates added
Utopia External Login Instructions and Options
Utopia External Login Instructions and Options
This file is to explain how to create an external login page and the options available
External Login Instructions
- Create an iframe with the src set to "~/#/extLogin/" (replace ~ with host site)
- Examples:
<iframe src='https://app.securedrawer.com/#/extLogin/'/> <iframe src='https://express.efilecabinet.net/#/extLogin/'/>
External Login Options and Notes
- Open a New Tab on Successful Login - this is done by setting the src to "~/#/extLoginNewTab/". a. This will authorize the user in a new tab and clear out their login details after success b. This will allow websites to embed a small login snippet and not a full page iframe. c. Minimum height and width of the iframe is: height="305px" width="250px"
- Redirect to Specific Logcation After Login - This is accomplished by appending the desired location to the src. a. Redirect Instructions: 1. Navigate to the desired redirect location inside the system. 2. Copy the segment of the URL that appears after the hash '#' 3. Append that segment to the end of the src URL "/#/home/state/data/node/490025/1375574/details/1375574" - a location in my account b. I now copy "/home/state/data/node/490025/1375574/details/1375574" c. and append it the src URL "https://~/#/home/state/data/node/490025/1375574/details/1375574 " d. Now anyone logging in through that iframe will be redirected to the navigated location automatically if they have access to it.
Test Against Production Read Replica
To follow our security policy YOU MUST HAVE TWO OTHER DEVELOPERS OBSERVING when you access production information
Be sure to step over the listed breakpoints to ensure we don't send notifications to users in production
Note: The snapshot of production is likely from a previous date. Ensure that your branches state will work with where production was at.
- If remote, connect to the VPN
- Delete the conf.json file from C:\ProgramData\EFC\Configuration
- Use the DbConnectionConfigurationData string from Prod DB Read Replica found in the Shared-Development section in LastPass to update the DbConnectionConfigurationData string in Utopia's appsettings.json.
- Add a breakpoint to step over
await ValidatePasswordAsync(password, dbUser);in the method ValidateUsernameAndPasswordAsync in BusinessLogic/Services/AuthenticationService.cs - Add
loginRequirementsStatus.UserSettingMFARequirementMet = true;below where the loginRequirementsStatus gets set in the method GetUserLoginRequirementsStatusAsync in BusinessLogic/Services/AuthenticationService.cs - And add a breakpoint to step over: PopulateUserSettingLoginRequirements, PopulateSecurityPolicyStatuses, await PopulateRolesFailingOtherRequirementsAsync, InvalidateGroupRolesWhereUserRoleIsFailing in the method GetUserLoginRequirementsStatusAsync in BusinessLogic/Services/AuthenticationService.cs
How to run local Utopia over LAN/connect from outside network
Why
At times it may be helpful to connect to your local instance of Utopia from other devices to be able to debug/test:
- Mobile device
- Apply garbage
- SalesForce
- Other integrations
To name a few. Also, it just feels cool.
How to setup Utopia over LAN
The key here is to set up IIS properly and then open whatever ports are needed on your firewall.
- Lets first get your local IP
- Run command prompt
- Type ipconfig
- Copy and save your IPv4 Address
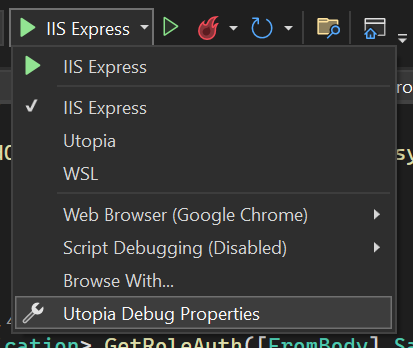
-
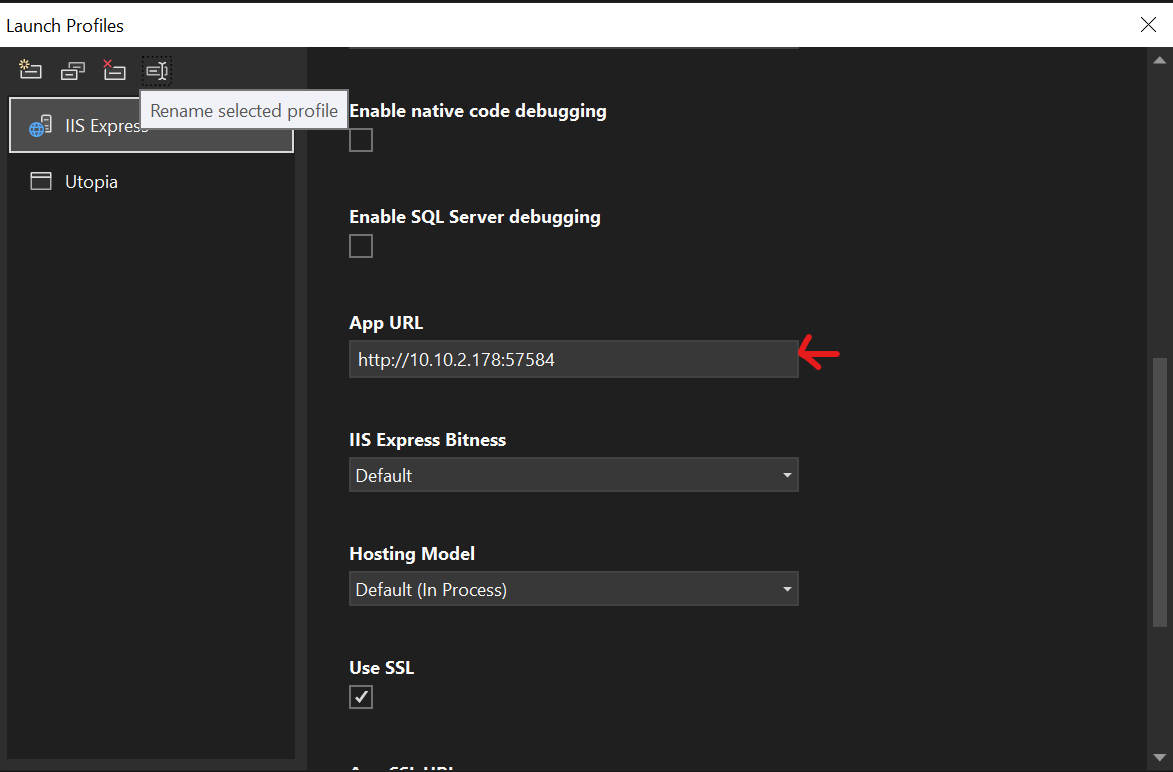
- Inside of Visual Studios, click on the IIS Express dropdown arrow and select Utopia Debug Properties
- Scroll down until you see App URL. Replace localhost with the saved IPv4 Address
-
- Close the window
- Find the .vs hidden folder of the Utopia solution and then go into Utopia\Config and open applicationhost.config
- For me it's C:\src\Utopia\Utopia\.vs\Utopia\config\applicationhost.config
- Inside of applicationhost.config, find where it sets up it's bindings
- Usually around line 162
- Searching for binding and it should go straight to it
- Duplicate the two lines that bind the two ports to localhost. Replace localhost with your saved IPv4 Address on those duplicated lines.
-
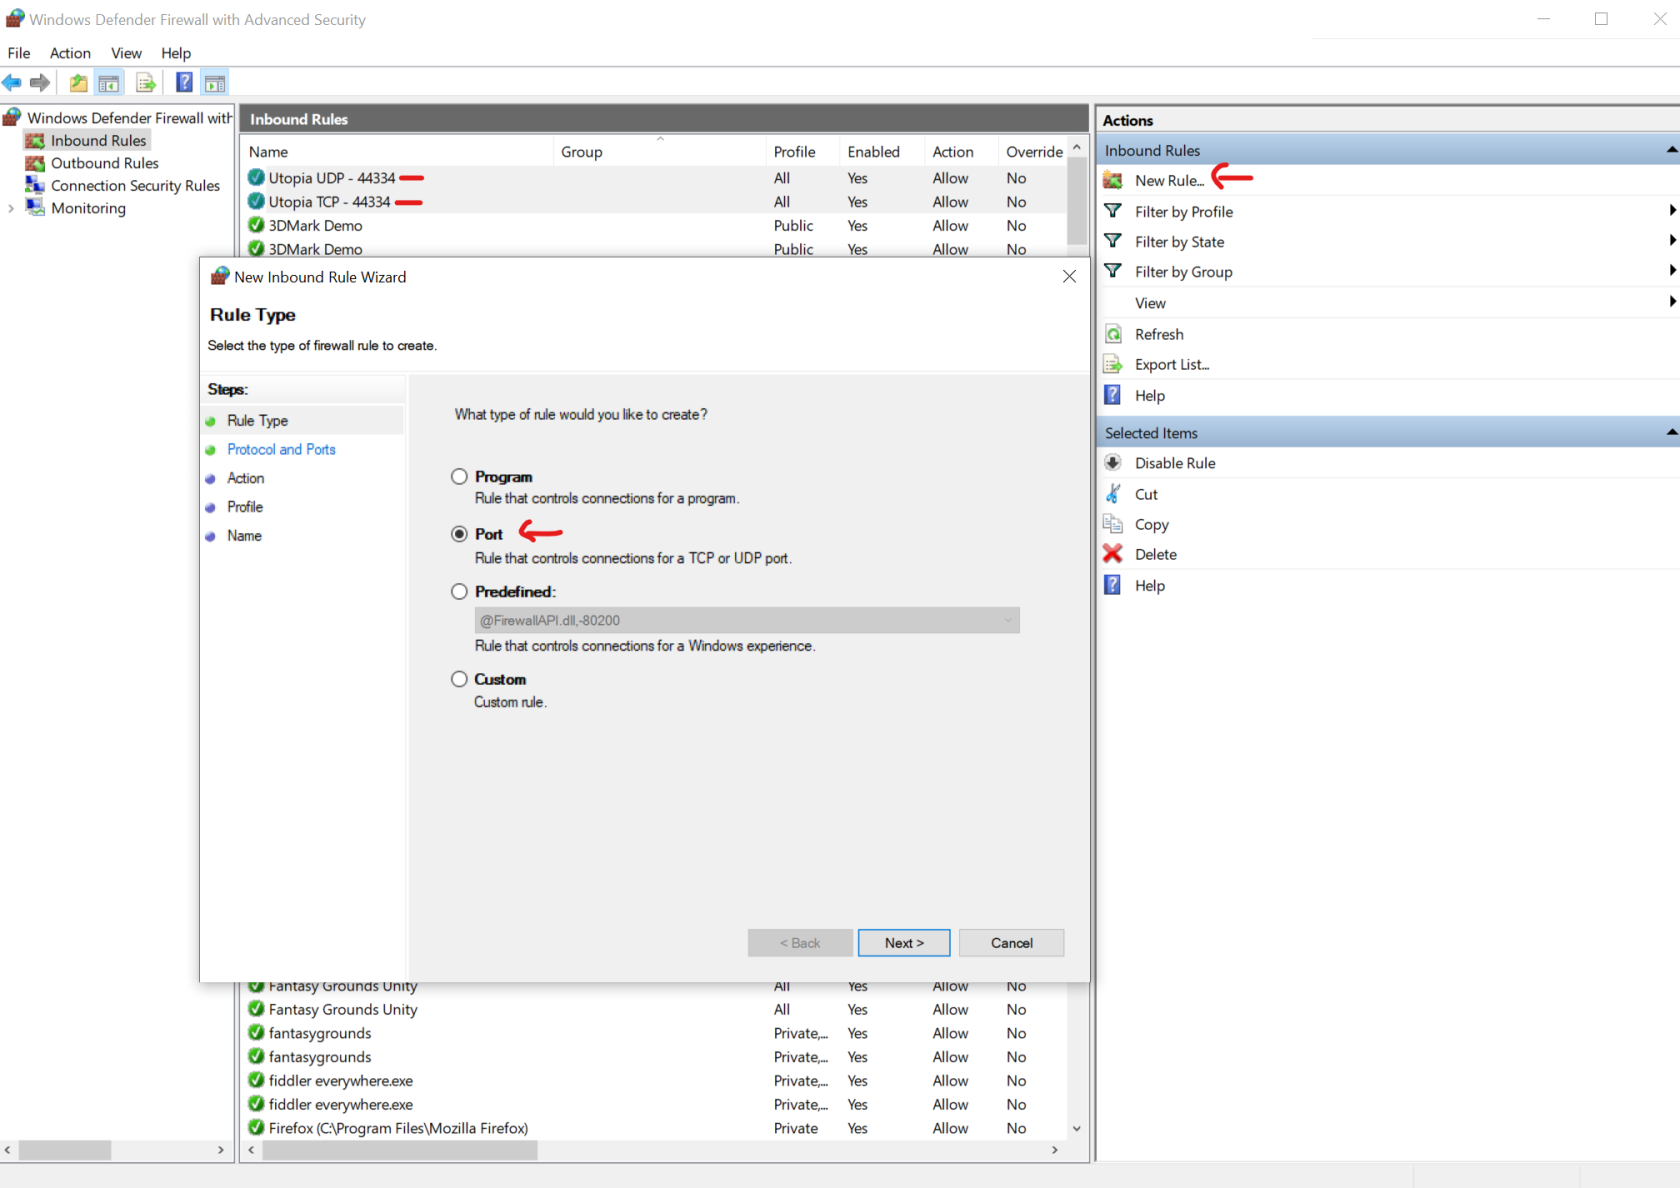
- Next, open up the ports inside of your windows firewall
- You will need to open up port 44334 for both UDP and TCP
- Actually not sure if you need both but I did just in case
- In some instances you may need to open 57584 as well
- I had to to be able to connect from the company mac via the desktop client (it was yelling at the not trusted certificate)
- Allow the connection
- Have Domain, Private, and Public all checked
- Give it a meaningful name
-
- Actually not sure if you need both but I did just in case
- You will need to open up port 44334 for both UDP and TCP
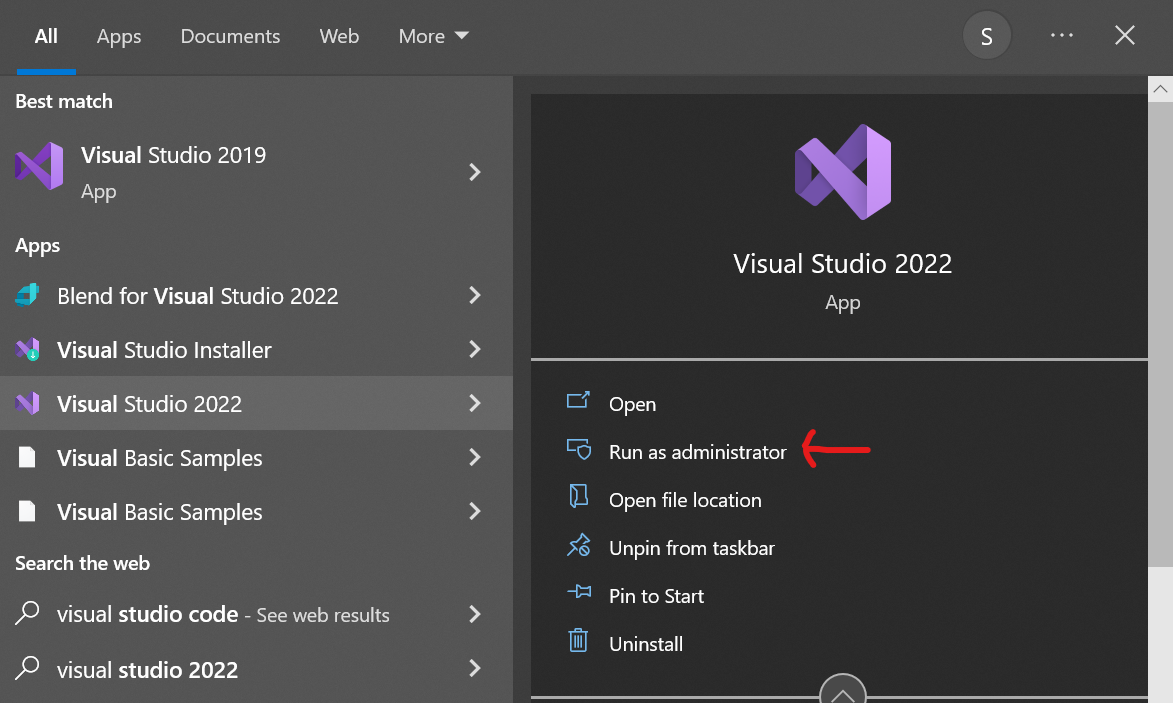
- Close out Visual Studio completely
- Open Visual Studio as administrator
-
- Finally, open Utopia and run it with IIS Express


Note:
- If you get an error that looks like this
-
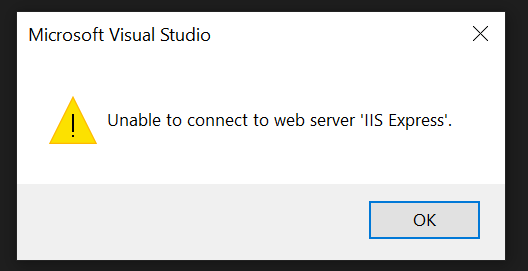
- Then you need to shut down Visual Studio completely and relaunch it as administrator
-
How to connect from outside network
This one is actually really simple. All you need to do is do some port forwarding. I'm not going to get into how to do this since each router is unique (basics is to log into the router and go to advanced).
Note:
- To connect, make sure the device you're connecting from is NOT on the local network
- You'll need your external IP
- Replace the internal IP with the external one on the connecting device
How to create a new user license type
- All changes are made in the Utopia solution in the Utopia git repository
- See this PR for the Compliance License for a previously implemented example
C#
- Add a value to the
UserLicenseEnumenum - Add a value to
AllowedNodeTypesByUserLicenseTypedictionary (if applicable)
- Instantiate a new
UserLicensein theUserLicensesstatic method
- Add a value to the
AccountFeatureEnumenum - Add a value to the
UserLicenseAccountFeaturesarray. The licenses in the UI will display in this order. - Add a value to the
MeteredAccountFeaturesarray (assuming that the license will be metered) - Add a value to these other arrays (if applicable)
UserLicenseAssignmentFallbackOrderRoleLicensesWithConcurrentUserSupportAdvancedOCRAccountFeatureTypesMeteredOCRAccountFeatureTypesUsageFeatureTypes
- Add a resource value for the title of the license
- The name must be
AccountFeatureEnum_{name-of-account-feature-enum}, e.g.AccountFeatureEnum_ComplianceUserLicense
- The name must be
- In the
GetAccountReportAsyncmethod, update the assignment to theuserCountLookupdictionary to also add the counts of the new license type
- In the
GetUsageAsyncmethod, add a line to set the count of the new license
- In the
GetUserLicenseCountLookupAsyncmethod, add a line to set the count of the new license
JavaScript
- In the
determineFeatureUsageMessagefunction, add aswitch casefor the new license
- In the
getUserRoleOnAccountfunction, add a block that returns a role for the new license if one exists
- In the
getPermissionPresetsfunction, add a block that sets the permission presets of the new license
- In the
isUserLicenseTypefunction, add the new license to theORclause - Add a function called
is{name-of-license-type}UserLicenseType
Concurrent Licenses
This feature is primarily used by Caselle
- The concurrent license count is actually based off the value added to the Full User License feature.
- For example, an account with 4 concurrent licenses will have the Concurrent License feature applied to the account with the value as null, and the Full User License feature with the value of 4.
- An account with the concurrent license feature can add more full users to the account than the feature value, but they will only be able to have 4 of those full users logged in at a time.
- Currently the account can only have the Full User License feature with the Concurrent License feature. If there comes a time that we'd like to allow different user types the code would need to be adjusted.
- A single user is allowed to log into multiple applications as one concurrent license user.
- The external applications that should be part of concurrent licensing need to have their application IDs added to the Azure configuration setting Utopia:Settings:ExternalClientApplicationIds
- If we ever decide to enforce concurrent licensing for the mobile app or other internal apps those will also need to be added in the code.
- The bulk of the logic for concurrent licensing is in AuthenticationService.cs. See the method GetRolesFailingConcurrentLicensingAsync.
Generate SQL for migration:
Update-Database -Script -SourceMigration: [CurrentAppliedMigrationName] -TargetMigration: [MigrationToUpdateToName]Update for updating remote DB's/connections that require authentication:
update-database -verbose -ProjectName DataAccess -ConnectionString "data source={databaseserveraddress};User={databaseUsername};password={password};initial catalog={schemaName};integrated security=False;MultipleActiveResultSets=True;App=EntityFramework" -ConfigurationTypeName UtopiaDbMigrationConfiguration -ConnectionProviderName System.Data.SqlClientUpdate DB to the last state - NO VERBOSE
update-database -ProjectName DataAccess -ConnectionString "data source=(localdb)\MSSQLLocalDB;initial catalog=UtopiaDB;integrated security=True;MultipleActiveResultSets=True;App=EntityFramework" -ConfigurationTypeName UtopiaDbMigrationConfiguration -ConnectionProviderName System.Data.SqlClientThis message comes through when I went and changed DbNodeClosures ID, needing to drop the restraint and change the Primary Key name. We were forcing users to Manual to change these, but we can use this script (or a variant of it) to do the rename automatically.
From Roman Alekhin
@BryanC this script searching constraint name in sys.key_constraints which contains constrains names for all tables. We just specify table name and constraint type (PK or UK) and receive for example primary key name for specific DB. As result we will receive correct name for any person's DB.
This will find PK or UK by table name in sys.key_constraints and generate SQL script for dropping it
This just replaces <constraitType> macro to PK
And this drops PK for all tables in list: